
When Water Wins: Why Putting a Sump Pump in Your Basement Matters
Putting a sump pump in basement spaces is one of the most effective ways to protect your home from water damage, mold, and costly foundation repairs.
Here’s a quick overview of how it works:
- Locate the lowest point in your basement floor
- Dig a sump pit (typically 10-12 inches below floor level)
- Install a perforated basin and submersible pump
- Connect a PVC discharge pipe routed away from your foundation
- Test by pouring water into the pit and confirming the float activates
- Maintain by testing every 2-3 months and cleaning annually
A wet basement isn’t just an inconvenience. It’s a warning sign. Water seeping through your floor or walls creates the perfect environment for mold, structural damage, and ruined belongings. Whether you’re dealing with a high water table, heavy New England rainfall, or clay-heavy soil that holds moisture like a sponge, a properly installed sump pump system gives that water somewhere to go before it becomes your problem.
The good news: this is a project that experienced DIYers can tackle. But it involves breaking concrete, digging, electrical work, and proper drainage planning — so it pays to understand every step before you start.
I’m Joe Gerrior, owner of Gerrior Masonry & Landscape Construction Corp., with over 34 years of experience helping Massachusetts homeowners solve drainage and foundation problems — including putting a sump pump in basement settings across Middlesex and Essex County. In the sections below, I’ll walk you through everything you need to know to do this right.
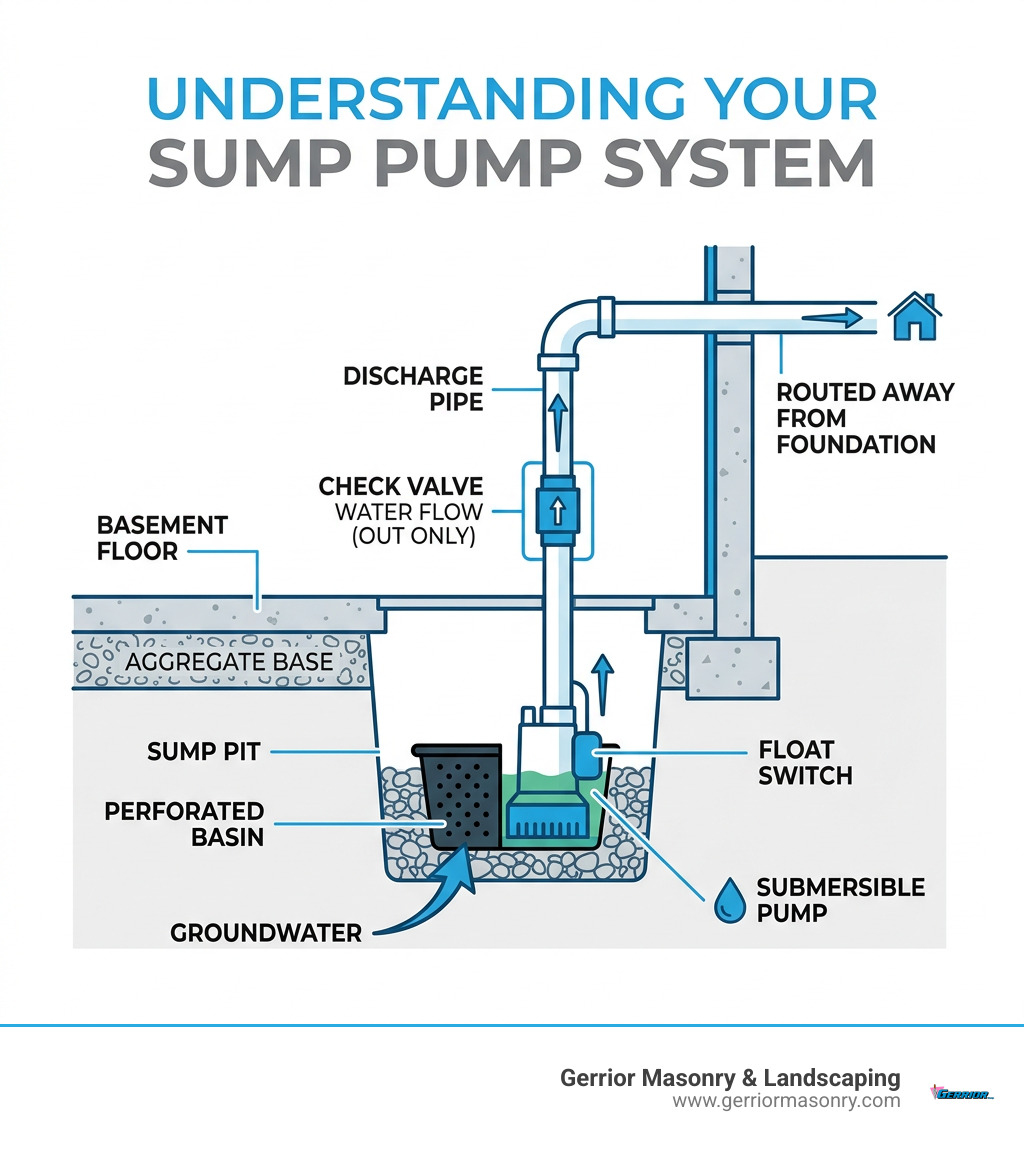
The Essential Guide to Putting a Sump Pump in Basement
When we talk about putting a sump pump in basement floors, we are essentially building a defense system against hydrostatic pressure. This is the pressure exerted by fluid (groundwater) due to the force of gravity. In areas like Lexington or Winchester, where the water table can be high, that pressure pushes water through tiny cracks in your foundation or even up through the floor slab itself. This pressure is relentless; it doesn’t just cause leaks, it can actually compromise the structural integrity of your concrete over time.
A sump pump acts as a relief valve. It collects the water in a pit (the “sump”) and pumps it out before the water level reaches your floor. According to Scientific research on groundwater pumping stations, selecting the correct pump based on “performance curves”—which measure how much water a pump can move relative to the height it has to lift it—is critical for long-term success. If you choose a pump that isn’t rated for the “head height” (the vertical distance the water must travel), the motor will burn out prematurely.
Signs You Need a Sump Pump and Choosing the Right Type
How do you know if you’re a candidate for putting a sump pump in basement areas? Look for these red flags:
- Standing Water: If you see puddles after a Nor’easter, your basement is already losing the battle. Even small amounts of standing water can lead to thousands of dollars in damage.
- Musty Odors: That “basement smell” is usually mold or mildew thriving on hidden moisture behind walls or under floorboards.
- Efflorescence: A white, powdery substance on concrete walls indicates water is evaporating and leaving minerals behind. It’s a clear sign of moisture migration.
- Wall Cracks: Hydrostatic pressure can bow walls and cause visible cracking. For more serious structural issues, check out our guide on foundation leak repair.
Once you’ve decided to install one, you need to choose the right pump. There are two primary residential styles:
- Submersible Pumps: These are designed to be fully underwater inside the pit. They are quieter, more powerful, and safer if you have children or pets, as the pit is sealed with a lid. They also tend to last longer because the water surrounding the motor helps keep it cool during heavy use.
- Pedestal Pumps: The motor sits on a column above the pit. While they are easier to service and generally cheaper, they are louder and more prone to being bumped or damaged. They are often used in very narrow pits where a submersible might not fit.
For most Massachusetts homes, we recommend a high-quality submersible pump with a cast iron core for better heat dissipation.
Tools and Materials for Putting a Sump Pump in Basement
Before you start swinging a hammer, you’ll need to gather your supplies. Putting a sump pump in basement concrete requires heavy-duty tools and a bit of physical stamina.
The Shopping List:
- submersible sump pump: Aim for 1/3 to 1/2 HP for standard homes.
- sump basin: A heavy-duty perforated plastic liner.
- 1 ½” PVC pipe: For the discharge line.
- check valve: Crucial! It prevents water in the pipe from falling back into the pit when the pump stops.
- breaker hammer: To get through that thick concrete slab.
- gravel: To line the bottom and sides of the pit for better filtration.
- landscape fabric: To wrap the basin and prevent silt from clogging the pump.
Step-by-Step Guide to Putting a Sump Pump in Basement
If you’re ready to get your hands dirty, follow this process. If this looks like more than you want to handle on a Saturday, our basement waterproofing company services are always here to help.
1. Find the Low Spot
Water follows gravity. Use a laser level or simply observe where water pools after a storm. Ensure the spot is at least 10 inches away from the foundation walls to avoid damaging the footings or the structural integrity of the wall base.
2. Break the Concrete
Mark the outline of your basin on the floor, adding about 6 inches of diameter for gravel backfill. Use a breaker hammer to chip away the concrete. We recommend hanging plastic sheeting from the ceiling to contain the massive amount of dust this creates, and always wear a respirator.
3. Pit Excavation
Dig the hole about 6 inches wider and 12 inches deeper than the basin itself. This extra space allows for a base of gravel which helps the water flow into the pit more efficiently while filtering out large debris.
4. Prepare the Liner
If your sump basin isn’t already perforated, drill 1/2-inch “weep holes” in the sides every 4 inches. Wrap the exterior in landscape fabric to keep fine silt and sand out of the pump’s intake.
5. Sump Pump Liner Placement
Place the basin in the hole. Ensure it is level and flush with the basement floor. You can see a visual of this step here: sump pump liner placement. Fill the space around the liner with gravel up to about 6 inches from the top.
6. Install the Pump and Plumbing
Set the pump inside the basin, ensuring the float arm can move freely. Connect your 1 ½” PVC pipe to the pump’s outlet. Install the check valve on the vertical section of the pipe, making sure the arrow points in the direction of the water flow.
7. Final Seal
Fill the remaining gap around the top of the basin with concrete. Smooth it over so it’s flush with the rest of the floor. Use sealing foam or caulk where the discharge pipe exits the foundation wall to keep pests, radon gas, and moisture out.
Professional Installation vs. DIY: Final Steps and Maintenance
Deciding between a DIY approach and hiring a pro often comes down to your comfort level with structural work. Putting a sump pump in basement floors isn’t just about the pump; it’s about the integrity of the slab and ensuring the discharge route is effective.
| Feature | DIY Installation | Professional Installation |
|---|---|---|
| Estimated Cost | $300 – $800 | $1,500 – $10,000+ |
| Time Investment | 2 – 3 Days | 6 – 8 Hours |
| Tools Needed | Rental (Jackhammer, etc.) | Included |
| Risk Factor | High (Foundation/Plumbing) | Low (Warranty/Experience) |
| Permits | Homeowner responsibility | Handled by contractor |
Note: All service prices listed are average costs based on internet data and do not represent actual quotes for Gerrior Masonry services.
When considering the soil around your home, checking UCONN’s Soil Survey can provide insights into how much water your ground typically retains. Clay-heavy soils in parts of Massachusetts retain water longer, which might influence whether you need a single or dual pump system to handle the volume.
Discharge Pipes and Proper Drainage Solutions
The most common mistake we see is people putting a sump pump in basement pits but then failing to move the water far enough away. If you pump water just two feet outside your wall, it’s going to soak right back down into the pit. It’s a literal “hamster wheel” for your electricity bill and puts unnecessary strain on the pump motor.
- The 10-Foot Rule: Your discharge line should extend at least 10 feet from the house, preferably sloping downward toward a natural drainage area or the street.
- Splash Blocks: Use a downspout extension and a splash block to prevent soil erosion where the water exits. This prevents the water from digging a hole in your lawn.
- Dry Wells: In flat yards or areas with poor drainage, we often recommend a dry well. This is an underground structure that disposes of unwanted water by dissipating it into the ground. Learn more about backyard drainage solutions dry-well.
- Anti-Freeze Devices: In cold climates like Medford or Andover, discharge lines can freeze solid. Devices like “IceGuard” allow water to escape through slotted openings if the main pipe is blocked by ice, preventing a basement flood during a winter thaw.
For a deeper dive into managing exterior water, see our guide on drainage around house foundation.
Battery Backups and Avoiding Common Mistakes
If the power goes out during a thunderstorm (and in Massachusetts, it usually does), your primary sump pump is just a very expensive paperweight. This is why we strongly advocate for a battery backup or a dual pump system. A backup system provides peace of mind when you aren’t home to monitor the basement.
- Battery Backup: These systems can provide up to 24 hours of operation without mains power. Modern versions even include Wi-Fi alerts to notify your phone if the pump activates.
- Dual Pump Systems: This setup includes two pumps in one basin. If the first pump fails or is overwhelmed by a massive influx of water, the second one kicks in automatically.
- Common Mistake – Tied Discharge Lines: Never tie two discharge lines together inside the house. If one pump is running, it could force water back down the other pipe into the pit. Always run them separately to the exterior.
- Common Mistake – Float Obstruction: Ensure the pump is positioned so the float (the ball that tells the pump when to turn on) doesn’t get stuck against the side of the basin. A stuck float is the #1 cause of pump failure.
Long-Term Maintenance Checklist
Putting a sump pump in basement floors is not a “set it and forget it” project. To ensure it works when you need it most, follow this schedule:
- Every 3 Months: Pour a bucket of water into the pit to ensure the pump activates and the water disappears quickly.
- Annually: Remove the pump and clean the intake screen. Debris and silt can build up and reduce efficiency.
- Check the Discharge: Ensure the exit point is clear of leaves, mulch, or ice.
- Listen: If the pump makes a grinding noise, the impeller may be damaged or obstructed.
If your basement entry is also a source of leaks, you might want to look into bulkhead-replacement to ensure your entire basement envelope is sealed.
Costs and When to Call a Professional
How much does putting a sump pump in basement floors actually cost? Based on internet average data, you can expect a wide range depending on the complexity:
- Basic DIY Replacement: $150 – $500 (if the pit and pipes already exist).
- New DIY Installation: $300 – $1,200 (including tool rentals).
- Professional Retro-fit: $2,500 – $5,500.
- Full Waterproofing System: $6,000 – $15,000+ (includes interior French drains and high-end dual pumps).
Note: All service prices listed are average costs based on internet data and do not represent actual quotes for Gerrior Masonry services.
When should you call us?
- Finished Basements: If you have a finished space, you don’t want to mess up the flooring or risk a flood due to a DIY error.
- Structural Concerns: If you see significant cracks, you need a pro to evaluate if you need foundation repair in addition to a pump.
- Electrical Safety: Sump pumps require a dedicated GFCI outlet. If you aren’t comfortable wiring a new circuit, call an expert.
- The “Back-Breaker” Factor: Digging through Massachusetts hardpan and breaking concrete is exhausting work. We have the equipment to do it in a fraction of the time.
Gerrior Masonry & Landscape Construction is based in Woburn, MA, and services Middlesex and Essex County, Massachusetts. For professional assistance with your home’s water management, visit our basement sump pump service page.
