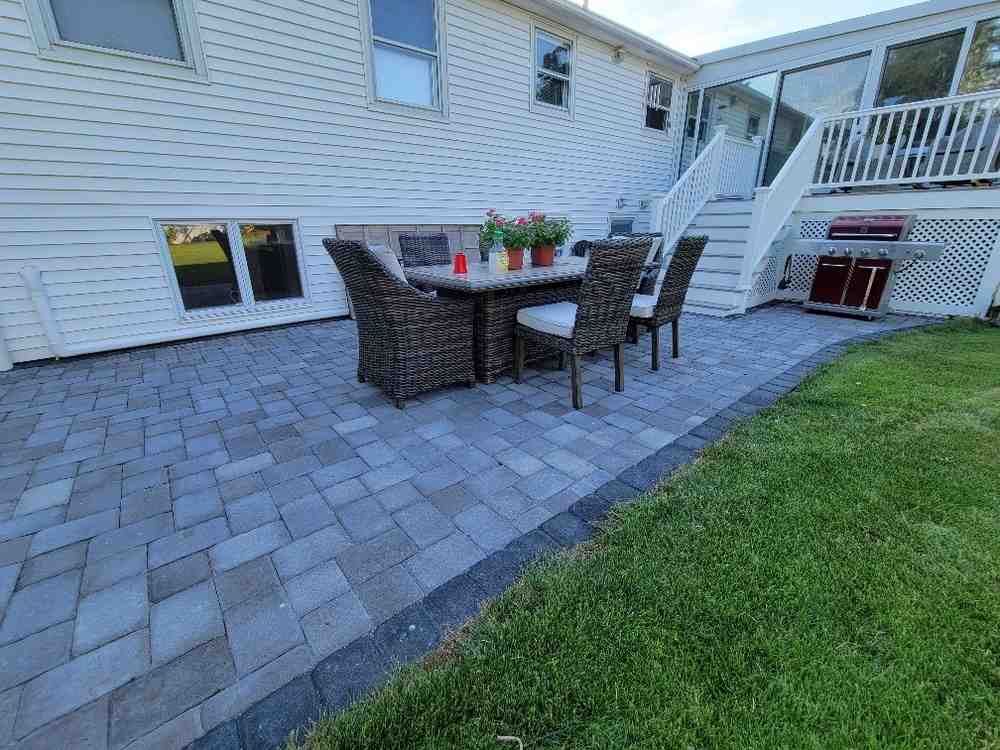
Why Patio Pavers Installation Is One of the Best Outdoor Upgrades You Can Make
Patio pavers installation is a proven way to add beauty, function, and lasting value to your outdoor space. Here’s a quick overview of how it’s done:
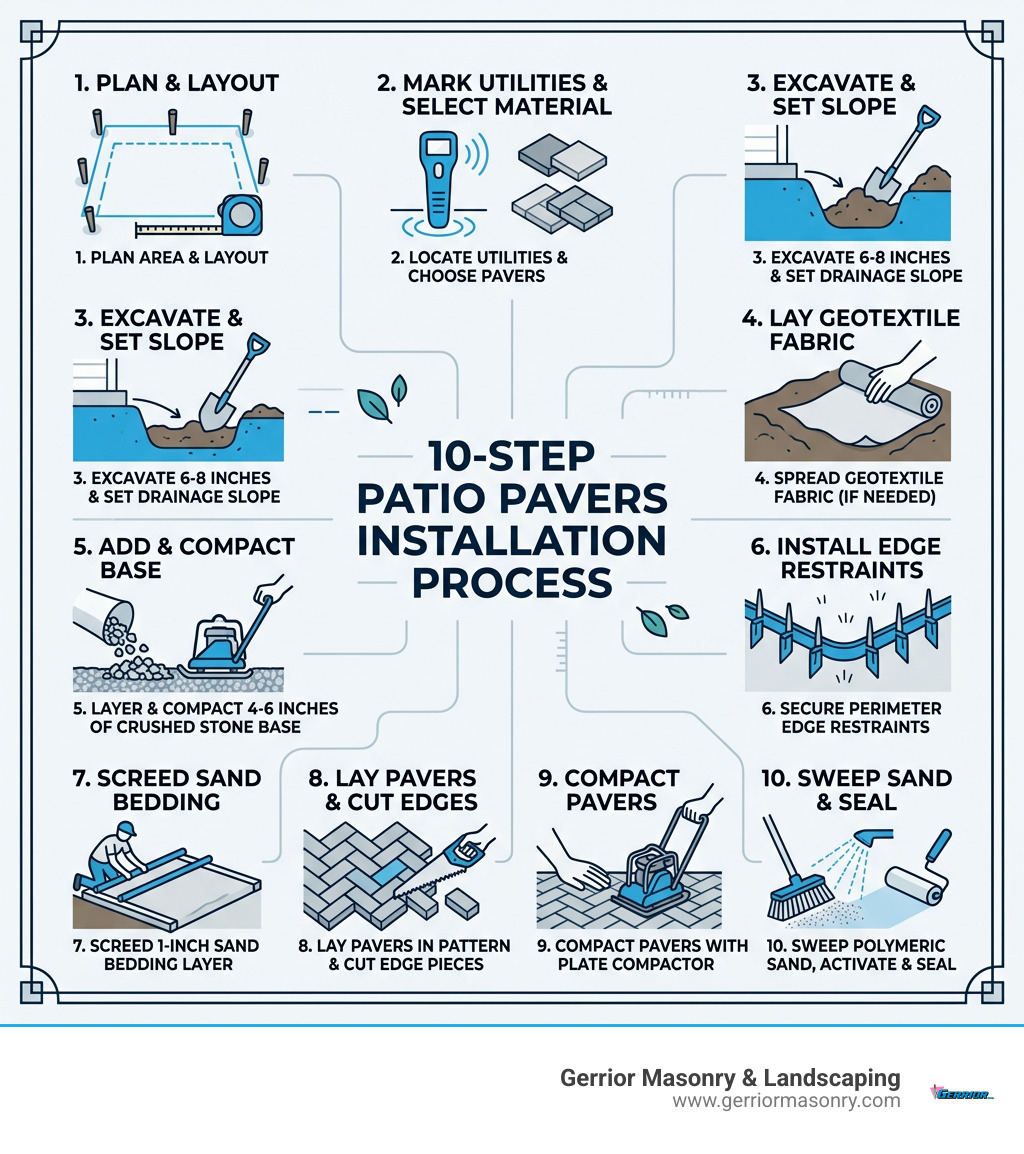
How to install patio pavers (10 steps):
- Plan and lay out your patio area with stakes and string
- Mark utilities and choose your paver material
- Excavate 6–8 inches deep and set a drainage slope
- Lay geotextile fabric over the subgrade if needed
- Add and compact 4–6 inches of crushed stone base in layers
- Install edge restraints to lock the perimeter
- Screed a 1-inch sand bedding layer for a flat, even surface
- Lay pavers in your chosen pattern, cutting pieces to fit edges
- Compact pavers into place with a plate compactor
- Sweep in polymeric sand, activate with water, and seal
A well-built paver patio can last for decades with minimal upkeep. It handles foot traffic, handles New England weather, and looks great doing it. Whether you’re creating a backyard gathering space or upgrading your outdoor living area, getting the installation right from the start is what separates a patio that holds up from one that shifts, cracks, or floods.
This guide walks you through every step — no guesswork, no shortcuts.
I’m Joe Gerrior, owner of Gerrior Masonry & Landscape Construction Corp., with over 34 years of hands-on experience in hardscaping and patio pavers installation across Massachusetts. In this guide, I’ll share the same process my team uses on every project to ensure a stable, beautiful result that stands the test of time.
Common patio pavers installation vocab:
Planning and Preparation for Patio Pavers Installation
Before we pick up a shovel, we have to start with a solid plan. A successful patio pavers installation begins long before the first stone is laid. We need to define the project scope: Are you looking for a simple sitting area in Burlington, or a sprawling multi-level entertainment space in Lexington?
First, select your site. It should be relatively level and, most importantly, away from low-lying areas where water pools. Once you have a spot, you must mark your utilities. In Massachusetts, calling 811 is a non-negotiable step to ensure you don’t hit any underground lines during excavation. This service, often referred to as ‘Dig Safe,’ is essential for safety and legal compliance.
When it comes to ordering materials, math is your best friend. A cubic yard of paver base covers approximately 108 square feet at a 3-inch depth. To avoid project delays, we always recommend ordering a 10%–15% overage. This accounts for pavers that will be cut to fit curves or odd spaces, as well as any potential breakage during transport. If your design has a lot of intricate curves, lean toward that 15% mark.
Choosing the Right Materials
The type of paver you choose dictates the look and longevity of your patio. Here is a quick comparison of the most popular options we use in Middlesex and Essex County:
| Paver Type | Durability | Maintenance | Best For |
|---|---|---|---|
| Concrete Pavers | High | Low | Uniform looks, driveways, and modern patios. |
| Brick Pavers | Moderate-High | Low | Classic aesthetic, historical homes in Salem or Concord. |
| Natural Stone | Very High | Moderate | Unique, high-end backyard patio designs. |
Based on internet data, the average cost for patio pavers installation ranges from $15 to $65 per square foot. That high-end natural stones or complex patterns can easily push costs toward the higher end of that spectrum, sometimes exceeding $100 per square foot depending on the site conditions and material rarity.
Essential Tools for the Job
To do this like a pro, you’ll need more than just a hammer. Here are the essentials:
- Plate Compactor: Essential for a stable base.
- Masonry Saw: For clean, professional cuts.
- Screed Pipes and Board: To level the sand bedding.
- Rubber Mallet: For setting pavers without cracking them.
- Geotextile Fabric: To separate soil from your base material.
Layout, Excavation, and Drainage for Patio Pavers Installation
Layout is where your vision meets the dirt. Use stakes and mason’s line to outline the perimeter. We recommend marking about 8 inches outside the actual patio edge to give yourself room to work and space for the edge restraints.
Excavation depth is critical. For pedestrian areas like a patio or walkway, you need to dig 6–8 inches deep. If you were building a driveway, you’d need 8–12 inches. The quality of your sub-base soil also matters. In areas like Woburn or Burlington, you may encounter heavy clay. Clay retains moisture, which requires a slightly deeper gravel base to prevent shifting during the freeze-thaw cycles. Conversely, sandy soil provides excellent drainage but may require more compaction effort to ensure a rock-solid foundation.
Drainage is the most overlooked part of DIY projects. You must ensure water runs away from your home’s foundation. We follow a standard slope of 1 inch of drop for every 4 feet of distance. This keeps your basement dry and your patio stable. For homes with existing water issues, you might want to look into more advanced drainage systems or dry wells to handle heavy New England rains.

Step-by-Step Execution and Maintenance
With the hole dug and the slope set, it’s time for the heavy lifting. The secret to a patio that doesn’t sink is the base. We use a crushed stone base, typically 4–6 inches thick for patios.
Preparing the Base and Edge Restraints
Don’t just dump all your gravel in at once! Most plate compactors can only handle 3–4 inches of material at a time. If you dump 6 inches and try to compact it, the bottom layers will remain loose, leading to uneven settling later.
Base Preparation Tips:
- Moisture is Key: If the base material is bone dry, spray it lightly with a hose. This helps the particles lock together during compaction.
- Geotextile Over Plastic: We get asked this a lot: “Should I use plastic to stop weeds?” The answer is a firm no. Plastic traps water, which can cause the base to shift and pavers to heave during the freeze-thaw cycles we see in Woburn and North Andover. Instead, use a geotextile fabric. It allows water to pass through but prevents the soil from mixing with your clean gravel base.
- Lateral Stability: Once the base is compacted, install your edge restraints. These are typically plastic or metal rails held in place by long spikes. They prevent the pavers from “creeping” outward over time.
For those interested in the technical details of why these layers matter, you can check out this scientific research on paver installation which highlights the importance of seasonal care and proper base mechanics.
Screeding Sand and Laying the Paver Pattern
Once the base is rock hard, it’s time for the bedding layer. We use a 1-inch thick layer of coarse sand. To get this perfectly flat, lay down two 1-inch PVC pipes as guides, spread your sand, and “screed” it across the pipes using a straight board. Once done, remove the pipes and carefully fill the indentations with sand. Do not walk on this sand once it is leveled!
Now comes the fun part: laying the pavers. Start from a straight edge (usually the house) and work your way out.
- Running Bond: The easiest for DIYers; it’s just offset rows like bricks on a house.
- Herringbone: Great for high-traffic areas because the interlock is very strong, but it requires more cutting.
- Random/Modular: Uses different sizes for a natural look.
If you’re looking for inspiration, we have plenty of paver walkway ideas that utilize these patterns to create stunning visual flow.
Finishing Touches for a Successful Patio Pavers Installation
As you reach the edges, you’ll likely need to cut pavers to fit. A masonry saw with a diamond blade is the best tool for this. Once all pavers are laid, run the plate compactor over the surface. This “sets” the pavers into the bedding sand.
Next, we apply polymeric sand. This isn’t regular sand; it contains binders that activate with water to create a glue-like bond.
- Sweep the sand into the joints while the pavers are completely dry.
- Use the plate compactor again to shake the sand down into the gaps.
- Sweep off all excess sand from the surface (if it stays on top and gets wet, it will stain!).
- Mist the patio with water to activate the polymers.
For a visual walkthrough of this process, the How To Install Pavers guide from This Old House is an excellent resource.
Long-Term Care and Troubleshooting
Even the best patio pavers installation requires a little love. Proper maintenance ensures that your investment remains beautiful and functional for decades.
Common Issues and Solutions
- Efflorescence: This is a white, powdery salt that sometimes appears on new pavers. It’s natural and usually washes away with time, but specialized cleaners can speed up the process.
- Weeds: If you used polymeric sand correctly, weeds shouldn’t grow from the bottom. Most “weeds” actually start from seeds blowing into the top of the cracks. Regular sweeping and occasional re-sanding keep them at bay.
- Uneven Settling: This usually happens because the base wasn’t compacted in layers or the drainage was poor. If a few pavers sink, you can pry them up, add a bit of sand, and reset them.
Winter Maintenance and Snow Removal
For homeowners in the North Shore, winter is the ultimate test of a patio. When clearing snow, avoid using metal shovels or ice chippers, which can scratch or gouge the surface of your pavers. Instead, use a plastic shovel or a snow blower with a rubber-edged paddle. When it comes to de-icing, avoid rock salt (sodium chloride), as it can penetrate the pores of the stone and cause pitting over time. Instead, use calcium chloride-based products or simple sand for traction, which are safer for the masonry and your surrounding landscape.
Can You Build a Fire Pit?
Yes! A paver patio is a perfect spot for a fire pit. However, you must use fire-resistant pavers or a steel fire ring insert to protect the stone from heat stress. Always keep the fire pit at a safe distance from your house and low-hanging trees. If you’re planning a full outdoor kitchen, consulting a professional patio contractor is a smart move to ensure gas lines and heavy structures are handled safely.
Should You Seal Your Pavers?
Sealing has its pros and cons.
- Pros: Enhances color (the “wet look”), protects against oil stains, and further stabilizes joint sand.
- Cons: It needs to be reapplied every 3–5 years and can make the surface slightly more slippery when wet. If you choose to seal, ensure you use a breathable, high-quality sealer designed for the specific type of stone or concrete you have installed.
For a visual walkthrough of this process, the How To Install Pavers guide from This Old House is an excellent resource.
Professional Oversight for Your Massachusetts Home
While many homeowners in places like Reading, Peabody, and Saugus successfully tackle patio pavers installation as a DIY project, it is a labor-intensive process that requires precision equipment. Mistakes in compaction or drainage can lead to costly repairs just a few seasons down the road.
At Gerrior Masonry & Landscaping, we’ve spent three decades perfecting this craft. Whether you need a simple brick paver patio or a complex multi-tiered stone design, our team provides owner-oversight on every job to ensure it meets our high standards. We understand the specific soil conditions of the North Shore and the challenges our winters present to hardscape structures.
If you’re ready to transform your backyard but want the peace of mind that comes with professional experience, we are here to help. From the initial excavation to the final sweep of sand, we handle the heavy lifting so you can just enjoy the results.
Gerrior Masonry & Landscape Construction is based in Woburn, MA, and services Middlesex and Essex County, Massachusetts. We provide expert masonry and hardscaping services to communities including Winchester, Wilmington, Wakefield, and beyond. Contact us today to discuss your next outdoor project!