
Outdoor Wall Construction 101: From Trench to Topper
Why Your Retaining Wall Foundation Determines Everything
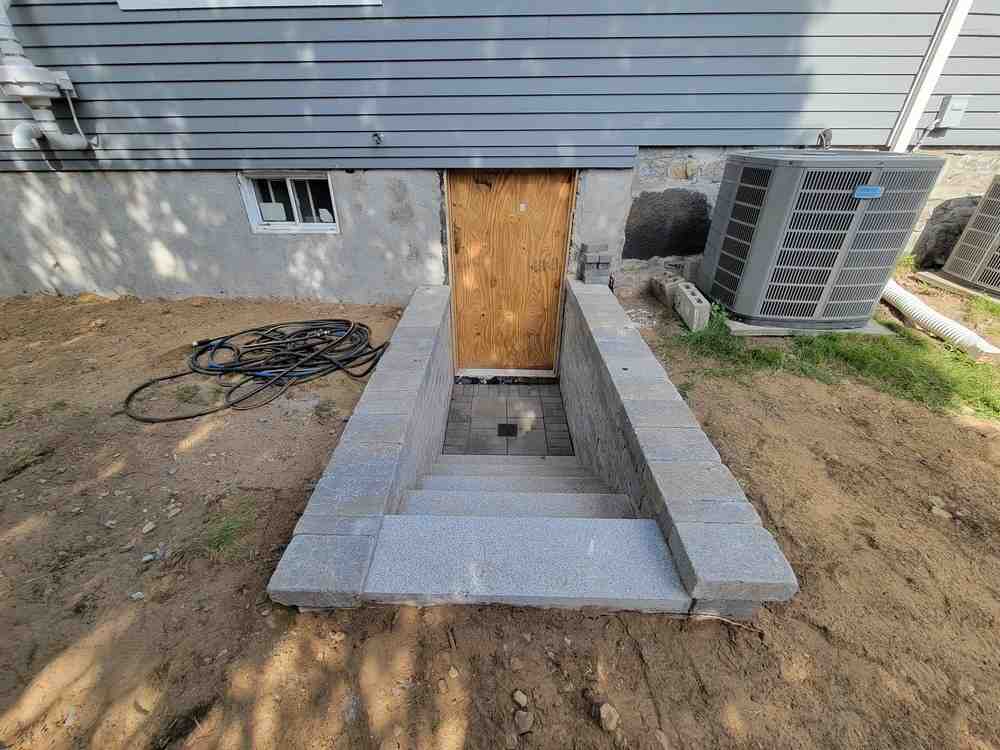
A retaining wall foundation is the buried base layer that supports your entire wall — and getting it right is the single most important step in the whole project.
Here’s what you need to know at a glance:
| Wall Height | Trench Width | Trench Depth | Embedment Depth |
|---|---|---|---|
| 0–2 ft | 12 in | 4 in | 4 in |
| 2–4 ft | 18 in | 4 in | 6 in |
| 4–6 ft | 24 in | 6 in | 8 in |
| Over 4 ft | Engineer required | Engineer required | Engineer required |
- Base material: Use crushed stone, #57 stone, or paver base — never pea gravel or river rock
- Compaction: Always compact in layers; don’t skip this step
- Drainage: A perforated drain pipe is required for walls over 4 ft or on poor-draining sites
- Permits: Most Massachusetts towns require a building permit for walls taller than 4 ft
A wall built on a weak or poorly prepared foundation will lean, settle, or collapse — often within just a few years. The soil pressure pushing against a retaining wall is enormous, and only a properly engineered base can resist it over the long term.
I’m Joe Gerrior, owner of Gerrior Masonry & Landscape Construction Corp., and after 34 years of building and repairing retaining wall foundations across Massachusetts, I’ve seen what separates walls that last decades from those that fail after a single winter. In this guide, I’ll walk you through everything you need to build a retaining wall foundation that holds — from trench dimensions to drainage to knowing when to call an engineer.
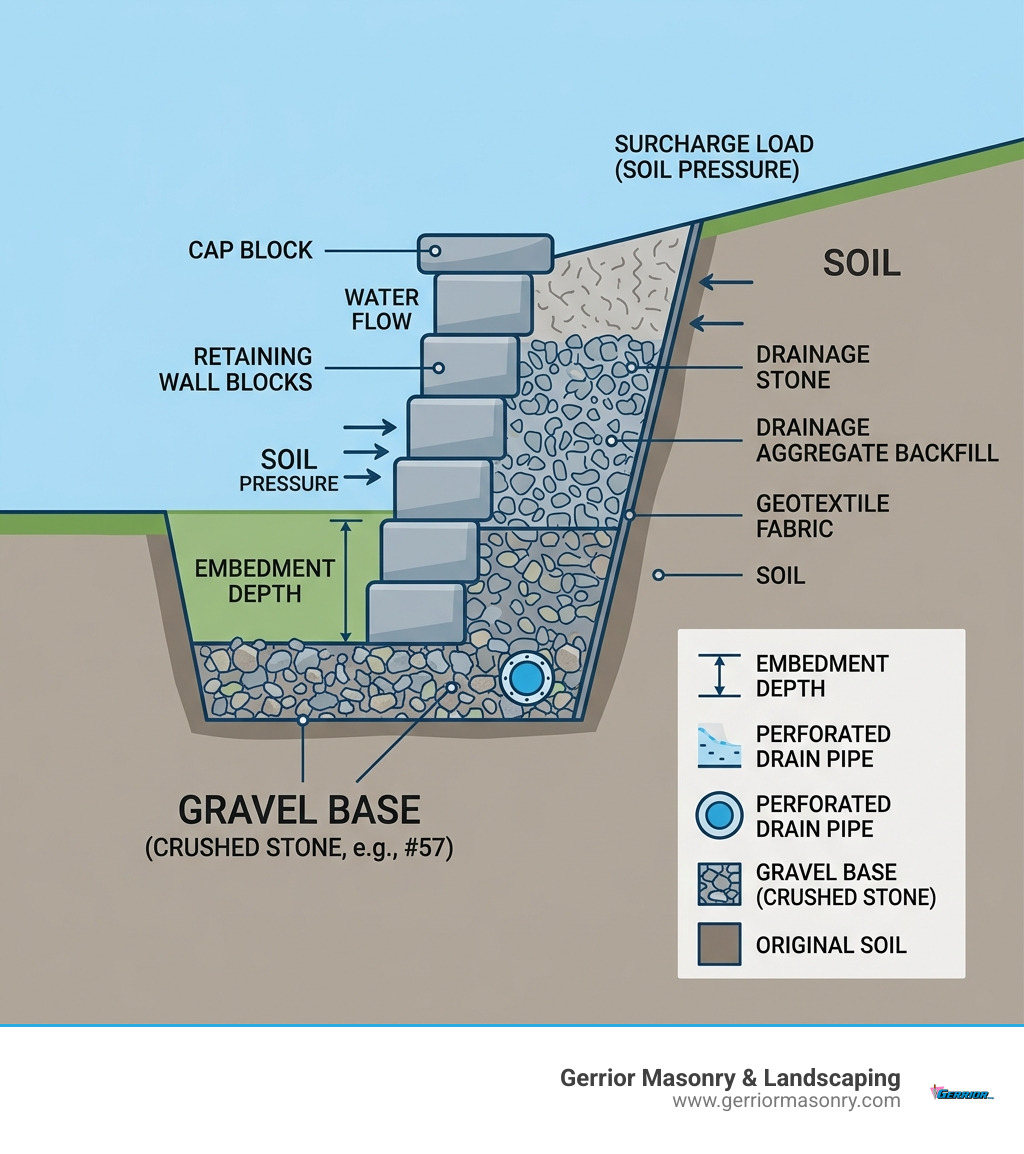
Glossary for retaining wall foundation:
Engineering a Rock-Solid Retaining Wall Foundation
When we talk about a retaining wall foundation, we aren’t just talking about the dirt at the bottom of a hole. We are talking about a carefully engineered system of excavated soil, compacted aggregates, and buried structural units. Unlike a house foundation, which is braced at the top by floor joists and a roof, a freestanding retaining wall is often “unbraced.” This means it has to stand entirely on its own against the lateral pressure of the earth behind it.
The first step in any retaining wall installation is understanding the site. In places like Andover, MA, or Winchester, MA, we often deal with heavy clay or rocky “glacial till.” These soils behave differently when wet, which is why the base for retaining wall must be prepared to handle both weight and water.
Determining Depth and Width for Your Retaining Wall Foundation
The dimensions of your trench are dictated by the height of the wall and the weight of the material you are using. A common mistake we see in DIY projects in Arlington and Medford is a trench that is too narrow. If the trench isn’t wide enough, the pressure from the backfill can actually “kick” the bottom of the wall forward because there isn’t enough friction at the base.
The Rule of Thumb for Width: Your retaining wall foundation trench should generally be twice as wide as the block or stone you are using. For a standard 6-inch or 8-inch block, an 18-inch width is a safe minimum for walls under 4 feet. As the wall gets taller, we increase that width to 24 inches or more to provide a larger “footprint” to distribute the weight.
The Rule of Thumb for Depth: Depth is a two-part calculation: the thickness of your base material (the leveling pad) plus the “embedment.”
- The Base Pad: Usually 4 to 6 inches of compacted crushed stone.
- Embedment: This is the portion of the wall that stays buried underground. For a standard gravity wall, we typically bury 1 inch of block for every 1 foot of wall height. So, a 3-foot wall needs at least 3 inches of block underground, while a 6-foot engineered wall might require 8 inches or more.
According to Scientific research on SRW best practices, the depth of the trench should be at least 6 inches plus an additional 1 inch for each foot of wall height to account for the buried block. This embedment is what prevents the wall from sliding forward under the pressure of the soil.
Essential Materials for a Stable Retaining Wall Foundation
The materials you choose for your foundation pad are just as important as the depth of your trench. We always tell our clients in Woburn and Burlington that “round is wrong.” If you use pea gravel or river rock for your base, the stones will act like ball bearings, allowing the wall to shift.
You need angular, crushed stone that “locks” together when compacted. Recommended materials include:
- #57 Stone: A clean, 3/4-inch crushed stone.
- Crushed Stone Screenings: Often called “dense grade,” this contains a mix of small stones and stone dust that packs down like concrete.
- Paver Base: A reliable choice for smaller garden walls.
Once the material is in the trench, it must be compacted in “lifts.” This means you don’t dump 6 inches of stone and run the compactor once. You add 2 inches, compact it until it’s rock-hard, add another 2 inches, and repeat. This ensures there are no air pockets that could lead to settling later.
For those interested in different styles, the foundation requirements stay largely the same whether you are doing hardscape retaining walls with manufactured blocks or a natural stone garden wall.
| Feature | Gravity Wall Foundation | Cantilever Wall Foundation |
|---|---|---|
| Height Limit | Typically up to 10 ft | Often exceeds 15–20 ft |
| Footing Type | Compacted gravel/stone | Reinforced concrete “L” or “T” |
| Stability Source | Pure weight of the units | Weight of soil on the footing |
| Embedment | 1:12 ratio (1″ per 1′ height) | Deeply buried concrete toe/heel |
Managing Water and Drainage Requirements
If you ask any masonry expert in Massachusetts what the #1 cause of retaining wall failure is, they won’t say “bad blocks” or “thin stone.” They will say water.
When soil behind a wall becomes saturated, it creates “hydrostatic pressure.” Water is incredibly heavy (about 62.4 pounds per cubic foot), and when it gets trapped behind a wall with a poor foundation, it can easily push a wall over or cause the foundation to wash out.
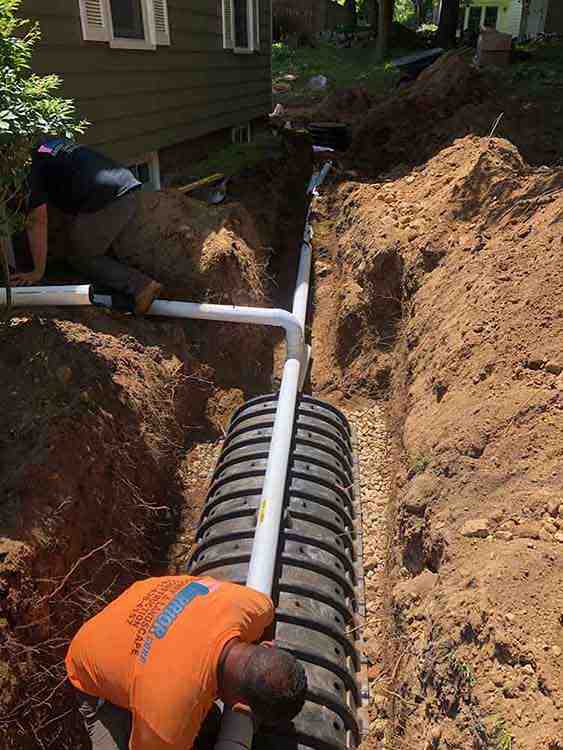
To prevent this, every retaining wall foundation over 4 feet tall (or any wall built in heavy clay soil) needs a drainage system. This usually involves:
- Perforated Drain Pipe: A 4-inch pipe placed at the lowest point of the foundation, behind the first course of blocks.
- Drainage Stone: A chimney of clean, crushed stone (at least 12 inches wide) that runs from the foundation all the way up to the top of the wall.
- Filter Fabric: This keeps the fine dirt from the yard from clogging up your drainage stone and pipe.
Properly venting this pipe to “daylight” (an area where the water can safely run away from the wall) is crucial. Without this, your foundation will eventually sit in a pool of mud, losing its bearing capacity. You can find more details on how we handle these complex water issues on our drainage systems services page. For a deeper dive into how these systems interact with building structures, see the Scientific research on structural relationships.
Professional Standards and Common Pitfalls
In the masonry world of 2026, we follow strict standards to ensure safety. One of the most important rules is the 4-foot rule. In almost every municipality we service — from Concord to Salem — any wall that is 4 feet or taller (measured from the bottom of the footing to the top of the wall) is legally required to have a building permit and engineered drawings.
This isn’t just red tape. A 4-foot wall is holding back thousands of pounds of earth. If you are building a wall that will have a “surcharge” — like a driveway, a swimming pool, or a house foundation — within a distance equal to twice the wall’s height, the engineering becomes even more critical.
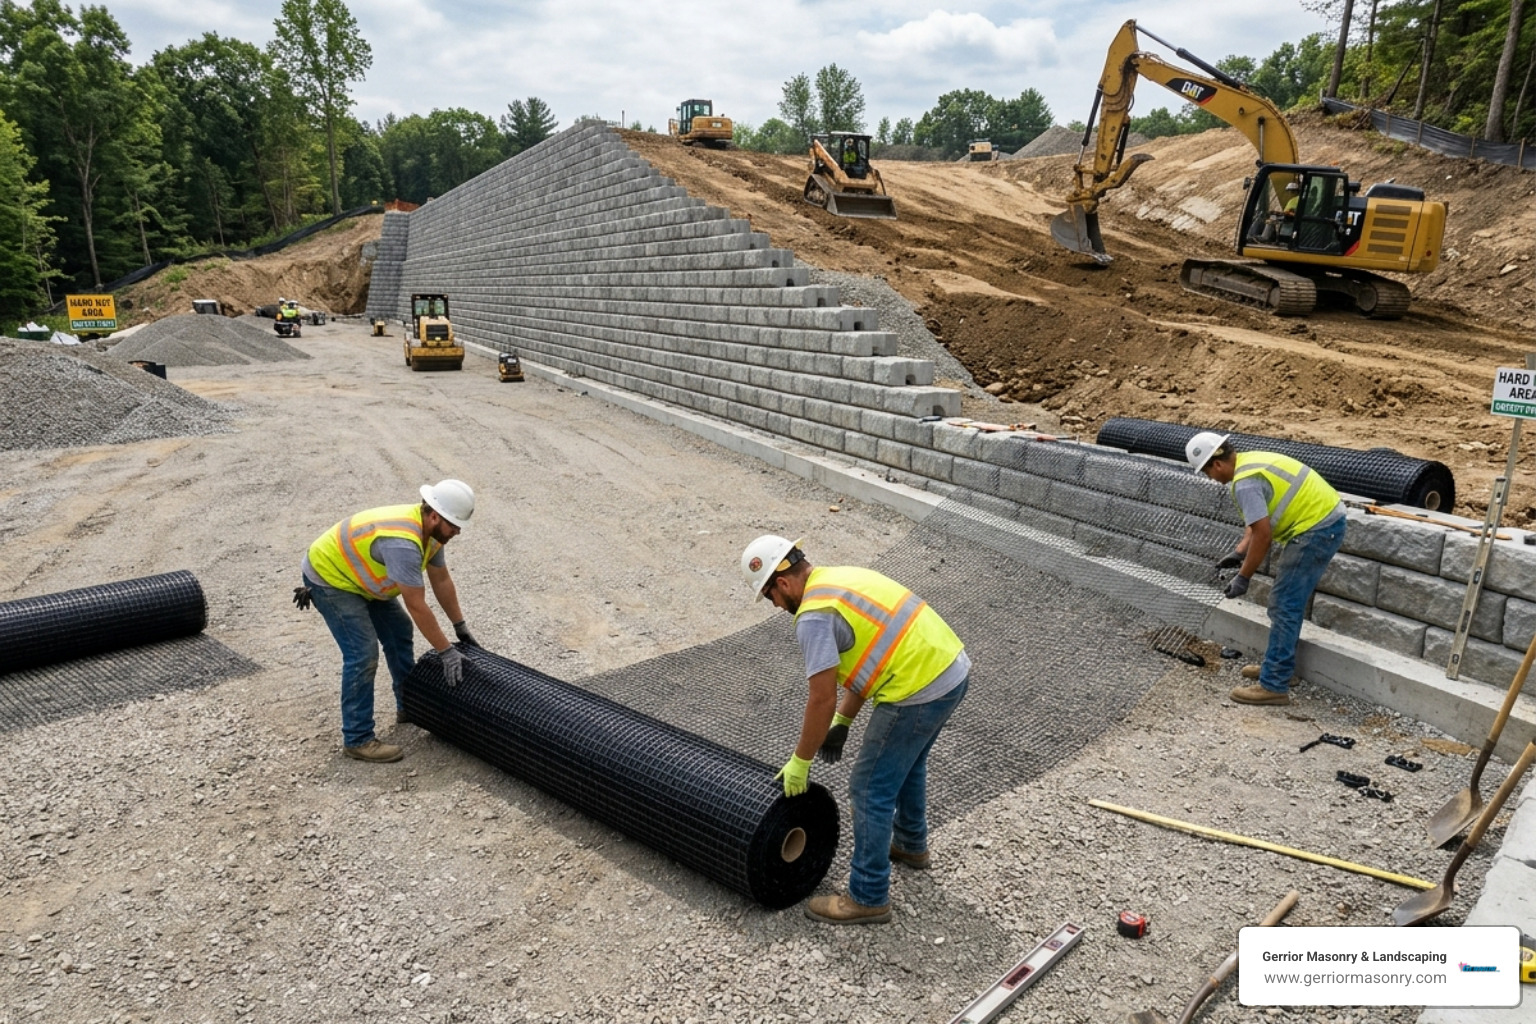
When we build taller walls, we often use geogrid. This is a high-strength synthetic mesh that is laid between the courses of block and extended back into the soil. It turns the soil itself into a reinforced mass, taking the pressure off the face of the wall. This geogrid must be tied into the retaining wall foundation plan to ensure the entire structure moves (or stays still) as one unit.
If you’re looking for high-end aesthetics with these professional standards, you might consider custom retaining walls or natural stone retaining options.
When to Call a Professional Engineer
While a 2-foot garden bed is a great weekend project, some scenarios are simply too dangerous for a DIY approach. You should always consult a professional if:
- The Wall is Over 4 Feet: As mentioned, this is the legal and safety threshold.
- The Ground Slopes Downward in Front of the Wall: This is called a “toe slope.” If the ground drops away in front of your wall, there is nothing to “push back” against the base. We often have to bury the wall much deeper in these cases — sometimes several feet — to find stable ground.
- The Ground Slopes Upward Behind the Wall: A “surcharge slope” significantly increases the pressure on the wall.
- You Are Building Near a Property Line: You don’t want your wall foundation to accidentally undermine your neighbor’s fence or shed.
Our team of retaining wall landscapers works closely with structural engineers to ensure these factors are accounted for. This is especially true for traditional Massachusetts styles like fieldstone wall construction, where the irregular shapes of the stones require a perfectly level and stable base to prevent shifting.
Avoiding Costly Foundation Mistakes
We spend a significant amount of our time performing foundation repair on walls that were built incorrectly. Here are the most common “wall killers” we see:
- Building on Organic Soil: You cannot build a wall on top of topsoil, mulch, or sod. Organic material rots and compresses over time. If your foundation sits on organic soil, the wall will sink. You must dig down until you hit firm, inorganic subsoil.
- Skipping the Plate Compactor: Using a hand tamper is fine for a tiny border wall, but for anything structural, you need the thousands of pounds of force provided by a mechanical plate compactor.
- Leveling with Dirt: Never use loose soil to level your blocks. Always use your crushed stone base or a very thin layer (less than 1/2 inch) of coarse sand. Soil will wash away; stone will stay.
- Ignoring the “Active Zone”: If you dig a trench for a new wall too close to an existing cinder block foundation, you could cause the house foundation to settle. This is why professional oversight is so important.
Conclusion: Building for the Future with Gerrior Masonry
Building a retaining wall foundation is about more than just moving dirt; it’s about creating a permanent structure that enhances your property and protects your landscape. At Gerrior Masonry & Landscaping, we bring over 30 years of experience to every project. Whether we are working in Lexington, Newton, or our home base of Woburn, MA, our skilled team ensures that every wall is built to last.
One of our unique advantages is owner oversight. Joe Gerrior is personally involved in ensuring the quality of our work, from the first scoop of the excavator to the final capstone. Beyond masonry, we also provide landscape walls and essential commercial snow removal services to keep Massachusetts businesses safe during our tough winters.
What does a retaining wall cost in Massachusetts? While every site is unique, internet data suggests that average costs for a professionally installed retaining wall in the Massachusetts area range from $40 to $150 per square foot. Depending on the height, material (like natural fieldstone vs. interlocking block), and drainage needs, total project costs typically fall between $5,000 and $45,000+. Factors like difficult access, steep slopes, or the need for an engineer can push prices toward the higher end of that range.
If you are ready to transform your yard with a wall that stands the test of time, reach out to us. We’ve built our reputation one stone at a time, ensuring that every retaining wall foundation we lay is a rock-solid investment in your home’s future.
Gerrior Masonry & Landscape Construction is based in Woburn, MA, and services Middlesex and Essex County, Massachusetts.