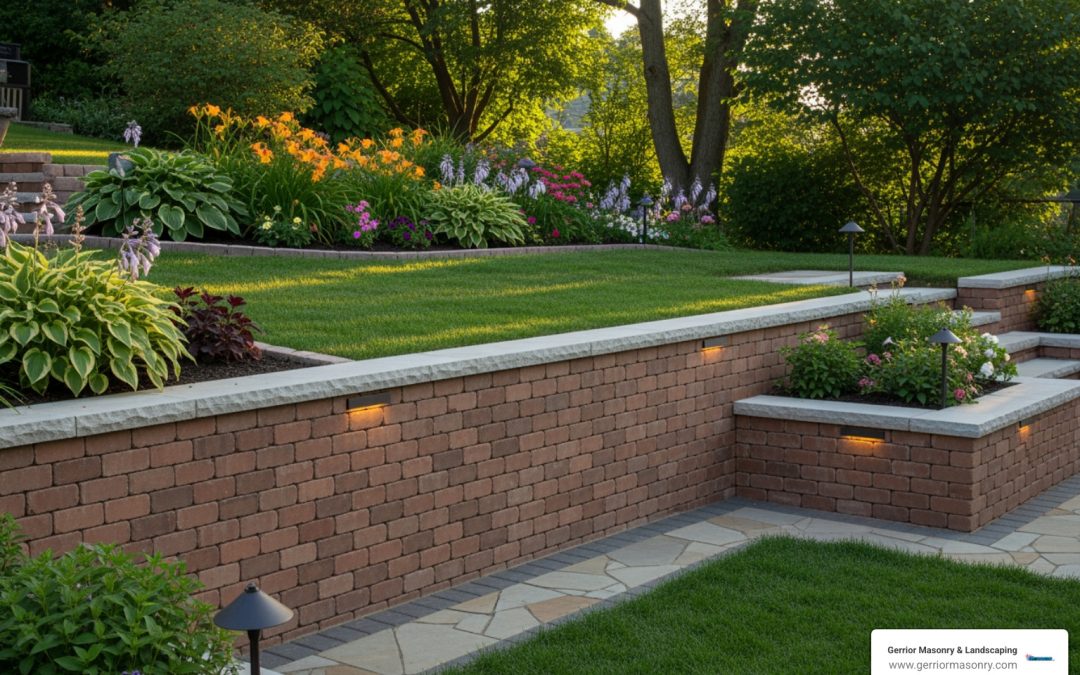
Brick retaining wall ideas can turn a challenging sloped yard into a functional, beautiful outdoor space. These structures control erosion, create level areas for patios or gardens, define landscape “rooms,” and add timeless beauty that increases property value.
A retaining wall is designed to hold back soil on sloped terrain. Brick is a superior material choice, offering durability and classic style that outlasts timber and looks less industrial than concrete blocks. The key to a successful brick retaining wall isn’t just the brick you see; it’s the engineering behind it. Poor drainage is the number one cause of failure, as a wall can hold back tons of saturated soil. Proper construction with a solid foundation, adequate drainage, and the right structural design is critical.
Today, most walls use a structural block core with a brick veneer. This method is more affordable than traditional solid brick walls—typically ranging from $20 to $75+ per square foot installed—while delivering the beautiful brick appearance homeowners want.
I’m Joe Gerrior, owner of Gerrior Masonry & Landscape Construction Corp. For over 34 years, my team has been helping Massachusetts homeowners transform sloped properties with expertly built retaining walls. Proper installation is the difference between a wall that lasts for decades and one that fails within a few years.
Inspiring Brick Retaining Wall Ideas and Key Considerations
When considering brick retaining wall ideas, success depends on smart construction, material choices, and sound engineering. Let’s explore the key factors for building a wall that lasts.
Construction Methods and Cost
The way a brick retaining wall is built impacts its strength and cost. The two primary methods are the traditional cavity wall and the modern block core wall.
Cavity Wall: This classic method uses two parallel brick walls on a shared foundation, with the space between them often reinforced. It’s robust but more labor-intensive and costly.
Block Core Wall: This popular and affordable method uses a core of reinforced concrete blocks for structural strength. A brick veneer is then applied to the exterior, giving the appearance of a solid brick wall. This approach, often recommended by our team at Gerrior Masonry & Landscaping, balances strength, cost, and the classic brick look.
When using a block core, veneer options include full bricks, thinner half bricks, or lightweight thin brick veneer, which is great for quick installations.
Cost Implications
The cost of a brick retaining wall varies based on method, height, site conditions, and materials. Based on internet data, the average cost can range from $20 to $75+ per square foot installed. These are average costs and not actual quotes for Gerrior Masonry & Landscaping services. Taller walls requiring more engineering, reinforcement, and drainage will be at the higher end of the spectrum. For any structural issues related to your property’s foundation, remember to consider more info about foundation repair.
Aesthetic Choices for Your Brick Retaining Wall Ideas
Your wall is a major visual element. The right aesthetic choices can lift your entire landscape.
Brick Styles and Colors
Brick’s beauty is in its versatility. Popular choices include:
Traditional Red Brick: A timeless choice that offers warmth and historical charm.
Clinker Bricks: Darker, irregular bricks that provide a rustic or sophisticated modern aesthetic.
Reclaimed Brick: Salvaged bricks with a unique, historic patina that cannot be replicated.
Mortar color and joint style also dramatically alter the final look.
Design Patterns and Forms
The brick bond pattern adds another layer of design. Running bond is the most common, but intricate patterns like Herringbone can be used for accents. The wall’s form is also key. Straight walls offer a clean, formal look, while curved walls add softness and flow. For steep slopes, terraced walls create multiple shorter walls with level tiers for planting, a practical and beautiful solution. We can help you with more info about landscape walls that complement your design.
The Critical Role of Drainage and Engineering
Without proper drainage, even the most beautiful wall will fail. Water creates immense hydrostatic pressure behind a wall, which can lead to bulging, cracking, or collapse.
Essential Drainage Components
A well-designed system is non-negotiable and includes:
Gravel Backfill: A layer of crushed gravel behind the wall allows water to drain freely.
Filter Fabric: This separates the gravel from the surrounding soil, preventing clogs.
Perforated Drainpipe: A pipe at the base of the wall collects water and carries it away.
Weep Holes: Small openings at the base of the wall allow water to escape.
As experts at PJCArchitecture note, retaining walls “are purposeful and allow a certain level of control…”—especially over water. For comprehensive solutions, we offer more info about drainage systems.
Foundation and Reinforcement
A wall’s strength begins with a solid footing of compacted gravel laid below the frost line to prevent movement. The wall should also be built with a slight backward lean, or “batter,” to leverage gravity against soil pressure. For taller walls, geogrid reinforcement, a synthetic mesh laid in the backfill, is critical for stability.
When to Hire an Engineer
While you can DIY short, simple walls, professional help is crucial for walls over 3-4 feet high, on steep slopes, with poor soil, or supporting heavy loads like a driveway. Many communities in Middlesex and Essex County, MA, require permits and engineered plans for taller walls to ensure safety.
Brick vs. Other Materials: Making the Right Choice
It’s helpful to see how brick compares to other popular retaining wall materials.
Material Comparison Table
Feature
Brick Retaining Walls
Concrete Blocks (SRW)
Natural Stone Retaining Walls
Timber Retaining Walls
Aesthetics
Timeless, classic or modern
Modern, uniform, can mimic stone
Organic, rustic, unique
Rustic, natural
Durability
Excellent (50-100+ years)
Very good (50-100+ years)
Excellent (100+ years)
Moderate (10-20 years), prone to rot
Cost (per sq ft installed)
Avg. $20-$75+ (internet data)
Avg. $45-$270+ (internet data)
Avg. $20-$100+ (internet data)
Avg. $15-$30+ (internet data)
Maintenance
Low
Low
Low
Moderate to High
Installation
Requires skilled masonry
DIY-friendly for short walls
Labor-intensive, requires skill
Can be DIY for short walls
Why Choose Brick?
Brick offers a unique combination of timeless appeal that complements any architecture, proven durability for a generational lifespan, and incredible design versatility. Its perceived value and curb appeal often surpass more utilitarian options. At Gerrior Masonry & Landscaping, we specialize in a wide range of hardscaping services and can help you choose the best material for your project.
Common Problems and How to Avoid Them
Understanding potential failures is the first step in preventing them. A retaining wall is in a constant battle with gravity and water.
Signs of Trouble
Be vigilant for signs of failure like bulging, leaning, or significant cracking. These indicate excessive pressure, often from poor drainage, and require immediate professional assessment. White, powdery deposits (efflorescence) are less severe but signal that water is migrating through the wall. Small cracks can sometimes be filled with masonry caulk, but larger ones need an expert opinion.
How to Avoid Problems: Best Practices
Avoiding these issues comes down to meticulous planning and expert execution. The key is to:
Build a solid foundation below the frost line.
Install a comprehensive drainage system (gravel, drainpipe, filter fabric).
Compact the backfill material in thin layers.
Use geogrid reinforcement for taller walls.
Build with a slight backward lean (batter).
Following these best practices ensures your wall remains a beautiful, functional asset for decades. For issues with existing foundation walls, our team can provide more info about foundation repointing.
Creative Brick Retaining Wall Ideas for Your Landscape
Think of your retaining wall as an integral design element that can transform your yard.
Integrated Features
One of the most popular brick retaining wall ideas is to integrate features directly into the design. A low, wide wall can double as built-in seating around a patio or fire pit. You can also build planters into the top or face of the wall to add greenery and soften the hardscape. On properties with significant slopes, multi-tiered walls are a game-changer, creating a series of level terraces perfect for gardening.
Defining Spaces
Brick retaining walls excel at defining different “outdoor rooms.” Use a low wall to frame a patio, creating a sense of enclosure. A linear wall can edge a walkway, adding structure and guiding visitors. We can help integrate your wall with a new patio or walkway; explore our patio installation and walkways and stairs services for more information.
Highlighting with Water and Light
For a truly captivating effect, integrate a small water feature or embed subtle landscape lighting into the brickwork. A cascading waterfall creates a serene focal point, while lighting transforms the wall into a dramatic nighttime backdrop, highlighting its texture and the surrounding plants.
Conclusion: Bring Your Landscape Vision to Life
We’ve explored a wealth of brick retaining wall ideas, from critical construction methods and costs to the aesthetic versatility of brick and the paramount importance of proper engineering. A well-built brick wall is a harmonious blend of form and function that controls erosion, creates usable space, and adds timeless beauty to your property.
Brick offers an best combination of durability and style, making it a smart investment that improves curb appeal and stands the test of time in the New England climate. At Gerrior Masonry & Landscaping, we understand that building a retaining wall is a significant undertaking.
With over 30 years of experience, our skilled team takes pride in meticulous planning and expert craftsmanship, with owner oversight on every project. We ensure that every brick retaining wall we build not only looks stunning but is engineered to last for generations. If you’re ready to open up your yard’s full potential, contact our team for a consultation. Learn more about our landscape design and installation services.
Gerrior Masonry & Landscape Construction is based in Woburn, MA, and proudly serves Middlesex and Essex County, Massachusetts.
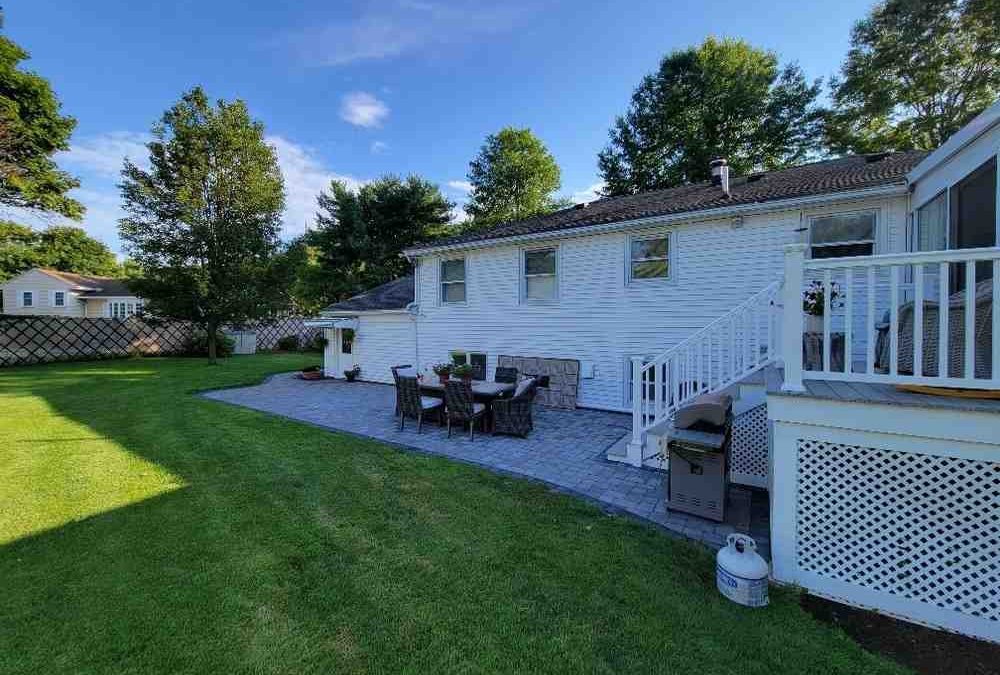
A brick paver patio is a highly sought-after outdoor living feature, prized for being a durable, attractive, and versatile surface. It is constructed from individual clay or concrete bricks laid on a meticulously prepared base of compacted gravel and sand. This modular construction is not just for looks; it provides a flexible surface that is ideal for everything from quiet morning coffees to lively backyard barbecues. The timeless curb appeal of brick adds significant value and character to any home. Furthermore, unlike monolithic poured concrete slabs that are prone to cracking, individual pavers are engineered to excel in regions with dramatic freeze-thaw cycles, making them a superior and long-lasting choice for homeowners in Massachusetts.
Quick Overview: What You Need to Know About Brick Paver Patios
Cost: $14–$24 per square foot on average (materials + labor); DIY materials run $9–$11/sq ft
Lifespan: Nearly a century with proper installation and maintenance
Best Use: Patios, walkways, pool surrounds, entertaining areas
Installation Depth: ~6 inches total (gravel base + sand + pavers)
Key Advantage: Individual bricks can be lifted and reset if settling occurs
Maintenance: Sweep, re-sand joints, optional sealing every 2–3 years
Brick paver patios outperform poured concrete in cold climates because they flex instead of cracking. They are more affordable than natural stone and offer modular repairability that a slab can’t match. Whether you’re planning a small nook or a large entertaining zone, understanding the process is key to a smart investment.
I’m Joe Gerrior, owner of Gerrior Masonry & Landscape Construction Corp. in Woburn, Massachusetts. With over 34 years of experience, my team has installed countless brick paver patios across Middlesex and Essex Counties that stand up to New England weather. In this guide, I’ll walk you through the essentials so you can decide if a brick paver patio is right for your home.
Planning, Costs, and Value of a Brick Paver Patio
Careful planning is the cornerstone of a successful brick paver patio project. Before starting, it’s important to set realistic expectations for your budget, timeline, and scope. An average patio is about 280 square feet, a good size for envisioning your own outdoor space.
When planning, consider these key aspects:
Budgeting: How much will you invest? This affects material choices and whether you hire a pro.
Size and Use: How will you use the patio? The intended function dictates the size and cost.
Site Access: Can equipment easily reach the site? Difficult access can increase labor costs.
Drainage: Proper drainage is critical in New England to prevent frost heave. The site’s slope and soil must be assessed.
Timeline: When do you want the project done? Factor in weather, material delivery, and design complexity.
Brick Paver Patio Cost: What to Expect in 2026
The cost of a brick paver patio varies. On average, expect to pay $14 to $24 per square foot for professional installation. For intricate designs or high-end materials, the price can climb to $75 or more per square foot. It’s important to note that these figures are average costs based on internet data and do not reflect actual pricing from Gerrior Masonry & Landscape Construction. We provide detailed, customized quotes for every project.
Here’s a quick cost breakdown:
Professional Labor: Typically $5 to $13 per square foot, covering excavation, base prep, and installation.
DIY Materials: Pavers, gravel, and sand usually cost between $9 and $11 per square foot.
DIY Tool Rental: A plate compactor, wet saw, and other tools can add $500 to $1,500 to a DIY budget.
Average Project Cost: For a 280-square-foot patio, the national average for professional installation is around $3,800, with a range of $2,400 to $7,000.
Factors that influence your final cost include location, project size, design complexity (simple patterns are cheaper than intricate ones), site preparation needs, and material choice. Permits may also be required in many Massachusetts towns, typically costing $0 to $250+.
Pro Install vs DIY: Time, Tools, and True Cost
Deciding between DIY and professional installation is a major choice. While the allure of saving on labor costs makes the DIY route tempting, it’s crucial to weigh the true costs in terms of time, effort, and potential for error.
The DIY Approach is a major undertaking that involves more than just laying bricks. It demands a significant time commitment, often spanning multiple weekends. You’ll need to rent or purchase specialized tools like a heavy-duty plate compactor and a masonry wet saw, which adds to the budget. The work itself is physically strenuous, involving heavy lifting, digging, and precise leveling.
Achieving a perfectly level, long-lasting patio requires meticulous attention to detail, especially during the base preparation phase. Even minor errors here can lead to uneven settling, poor drainage, and a patio that fails prematurely. Furthermore, DIYers must account for hidden costs like material delivery fees and waste disposal, as well as potential safety risks associated with handling heavy equipment and materials.
The Professional Advantage of hiring a team like ours includes:
Expertise and Efficiency: We have the experience and tools to complete the job correctly and quickly.
Proper Foundation: We ensure critical base compaction to prevent settling in our region’s freeze-thaw cycles.
Guaranteed Results: Professional installation often comes with a warranty for peace of mind.
Flawless Design: We can execute complex patterns that bring your vision to life.
For many, the durability and aesthetic appeal of a professional installation are a worthwhile investment. For more on patio construction basics, see the University of Missouri Extension’s guide.
Brick Paver Patio vs Concrete and Stone: Pros and Cons
Brick paver patios offer a compelling blend of benefits that often make them the superior choice in our climate.
Brick Paver Advantages:
Timeless Aesthetic: The classic look of brick adds warmth and character.
Superior Durability: Clay pavers are incredibly strong and resist cracking from freeze-thaw cycles better than concrete.
Modular Repairability: Individual bricks can be easily lifted and reset, unlike a concrete slab that requires patching or replacement.
Good Drainage: Sand-filled joints allow water to permeate, reducing runoff.
Low Maintenance: Pavers are colorfast and require minimal upkeep.
Comparisons to Other Materials:
Poured Concrete: While a poured concrete slab is often cheaper upfront, it is a rigid surface highly susceptible to cracking under the stress of our region’s freeze-thaw cycles. Once a crack appears, it is nearly impossible to repair invisibly, leading to unsightly patches that detract from the patio’s appearance. Over time, significant cracking may necessitate a complete and costly replacement.
Natural Stone: Flagstone or other natural stone patios provide a beautiful, high-end look with unique, organic shapes. However, this premium aesthetic comes at a significantly higher price point for both materials and the skilled labor required for installation. Like pavers, individual stones can be repaired, but sourcing matching stone and performing the repair can be more complex and expensive.
A well-installed brick paver patio can significantly increase your home’s resale value. Popular patterns we install include Herringbone, Basketweave, and Running Bond, each offering a unique look.
Design, Installation, and Maintenance Essentials
A beautiful brick paver patio relies on a complete system, from design and installation to ongoing maintenance. Each step is crucial for a patio that withstands New England weather.
Install Steps That Make It Last: Base to Borders
The secret to a long-lasting brick paver patio is a proper foundation. Here is our streamlined process for ensuring durability:
Layout and Excavation: We mark the patio area and excavate 6 to 7 inches deep. We establish a slope of about 1 inch per 8 feet away from the house for drainage. Before digging, call 811 to mark underground utilities.
Sub-Base Preparation: We compact the soil, then lay landscape fabric to stabilize it and prevent mixing with the gravel base.
Compacted Gravel Base: We add a 3.5 to 4-inch layer of crushed stone, moisten it, and compact it with a plate compactor to create a dense, stable foundation.
Bedding Sand Layer: A 1-inch layer of coarse sand is spread and leveled (screeded) to create a smooth bed for the pavers.
Edge Restraints: We install sturdy plastic, metal, or timber edging around the perimeter to lock the pavers in place and prevent shifting.
Laying the Pavers: We lay the pavers in the desired pattern, starting from a corner and working across the sand bed. We use a wet saw for any necessary cuts.
Joint Stabilization: We sweep polymeric sand into the joints. When activated with water, it hardens to lock pavers together and resist weeds.
Sealing (Optional): Applying a sealer every 2-3 years can protect against stains and improve color.
For walkways, we follow a similar process, ensuring a width of at least 3 feet for comfort. For a detailed DIY guide, you can refer to resources like This Old House on laying a brick patio.
Flexible (Sand-Set) vs Mortared Brick: Which System to Choose?
One critical choice is between a flexible (sand-set) system and a rigid (mortared) one. For most residential brick paver patios in Massachusetts, we strongly recommend the flexible system. Its ability to move with freeze-thaw cycles prevents cracking, and its permeable joints improve drainage. A mortared system, set on a concrete slab, is rigid and prone to cracking in our climate, leading to difficult and costly repairs.
Feature
Flexible (Sand-Set) Brick Paver Patio
Mortared Brick Paver Patio
Cost
Lower
Higher
Durability
Very durable, especially against freeze-thaw; modular repairs
Very durable, rigid; prone to cracking in freeze-thaw
Drainage
Permeable; allows water to seep through joints
Impermeable; requires surface runoff management
Repairability
Easy to replace individual pavers
Difficult and costly; cracks affect entire sections
Climate Suitability
Excellent for freeze-thaw climates (like MA)
Less suitable for freeze-thaw climates due to cracking risk
DIY Feasibility
More DIY-friendly
Requires professional masonry skills
For most homeowners in Middlesex and Essex Counties, the flexible, sand-set system is the most practical and long-lasting choice.
Caring for Your Patio: Seasonal Maintenance and Quick Fixes
A brick paver patio can last for decades with simple, ongoing care. Here are our best practices:
Regular Cleaning: Sweep or blow leaves and debris off the patio to prevent staining and weed growth. Occasionally rinse with a garden hose.
Joint Maintenance: If you notice gaps in the joints, sweep in more polymeric sand to keep pavers locked and prevent weeds.
Sealing (Optional): Apply a masonry sealer every 2-3 years to guard against stains and improve the paver’s natural color.
Weed and Moss Control: Polymeric sand is the best defense. If weeds or moss appear, pull them or use a hardscape-safe cleaner.
Spot-Level Repairs: If a paver sinks, simply lift it, adjust the sand base, and reset it. This is a key advantage of paver systems.
Winter Care: Use plastic shovels and paver-safe de-icers. Avoid rock salt, which can damage the surface.
Protect Your Investment: Use pads under furniture legs and direct downspouts away from the patio to prevent erosion.
With proper installation and a little seasonal attention, your brick paver patio will provide a beautiful outdoor space for decades.
At Gerrior Masonry & Landscape Construction, we understand the importance of quality and longevity. Based in Woburn, MA, our team has over 30 years of experience designing and installing beautiful hardscapes across Middlesex and Essex County. We believe in owner oversight on every project, ensuring our skilled team delivers the highest quality results that stand up to our demanding climate. If you’re considering a brick paver patio, we’re here to help you create a blissful outdoor space. For more information, please visit our page on patio contractors.
Block paving installers near me are professionals who design and install interlocking pavers for driveways, patios, and walkways. Finding the right one is key to a lasting, beautiful result. Whether you are looking to replace a cracked asphalt driveway or create a brand-new outdoor living space, the expertise of a professional mason ensures that your investment stands the test of time and the harsh New England elements.
Quick Steps to Find Quality Block Paving Installers:
Search manufacturer referral networks – Companies like Unilock and Belgard maintain databases of authorized contractors who are trained in specific product applications.
Check credentials – Verify licensing, insurance (minimum $2M public liability), and trade association memberships to ensure they follow industry best practices.
Review portfolios – Look at photos of completed projects and read customer testimonials on independent platforms to gauge their consistency and quality.
Get multiple quotes – Obtain at least 2-3 detailed estimates on company letterhead to compare scope, materials, and pricing accurately.
Ask key questions – Inquire about warranties, payment schedules, and project timelines to avoid any surprises during the construction phase.
Never pay deposits upfront – Reputable installers typically don’t require advance payment before materials arrive or work begins.
Block paving is widely considered the strongest paving product available, offering superior durability compared to asphalt or resin. These compressed concrete blocks can last for decades when properly installed, making them a cost-effective investment that adds significant value to your home. The material comes in various colors, textures, and patterns, with installation typically taking 3-5 days depending on the size of the area.
I’m Joe Gerrior, owner of Gerrior Masonry & Landscape Construction Corp. For over 34 years, we’ve helped Massachusetts homeowners transform their properties with quality hardscaping. Our team has extensive experience providing expert paver installation for residential and commercial clients throughout Middlesex and Essex County, ensuring every stone is laid with precision.
Block paving, also known as paver installation, involves laying individual blocks on a prepared sub-base. Its interlocking nature provides inherent strength, making it highly resistant to cracking under heavy loads. The benefits are numerous:
Exceptional Durability: Block paving is renowned for its strength and can withstand heavy traffic and harsh New England weather for decades without the surface degradation seen in asphalt.
Improved Aesthetics: With a vast array of colors, shapes, and patterns like herringbone or basketweave, block paving offers unparalleled design flexibility to complement your home’s architecture.
Increased Home Value: A well-installed block paved driveway or patio significantly boosts curb appeal and is a smart financial investment that yields high returns upon resale.
Easy Maintenance & Repair: Unlike poured concrete, individual blocks can be lifted and replaced if damaged or if underground utility access is needed, making repairs seamless and cost-effective.
Sustainability Options: Permeable pavers allow rainwater to drain through the surface into the ground, reducing runoff and helping manage drainage on your property effectively.
For more detailed information on how a new driveway can transform your property, please visit our page on driveway paving.
How to Find and Vet the Best Block Paving Installers Near Me
Finding the right block paving installers near me in Middlesex and Essex County is critical to the success of your project. With a structured approach, you can confidently select a professional team that understands the local soil conditions and climate challenges.
Starting Your Search for Local Paving Experts
Online Search: A search for “block paving installers near me” is a good start. Look for companies with a strong local presence, detailed websites, and a physical office location. This ensures they are an established business rather than a fly-by-night operation.
Manufacturer Referral Networks: Reputable paver manufacturers like Unilock and Belgard have networks of authorized contractors who meet high installation standards. These contractors are familiar with the latest products and often offer extended workmanship guarantees backed by the manufacturer.
Word-of-Mouth: Ask friends, family, and neighbors for recommendations. Personal referrals often lead to trustworthy contractors who have already proven their reliability in your community.
Portfolios and Testimonials: Review a contractor’s past work on their website. Customer reviews on platforms like Google and Yelp give insight into a company’s reputation and how they handle challenges. We take pride in our history of satisfied clients, and you can find out more about Gerrior’s credentials and experience on our site.
What to Look for in Reputable Block Paving Installers Near Me
Once you have a shortlist, vet them carefully to ensure they have the necessary qualifications:
Experience: Look for installers with a long history in the masonry industry. Our team at Gerrior Masonry & Landscape Construction brings over 30 years of experience to every project, ensuring we’ve seen and solved every possible site condition.
Licensing and Insurance: This is non-negotiable. Verify they are licensed in Massachusetts and carry adequate Public Liability Insurance (at least $2 million) and Worker’s Compensation to protect you from any liability during the build.
Certifications: Memberships in trade associations like Interlay or ICPI (Interlocking Concrete Pavement Institute) indicate a commitment to professional standards and ongoing education in the field.
Local Expertise: A contractor familiar with the specific climate and soil types in Middlesex and Essex County will build a more durable installation by accounting for the region’s significant freeze-thaw cycles.
Professionalism: Observe their communication from the first phone call. They should provide written estimates on company letterhead and have a clear, transparent payment schedule, avoiding large upfront deposits.
At Gerrior Masonry & Landscape Construction, we believe in transparency. Our commitment to excellence extends to all our hardscaping services, from simple walkways to complex multi-level patios.
Key Questions to Ask Potential Installers
Are you licensed and insured, including worker’s compensation?Why it matters: This protects you from liability for accidents or property damage that may occur on your premises.
Do you use insured subcontractors?Why it matters: You need to know exactly who is on your property and ensure that every individual working on the project is covered by insurance.
Can you provide references and a portfolio?Why it matters: This allows you to verify their work quality and customer satisfaction by speaking with people who have had similar work done.
What is the estimated project timeline?Why it matters: This helps you plan your schedule. A typical project takes 3-5 days for installation, plus 1-2 days for sealing and drying, depending on weather conditions.
What is your payment schedule?Why it matters: Be wary of contractors demanding large upfront deposits. Payments should align with project milestones, such as completion of excavation or delivery of materials.
Do you provide a warranty on your work and materials?Why it matters: A warranty shows confidence in their craftsmanship. Look for at least a two-year workmanship guarantee in addition to the manufacturer’s material warranty.
How do you handle change orders or unexpected issues?Why it matters: A clear process ensures any changes to the project scope or cost are documented and approved by you before the work proceeds.
How does the Massachusetts climate affect paving materials?Why it matters: A knowledgeable contractor will explain how their installation process, including sub-base depth and jointing sand choice, accounts for the local environment.
Understanding Block Paving Costs and Timelines
Please note that the costs provided here are national averages based on internet data and are not actual costs for Gerrior Masonry services. Actual pricing will vary based on your project details, site conditions, and material choices.
Typical Cost of Block Paving Installation:
While asphalt driveways cost about $7 to $15 per square foot, block paving is a more durable, premium option. You can anticipate costs to be in a higher range, potentially $10 to $30 per square foot or more, reflecting the labor-intensive nature of the work.
Factors Influencing the Price:
Paver Material: Standard concrete pavers cost less than natural stone, clay bricks, or custom-designed blocks with specialized finishes.
Project Size: Larger areas may have a lower per-square-foot cost due to economies of scale, but a higher overall price.
Design Complexity: Simple rectangular patterns are less expensive than intricate designs like herringbone, circular patterns, or custom borders.
Site Preparation: The need for extensive excavation, grading, or complex drainage solutions will add to the cost. Proper site prep is vital for longevity. See our excavation services for more.
Accessibility: Difficult site access for heavy machinery can increase labor costs and extend the project timeline.
Installation Timeline:
A project’s timeline depends on size and complexity. Simple patterns may take three days, while complex designs can take four to five days. Sealing adds one day, plus up to two days to dry. A typical project can take 5 to 10 days from start to finish. For seamless integration with your yard, consider our landscape design and installation services.
The Block Paving Process and Long-Term Value
Understanding the installation process helps you appreciate the craftsmanship involved in a quality block paving job. Each step is crucial for creating a durable surface that can withstand the weight of vehicles and the movement of the earth.
From Design to Completion: The Installation Steps
A professional installation follows a precise multi-stage process designed for maximum longevity:
Design and Preparation: We work with you to finalize the design, paver type, color, and pattern. The area is then cleared and marked, and we check for any buried utility lines to ensure safety.
Excavation: The ground is excavated to the required depth (typically 8-12 inches) to create a stable foundation. Removing organic matter like soil and roots is essential to prevent future settling. Our team is well-versed in safe excavation services.
Sub-Base Installation: A layer of crushed aggregate is laid and compacted in stages. This is the backbone of your paved surface, providing the necessary strength and allowing for proper drainage beneath the pavers.
Edge Restraints and Sand Bedding: Edge restraints are installed to prevent the pavers from spreading outward over time. A layer of sharp sand is then spread and leveled to create a perfectly flat bed for the pavers to sit on.
Laying Pavers: Our skilled masons carefully lay the individual blocks in your chosen pattern, ensuring tight, consistent joints and maintaining the correct lines throughout the project.
Jointing and Compaction: Polymeric or dry jointing sand is swept into the gaps, and a vibrating plate compactor locks the pavers together into a solid, interlocked surface that resists movement.
Sealing (Recommended): A high-quality sealant can be applied to protect the blocks from oil stains, improve color vibrancy, and prevent weed growth between the joints.
Signs of Quality Work:
A smooth, even surface with no dips, bumps, or tripping hazards.
Tight, consistent joints between blocks that are fully filled with sand.
Proper drainage with a slight pitch to ensure no water puddles on the surface.
Secure, heavy-duty edges that prevent any lateral paver movement.
A clean site with all debris removed upon project completion.
Durability, Maintenance, and Other Considerations for Block Paving Installers Near Me
Block paving is a long-term investment for any Massachusetts homeowner, offering a blend of beauty and resilience that other materials simply cannot match.
Longevity and Maintenance:
When properly installed by experts, block paving can last for 30 years or more, often outliving asphalt by a significant margin. To keep it looking its best:
Cleaning: Sweep regularly to remove debris and wash periodically with a mild detergent to prevent grime buildup.
Re-sanding: Every few years, sweep new jointing sand into the gaps to maintain the structural interlock and deter weeds from taking root.
Sealing: Reapplying a sealant every 3-5 years protects the pavers from UV damage, stains, and the harsh effects of winter salt.
Climate Considerations for Massachusetts:
Block paving is exceptionally well-suited for our region’s freeze-thaw cycles. The flexible joints between pavers allow for slight movement as the ground freezes and thaws, significantly reducing the risk of cracking that affects rigid surfaces like poured concrete. For properties with drainage issues, permeable pavers are an excellent, environmentally friendly solution. They allow rainwater to filter directly into the ground, reducing runoff and replenishing groundwater levels on your property.
To help you visualize the advantages, here’s a table highlighting some key features and benefits of block paving for informational purposes only:
Feature
Benefit for Homeowners
Durability
Withstands heavy traffic, long lifespan, minimal cracking
Aesthetics
Wide range of colors/patterns, customizable designs
Flexibility
Resists freeze-thaw cycles, easy to repair individual blocks
Maintenance
Simple cleaning, re-sanding, and occasional sealing
At Gerrior Masonry & Landscape Construction, we are passionate about creating stunning and resilient outdoor spaces that our clients can enjoy for a lifetime. If you’re ready to transform your outdoor living area with a beautiful and durable paved surface, we invite you to get a quote for your patio project today. Our team is ready to bring your vision to life with the highest level of craftsmanship.
Gerrior Masonry & Landscape Construction is based in Woburn, MA, and proudly services Middlesex and Essex County, Massachusetts.
Why Outdoor Kitchens Are Changing Lexington Backyards
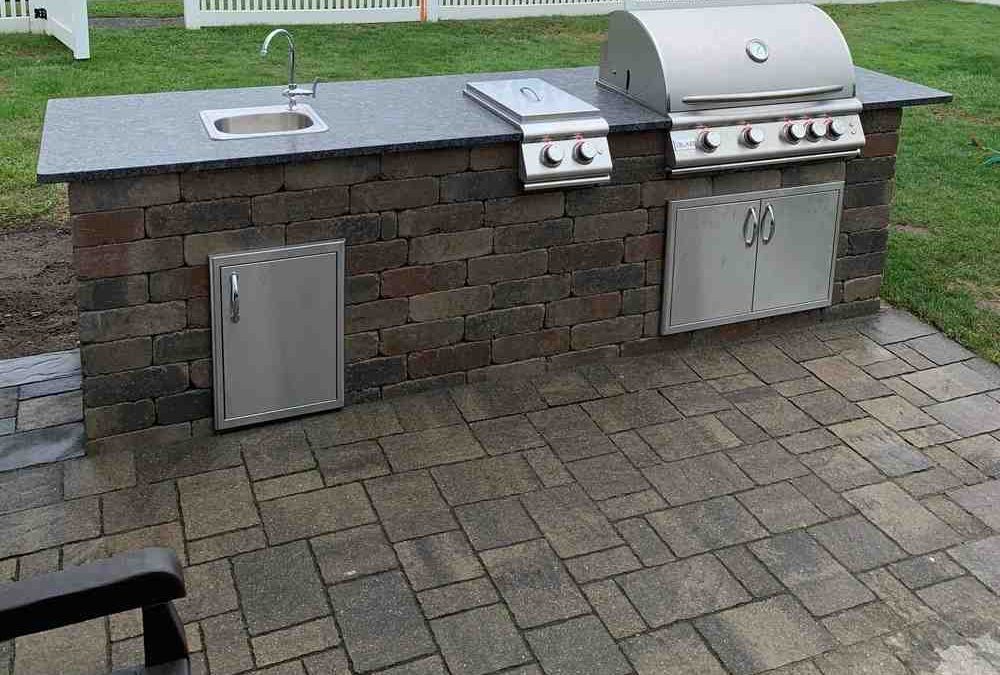
An Outdoor kitchen Lexington MA homeowner installs transforms their backyard into a year-round entertainment hub. It’s an additional “room” for entertaining that combines New England outdoor living with serious cooking capability, from simple grill stations to full kitchens with pizza ovens and beverage centers. The right design brings restaurant-quality cooking and comfortable gathering spaces right to your property.
Quick Answer: What Makes a Great Outdoor Kitchen in Lexington, MA?
Best Materials: Granite or soapstone counters, stainless steel appliances, and natural stone veneer for durability in freeze-thaw cycles.
Key Benefits: Expanded living space, increased home value, and improved entertaining capability.
Average Investment: $5,000 to $50,000+ depending on size, materials, and features.
Local Requirements: Building permits are required for structures with utilities.
Why Lexington Homeowners Choose Outdoor Kitchens
Outdoor kitchens add value and appeal to potential buyers while enhancing your quality of life. In Lexington’s climate, choosing the right materials is critical. Granite, stainless steel, and natural stone handle hot summers and freezing winters without warping or corroding. Smart landscape design can add shade with pergolas and privacy with hardscape integration.
I’m Joe Gerrior, owner of Gerrior Masonry & Landscape Construction Corp. For over 34 years, our team has designed and installed countless outdoor kitchen Lexington MA projects that combine beautiful masonry with practical functionality for New England’s climate. We help homeowners transform ordinary backyards into outdoor living spaces that become the heart of family gatherings.
Designing Your Dream Outdoor Kitchen in Lexington MA
This section guides you through planning, from choosing features and materials to understanding local trends. We design with New England’s climate in mind, ensuring your investment is beautiful, functional, and built to last for years.
Essential Components for a Functional Outdoor Kitchen
A great outdoor kitchen starts with a list of must-haves organized by zones: cooking, prep, cleanup, and storage. Select components that support how you cook and host.
Grill: A built-in or drop-in model sized for your needs.
Countertops: Generous, heat- and stain-resistant surfaces.
Storage: Weather-safe cabinets for tools and platters.
Sink: Hot/cold water for cleanup.
Refrigeration: For beverages and food safety.
Lighting: Task lighting for cooking and ambient lighting for safety.
Upgrades: Consider side burners, a smoker, pizza oven, or beverage center.
Choosing Weather-Resistant Materials for the New England Climate
Lexington’s climate demands materials that resist moisture, temperature swings, and UV damage.
Countertops
Granite: Durable and stays cool, but requires sealing.
Soapstone: Non-porous and heat-tolerant with a matte look.
Sealed Concrete: Customizable and modern, but needs professional sealing for durability.
Cabinetry and Doors
Stainless Steel: Excellent corrosion resistance (316 grade is best for coastal areas).
Marine-Grade Polymer (HDPE): Won’t rot or delaminate.
Structure and Facings
Natural Stone Veneer: A timeless look that withstands weather.
Brick and Block: Classic durability for bases and walls.
We often use natural stone veneer with bluestone or granite counters for a classic New England aesthetic that performs year-round. Explore our masonry services to see what works for your site.
Popular Design Trends for an Outdoor Kitchen in Lexington MA
Current trends focus on flow, flexibility, and four-season use:
Seamless Indoor-Outdoor Flow: Aligning the outdoor kitchen with the indoor one, often using a pass-through window.
Multi-Functional Islands: Combining bar seating with prep space to encourage interaction.
Shade Structures: Pergolas or pavilions extend usability and define the space.
Integrated Seating: Built-in seat walls and benches create a natural gathering area.
Fire Features: Pairing the kitchen with Outdoor fire pits creates an all-evening destination.
Smart Tech: LED lighting, Wi-Fi temperature probes, and app-controlled smokers.
Walkthrough: We test every component and share care tips before your first cookout.
A typical build takes 2–4 weeks after design and permitting, depending on scope.
Budgeting and Permits for Your Outdoor Kitchen in Lexington MA
Cost Factors: The final investment depends on size, complexity, materials, appliances, utilities, and site work.
Average Investment: Please note: The following are average cost ranges based on general online data for planning purposes and do not represent a formal quote or actual costs for Gerrior Masonry & Landscaping services.
Value and ROI: Outdoor kitchens are a top-requested upgrade that adds significant appeal and value for future buyers, with many homeowners recouping a substantial portion of their investment.
Permits and Local Requirements: Projects in Lexington involving gas, electrical, or plumbing require permits. Key considerations include frost-depth footings (48 inches), utility permits, and adherence to property setbacks. For current requirements, see the Lexington, MA Licenses & Permits information.
How an Outdoor Kitchen Lifts Daily Life in Lexington
A well-planned outdoor kitchen delivers everyday benefits beyond just great food:
Expands your usable living space without a full addition
Moves cooking heat and mess outdoors during summer
Makes weeknight dinners and weekend hosting easier
Becomes the natural gathering spot for family and friends
Creates a visual focal point that anchors your backyard design
We design for a smooth workflow, convenient storage, and effective lighting, so you’ll use your kitchen more often.
Practical Planning Tips We Share With Every Client
Start with the menu: Your cooking style dictates layout. Grilling and smoking need airflow and staging counters; pizza ovens need clear landing zones and peel access.
Keep the hot zone safe: Separate seating from high-heat appliances and traffic paths.
Choose light-colored countertop finishes in full sun: They stay cooler to the touch.
Plan for shade and wind: A pergola or a well-placed wall can make June through October more comfortable.
Think winterization: Quick-drain plumbing, appliance covers, and shutoff valves make seasonal transitions painless.
Lighting layers: Task lights for cooking; warm ambient lighting for diners; subtle step and path lighting for safety.
Real-World Material Choices We Trust In MA
Stone veneer bases paired with granite or bluestone counters—classic, durable, and quintessentially New England.
Stainless steel doors/drawers for secure, weather-ready storage.
Marine-grade polymer in hidden storage runs where hose bibs or winterization access is needed.
Sealed concrete counters for a modern touch, especially under covered zones.
Fire brick and refractory materials for wood-fired ovens.
Lighting: Small Choices, Big Impact
Lighting supports safety and ambiance—and it’s where smart choices multiply usability.
Task lighting over grill and prep surfaces
Under-counter and toe-kick lighting for orientation
Warm ambient lighting at dining and bar areas
Step and path lighting to guide guests back to the house
Dimmers and smart controls to set the mood (and save energy)
Frequently Asked Questions About Outdoor Kitchens in Lexington, MA
How far should the kitchen be from the house?
Typically 10–20 feet from the nearest door to balance convenience with safe ventilation.
Can we build on an existing patio?
Often, yes, if it has proper structural support. We may need to reinforce or expand it, which we’ll assess during a site visit.
Gas or propane?
Both are great options. Natural gas is convenient, while propane offers flexibility. We’ll review the code and performance factors for your project.
What about Lexington winters?
We design for winter with frost-depth footings, sealed materials, and simple winterization for plumbing. With proper covers, your kitchen will be ready each spring.
Can you integrate a fire pit?
Absolutely. Pairing a kitchen with a fire feature creates a complete outdoor living room.
Example Layouts That Work Beautifully Here
Compact Grill Station (urban lots or side yards)
5–8 ft station with built-in grill, drawers, and landing counter; optional narrow beverage fridge.
L-Shape With Bar Seating (most suburban lots)
Cook zone on the short leg; prep, sink, and seating on the long leg; keeps foot traffic out of the hot zone.
Island + Back Wall (entertainer’s favorite)
Back wall for grill/smoker/refrigeration; facing island for prep and serving with bar seating for 4–6.
Pizza-Focused Nook
Corner placement for oven with a dedicated prep counter, peel storage, and adjacent herb planter—yes, you can grow basil right there.
Maintenance: Keeping Your Kitchen Looking New
Wipe counters after use; use trivets and cutting boards
Reseal stone and concrete per manufacturer guidance (often annually)
Cover appliances when not in use for extended periods
Winterize water lines and drain appliances before first freeze
Clean burners and check igniters at season start
Small habits extend the life and good looks of your outdoor investment.
Your Next Steps
Gather inspiration: Save photos of kitchens you love—materials, layouts, must-have appliances.
Define the menu and guest list: It shapes layout, seating, and appliance choices.
Consider the setting: Sun/wind patterns, existing patio grades, and view lines.
Set a planning budget: Use the ranges above for ballpark thinking.
Talk to us early: We’ll help you refine scope, avoid pitfalls, and hit the season you’re targeting.
Partner with Lexington’s Outdoor Living Experts
A well-designed outdoor kitchen is an investment in your home and lifestyle that creates a favorite gathering spot for years. The team at Gerrior Masonry & Landscaping has over 30 years of experience crafting durable and stunning hardscape projects to ensure your vision becomes a reality. Ready to start planning? Contact a masonry contractor in Lexington, MA for a consultation. Gerrior Masonry & Landscape Construction is based in Woburn, MA, and services Middlesex and Essex County, Massachusetts.
We look forward to building the kind of Outdoor kitchen Lexington MA homeowners love—beautiful, durable, and unforgettable. Now, who’s bringing the pizza dough?
Why a Dry Basement Matters: Understanding the Basics
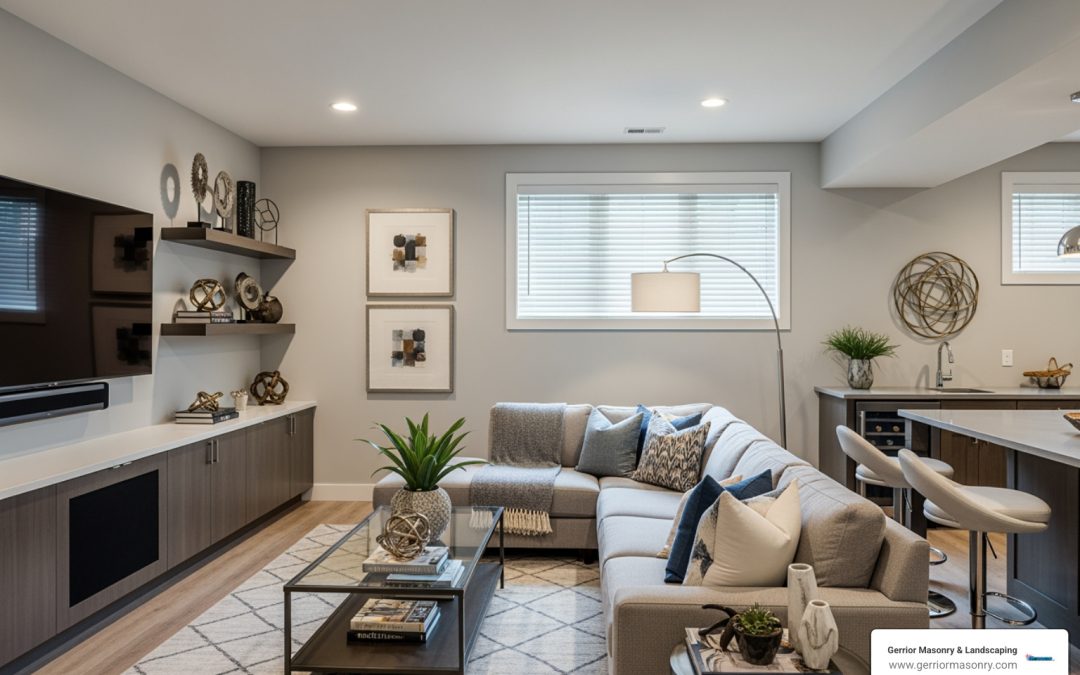
Basement Waterproofing near me is the process of preventing water from entering your basement. It’s crucial for protecting your home’s foundation, preventing mold, and creating safe, usable living space. A wet basement is more than an inconvenience; it’s a threat to your home’s structural integrity and your family’s health, leading to wood rot, foundation damage, and decreased property value.
Common signs your basement needs waterproofing:
Musty odors or visible mold
Damp spots or water stains on walls
Peeling paint or wallpaper
White powdery residue (efflorescence)
Cracks in foundation walls or floors
Standing water after rain
Solutions range from simple drainage improvements to comprehensive interior and exterior systems. I’m Joe Gerrior, owner of Gerrior Masonry & Landscape Construction Corp. For over 34 years, we’ve helped Massachusetts homeowners protect their properties with expert Basement Waterproofing, foundation repairs, and drainage solutions. This guide will help you understand your options.
A Homeowner’s Guide to Basement Waterproofing Solutions
Dealing with a wet basement can be overwhelming. Understanding the common causes and effective solutions is the first step to protecting your home.
Common Causes and Proactive Prevention
Water enters basements through the path of least resistance. Common causes include:
Hydrostatic Pressure: Water in saturated soil pushes against your foundation, forcing its way through cracks and porous concrete.
Foundation Cracks: Settling or improper curing can create cracks that act as direct entry points for water.
Poor Yard Grading: If your yard slopes toward your house, it funnels water directly to your foundation.
Clogged Gutters & Downspouts: Overflowing gutters or short downspouts dump water right next to your foundation, saturating the soil.
Window Well Leaks: Poorly drained window wells can fill with water and leak into the basement.
Failed Weeping Tiles: Damaged or clogged perimeter drains fail to divert groundwater, increasing pressure on your walls.
Proactive prevention is your first line of defense. Ensure your yard is graded to slope away from the foundation (at least six inches over 10 feet). Keep gutters clean and extend downspouts at least 15 feet away from the house. For properties with significant slopes, professionally installed drainage systems like swales can redirect water flow effectively.
Interior Basement Waterproofing: Managing Water from the Inside
When exterior prevention isn’t enough, interior solutions manage water that has already entered your basement. While exterior waterproofing prevents water from reaching the foundation, interior methods collect and remove it.
Interior Drainage Systems & Sump Pumps: An interior French drain (perforated pipe under the floor) collects water and channels it to a sump pit. A sump pump then automatically pumps the water out and away from your home. Sump pumps can be submersible (quieter, more powerful) or pedestal (easier maintenance). A battery backup pump is essential for protection during power outages.
Waterproofing Paints & Vapor Barriers: Products like DRYLOK
e or plastic sheeting can help manage minor dampness and humidity. However, they are a temporary fix and do not address the root cause of water intrusion. They can trap moisture against the foundation, potentially worsening structural issues or mold growth over time.
Foundation Crack Injections: For cracks in poured concrete, this is a highly effective solution. Polyurethane is injected into the crack, where it expands to create a flexible, watertight seal. For structural issues, epoxy injections are used to mend the crack and restore strength. Learn more about foundation repair here.
Exterior Waterproofing: Stopping Water at the Source
Exterior waterproofing is the most comprehensive and effective method because it stops water before it can even touch your foundation walls. The process is intensive, involving excavation of the soil around the entire foundation perimeter, down to the footing. Once exposed, the foundation walls are thoroughly cleaned to remove all dirt and old coatings. Any cracks or damage are then repaired to create a smooth, solid surface.
Next, a waterproof membrane, typically a seamless, polymer-based liquid that cures into a rubber-like barrier, is applied. This membrane is impenetrable to water. For added protection and drainage, a dimpled drainage mat is installed over the membrane. This creates an air gap, allowing any moisture to drain down freely to the new exterior French drain (weeping tile) installed at the base of the footing.
This pipe collects the groundwater and diverts it away from the foundation, often to a storm sewer or a dry well. Finally, the excavated area is carefully backfilled with gravel and soil, and the ground is graded away from the house. While it is the most expensive option, this method is the only one recognized by the U.S. International Building Code (IBC) as adequate to prevent structural damage from water, offering the highest level of long-term protection.
The Cost and Longevity of Waterproofing Solutions
Costs vary widely based on the method, home size, and severity of the problem. The ranges below are average estimates based on internet data only and are not actual prices for Gerrior Masonry & Landscape Construction services. Always request a customized quote for your specific project.
Crack Injections: About $600–$5,000+ per crack, depending on size, access, and whether structural repairs are needed.
Sump Pump Installation: About $800–$6,000+ depending on pump type, pit construction, discharge routing, and backup system.
Interior Drainage System: About $2,500–$20,000+ based on basement size, system design, and discharge setup.
Exterior Waterproofing: About $8,000–$40,000+ depending on excavation depth, access, soil conditions, and foundation size.
Note: All cost ranges shown are broad averages sourced from general internet data and are not specific quotes or pricing for Gerrior Masonry & Landscape Construction services.
Longevity also varies. DIY sealants may only last 1–5 years. Professionally installed interior drainage systems can last 10–25 years with regular sump pump maintenance. Comprehensive exterior waterproofing is the most durable solution, often lasting 20–50 years or more, protecting your home for decades. Regular maintenance, such as cleaning gutters and ensuring proper grading, is essential for all systems.
Making the Right Choice for Your Home’s Future
Choosing the right Basement Waterproofing solution is an investment in your home’s health and value. It’s important to know when a DIY approach is sufficient and when to call a professional.
DIY vs. Hiring a Professional: When to Call the Experts
Some minor tasks can be handled by homeowners, but most water issues require professional expertise for a lasting solution.
Suitable DIY Tasks:
Cleaning gutters and extending downspouts.
Improving minor yard grading issues.
Applying waterproof paint for minor dampness (as a temporary measure).
When to Call a Professional:
For any significant water intrusion or flooding.
To repair foundation cracks (especially structural ones).
To install interior drainage systems and sump pumps.
For any exterior waterproofing involving excavation.
If you have persistent musty odors or mold.
Attempting complex repairs yourself can worsen the problem, cause structural damage, and lead to higher costs later. A professional contractor like Gerrior Masonry & Landscaping provides an accurate diagnosis, uses quality materials, and offers warranties for their work. When in doubt, find a waterproofing professional to ensure the job is done right.
The Long-Term Value of a Dry Basement
Investing in professional Basement Waterproofing offers significant returns. It increases your home’s value, as buyers are wary of water issues—basement flooding may put a damper on your home sale. It also improves indoor air quality by eliminating the damp conditions where mold and mildew thrive, protecting your family’s health. A dry basement provides peace of mind, knowing your home is protected from water damage.
To help maintain a dry environment, consider using a dehumidifier to keep humidity below 50%, ensure proper ventilation, and promptly fix any leaky pipes.
At Gerrior Masonry & Landscape Construction, we have dedicated over three decades to providing expert Basement Waterproofing solutions. Our owner oversees every project, ensuring our skilled team delivers exceptional results that stand the test of time.
Gerrior Masonry & Landscape Construction is based in Woburn, MA, and proudly serves communities throughout Middlesex and Essex County, Massachusetts.
Contact us for a consultation today, and let us help you find the right Basement Waterproofing solution for your home.
A base for flagstone walkway is the single most important factor determining whether your stone path will last for decades or fail within a few years. Here’s what you need to know:
Quick Answer: Best Base for Flagstone Walkways
Recommended System: 3-4 inches of compacted crushed gravel (sub-base) + 1-2 inches of stone dust (setting bed).
Total Excavation Depth: 6-8 inches below finished grade.
Best Materials: Crushed stone for drainage and stability; stone dust for setting irregular flagstone.
Critical Step: Proper compaction of each layer to prevent settling.
Many homeowners overlook what lies beneath their beautiful stone path. A flagstone walkway is only as stable as its foundation. Without a properly prepared base, stones will shift, settle, and crack—especially in Massachusetts, where freeze-thaw cycles test every outdoor installation.
A strong, stable base is crucial. Native soil alone won’t provide the stability needed to resist frost heave and prevent settling. The solution is a multi-layered system that promotes drainage and keeps your stones level year after year.
I’m Joe Gerrior, owner of Gerrior Masonry & Landscape Construction Corp. With over 34 years of experience installing flagstone walkways throughout Massachusetts, I’ve learned which methods stand the test of time. A proper foundation isn’t just about following steps—it’s about understanding why each layer matters, especially in our region’s climate.
Step-by-Step: Building the Perfect Base for a Flagstone Walkway
Building a flagstone walkway is a rewarding project, but its longevity depends almost entirely on the quality of its base for flagstone walkway. Think of it as the invisible hero of your hardscaping project.
Site Preparation and Excavation
The journey to a durable flagstone walkway begins with meticulous site preparation. This phase sets the stage for a stable, long-lasting path, especially in the challenging climate of Middlesex and Essex County, Massachusetts.
Marking the Path
First, plan the layout, considering foot traffic and landscape integration. A garden hose or stakes and string can help visualize the path. We recommend a width of at least two feet for a single person and three feet for two people or moving garden equipment.
Calculating Excavation Depth (6-8 inches total)
A common question is, “How deep do I dig?” The answer is 6 to 8 inches below the final grade. This depth accommodates the sub-base, the setting bed, and the flagstone itself. For durability, use flagstones that are at least 1.5 to 2 inches thick and factor this into your total depth.
Soil Conditions and Drainage
The native soil in areas like Woburn, MA, impacts base preparation.
Clay Soil: Holds water, increasing the risk of frost heave. Deeper excavation or extra drainage may be needed. As experts at Fine Homebuilding note, proper drainage is key to preventing heaving.
Sandy Soil: Drains well but can be less stable, making thorough compaction essential.
The goal is to remove all loose topsoil and reach a hard-packed subgrade.
Ensuring a Proper Slope
Water is the enemy of hardscaping. A flat walkway invites pooling, erosion, and instability. We always build a slight slope (or pitch) of about 1/4 inch per foot, directing water away from structures. For more on water management, see our guide on The Importance of Proper Drainage in Hardscaping and Masonry Projects.
Why Native Soil is Not a Suitable Base
Relying on native soil alone will lead to settling, weed growth, poor drainage, and pest infestations. The expansion and contraction from moisture and freeze-thaw cycles will quickly ruin your walkway. That’s why a robust, engineered base system is non-negotiable.
Choosing Materials for Your Flagstone Walkway Base
The right materials are critical for a base that can withstand New England’s climate. We select materials for excellent drainage, compaction, and a firm foundation.
Gravel (Crushed Stone) for the Sub-Base
Crushed stone is the workhorse of a flagstone walkway base. We use 3/4-inch crushed stone with fines (crusher run) for the sub-base layer.
Pros: The angular pieces interlock when compacted, creating a stable, load-bearing layer. It also provides excellent drainage, which is vital for preventing frost heave during Massachusetts winters. A gravel base is flexible, allowing it to accommodate slight ground movement without the catastrophic cracking seen in rigid systems.
Cons: It must be thoroughly compacted in layers to achieve stability. Avoid rounded pea gravel, as it doesn’t lock together.
Sand vs. Stone Dust for the Setting Bed
The setting bed is the 1-2 inch layer directly beneath the flagstones.
Sand: While easy to level, sand has significant drawbacks. It can be washed away by rain, provides an inviting home for ants, and can lead to settling over time, especially with irregular flagstones.
Stone Dust (Quarry Screenings): We strongly recommend stone dust for the setting bed. When wet and compacted, its fine particles bind together almost like a natural cement, creating a much firmer bed than sand. It resists washout, deters ants, and is ideal for leveling flagstones of varying thicknesses.
Cement/Mortar-Set Base: A Word of Caution
While setting flagstone in concrete or mortar provides initial stability, we generally advise against it for walkways in our climate.
Pros: Creates a rigid, uniform surface.
Cons: The biggest drawback is the risk of cracking. In a region with freeze-thaw cycles, a rigid concrete base is almost guaranteed to crack over time. Repairs are difficult and expensive. A dry-laid system with a gravel sub-base and stone dust setting bed offers superior long-term performance and easier maintenance for most residential projects. Our team at Gerrior Masonry & Landscaping is expert in all types of Hardscaping and can help you choose the best approach for your needs.
Installation and Leveling: Setting the Base for a Flagstone Walkway
With the area excavated and materials chosen, the construction begins. Precision in this phase ensures the stability of your finished walkway.
Installing the Sub-Base (3-4 inches of gravel)
First, lay a high-quality landscape fabric over the excavated subgrade to block weeds and prevent the gravel from mixing with the soil. Next, spread a 3 to 4-inch layer of crushed gravel evenly across the area.
The Critical Role of Compaction
Compaction is the most vital step for a long-lasting base. Without it, materials will settle, and your walkway will become uneven. We apply gravel in 2-inch “lifts” (layers), compacting each one thoroughly before adding the next. For small paths, a hand tamper is sufficient; for larger projects, a plate compactor is more efficient. The goal is a firm surface you can walk on without leaving deep footprints.
Adding the Setting Bed (1-2 inches of stone dust)
On top of the compacted gravel, spread a 1 to 2-inch layer of stone dust. This is the bed where your flagstones will rest. Use a straight 2×4 to screed (level) the surface, maintaining the drainage pitch you established during excavation.
Leveling Individual Stones with a Rubber Mallet
This is where the artistry comes in.
Placement: Lay the flagstones, flattest side up, fitting them together like a puzzle with consistent joint spaces (about 1/2 to 1 inch).
Leveling: Place a stone on the setting bed and use a long level to check it.
Adjustment: If a stone is too high, gently tap it down with a rubber mallet. If it’s too low, lift it, add a small amount of stone dust underneath, and reset it. This process is repeated for every stone to create a stable, even surface.
The final steps lock your flagstones in place and give the walkway a polished look.
Joint Filler Options
The material between your stones is crucial for stability.
Stone Dust (Recommended): Our preferred choice for both the setting bed and joints. It compacts tightly, resists washout, deters ants, and prevents weeds. To apply, sweep the dust into the joints, gently water to settle it, and add more if needed after it dries.
Sand: Prone to washing out, attracting ants, and allowing weed growth. We generally advise against it for wider, irregular flagstone joints.
Polymeric Sand: We do not recommend polymeric sand for most flagstone applications. While it hardens to resist weeds, it is a rigid material that often cracks and fails in our freeze-thaw climate. Repairs are difficult, and it can stain the surface of your flagstones. The flexible stability of stone dust is a far better long-term solution.
Preventing Weeds and Ants
Our two-pronged attack against pests and weeds is the combination of landscape fabric underneath the base and densely compacted stone dust in the joints. The fabric provides a physical barrier from below, while the stone dust creates a hostile environment for germination and nesting on the surface.
Installing Proper Stone Walkway Edging
Edging is not just aesthetic; it’s a critical structural component that contains the base materials and prevents stones from shifting. Options include steel, plastic, or a border of stones set in a deeper trench. Proper Stone Walkway Edging is essential for locking the entire system together.
Conclusion: Build a Walkway That Lasts a Lifetime
Crafting an enduring flagstone walkway comes down to the quality of its base for flagstone walkway. A well-built base is a long-term investment in your property’s beauty and functionality.
The key takeaways are:
Excavate Deeply: A 6-8 inch depth is required for a proper base.
Prioritize Drainage: A slight slope and permeable materials are crucial to combat freeze-thaw cycles.
Choose the Right Materials: Use crushed gravel for the sub-base and stone dust for the setting bed and joints for superior stability.
Compact Diligently: Thoroughly compact every layer to prevent settling.
Finish Strong: Use proper joint filler and edging to protect your investment.
While DIY can be rewarding, achieving a professional finish that withstands the Massachusetts climate requires experience. At Gerrior Masonry & Landscape Construction, we pride ourselves on building hardscaping that lasts. With over 30 years of experience and owner oversight on every project, our team ensures your walkway is a source of pride for decades.
Whether you’re envisioning a winding garden path or a stately entrance, explore our services for Walkways & Stairs and let us create a masterpiece for your property.
Gerrior Masonry & Landscape Construction is based in Woburn, MA, and services Middlesex and Essex County, Massachusetts.
 of 1 inch per 12 inches of height - brick retaining wall ideas infographic")


, payment terms (avoid upfront deposits), and project timelines; Step 6 - Check references from previous customers and visit completed projects if possible - block paving installers near me infographic step-infographic-4-steps")


, 3-4 inches of crushed gravel sub-base layer, 1-2 inches of stone dust or sand setting bed, and 1.5-2 inch thick flagstone on top, with labels indicating proper drainage slope and total excavation depth of 6-8 inches - base for flagstone walkway infographic")

