Why Installing a Paver Patio Is One of the Best DIY Projects You Can Take On
Installing a paver patio is a rewarding weekend project that can transform your backyard into a functional outdoor living space — and it’s more achievable than most homeowners think.
Here’s the quick overview of how to install a paver patio:
Plan and measure your patio area, then mark it with stakes and string
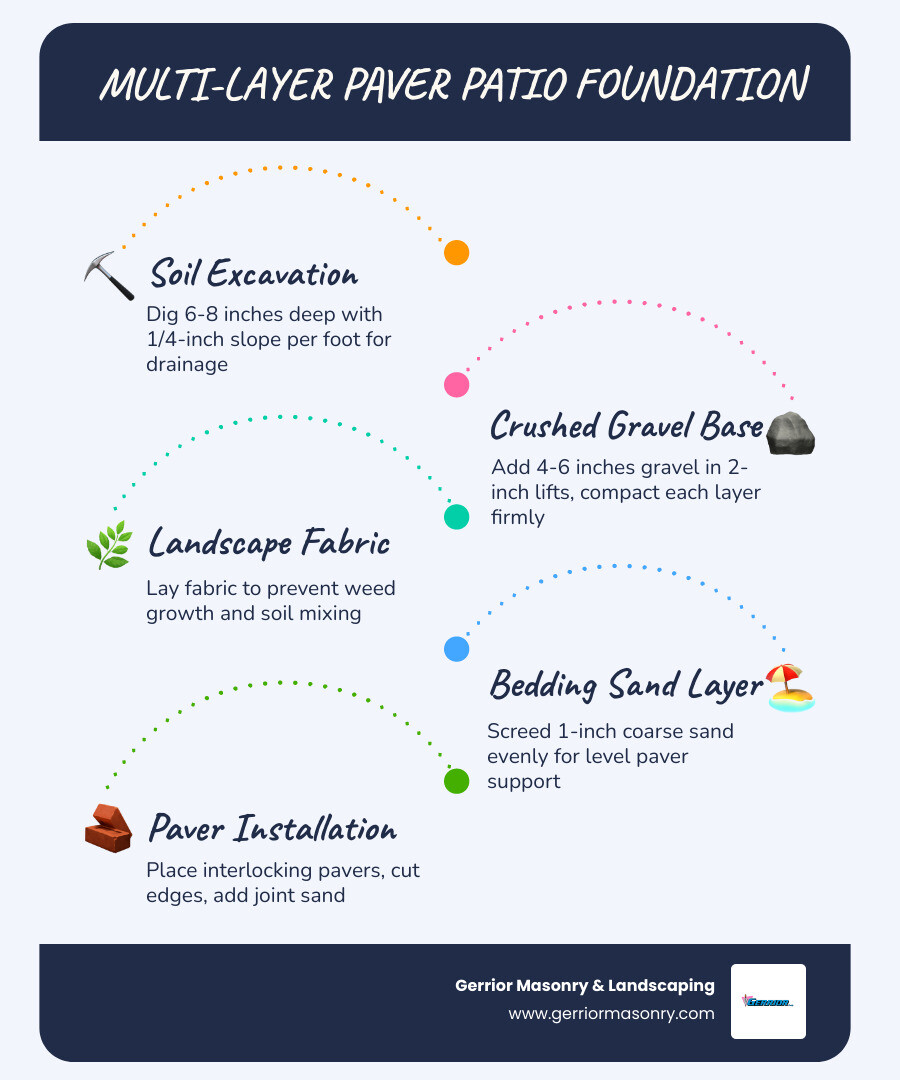
Excavate 6-8 inches of soil to make room for base layers
Lay landscape fabric, then compact 4-6 inches of crushed gravel in 2-inch lifts
Screed a 1-inch layer of coarse bedding sand until level
Lay pavers in your chosen pattern, starting from a straight edge
Cut pavers to fit edges using a masonry saw
Install edge restraints to prevent shifting over time
Sweep polymeric sand into joints, compact, and mist to set
A properly built paver patio can last 30 years or more with minimal upkeep. DIY material costs typically run $500-$1,500 for a 10×10 foot patio — a fraction of professional installation prices.
The key to success? It all comes down to what’s underneath the pavers. A solid, well-compacted base is what separates a patio that lasts decades from one that shifts and sinks after the first New England winter.
I’m Joe Gerrior, owner of Gerrior Masonry & Landscape Construction Corp., with over 34 years of hardscaping experience — including hundreds of installing paver patio projects across Massachusetts. In this guide, I’ll walk you through every step so you can build it right the first time.
Relevant articles related to installing paver patio:
The Essential Guide to Installing Paver Patio Success
Success in installing paver patio surfaces isn’t about how fast you can lay the bricks; it’s about the patience you show during the “invisible” phases. If you’ve ever walked across a patio that felt like a roller coaster under your feet, you’re looking at a project where someone skipped the foundation steps.
In places like Woburn, Burlington, and Lexington, our soil goes through a brutal freeze-thaw cycle. Water in the ground expands by about 10% when it freezes, which can easily heave a poorly installed patio. To prevent this, your excavation depth and soil stability are non-negotiable.
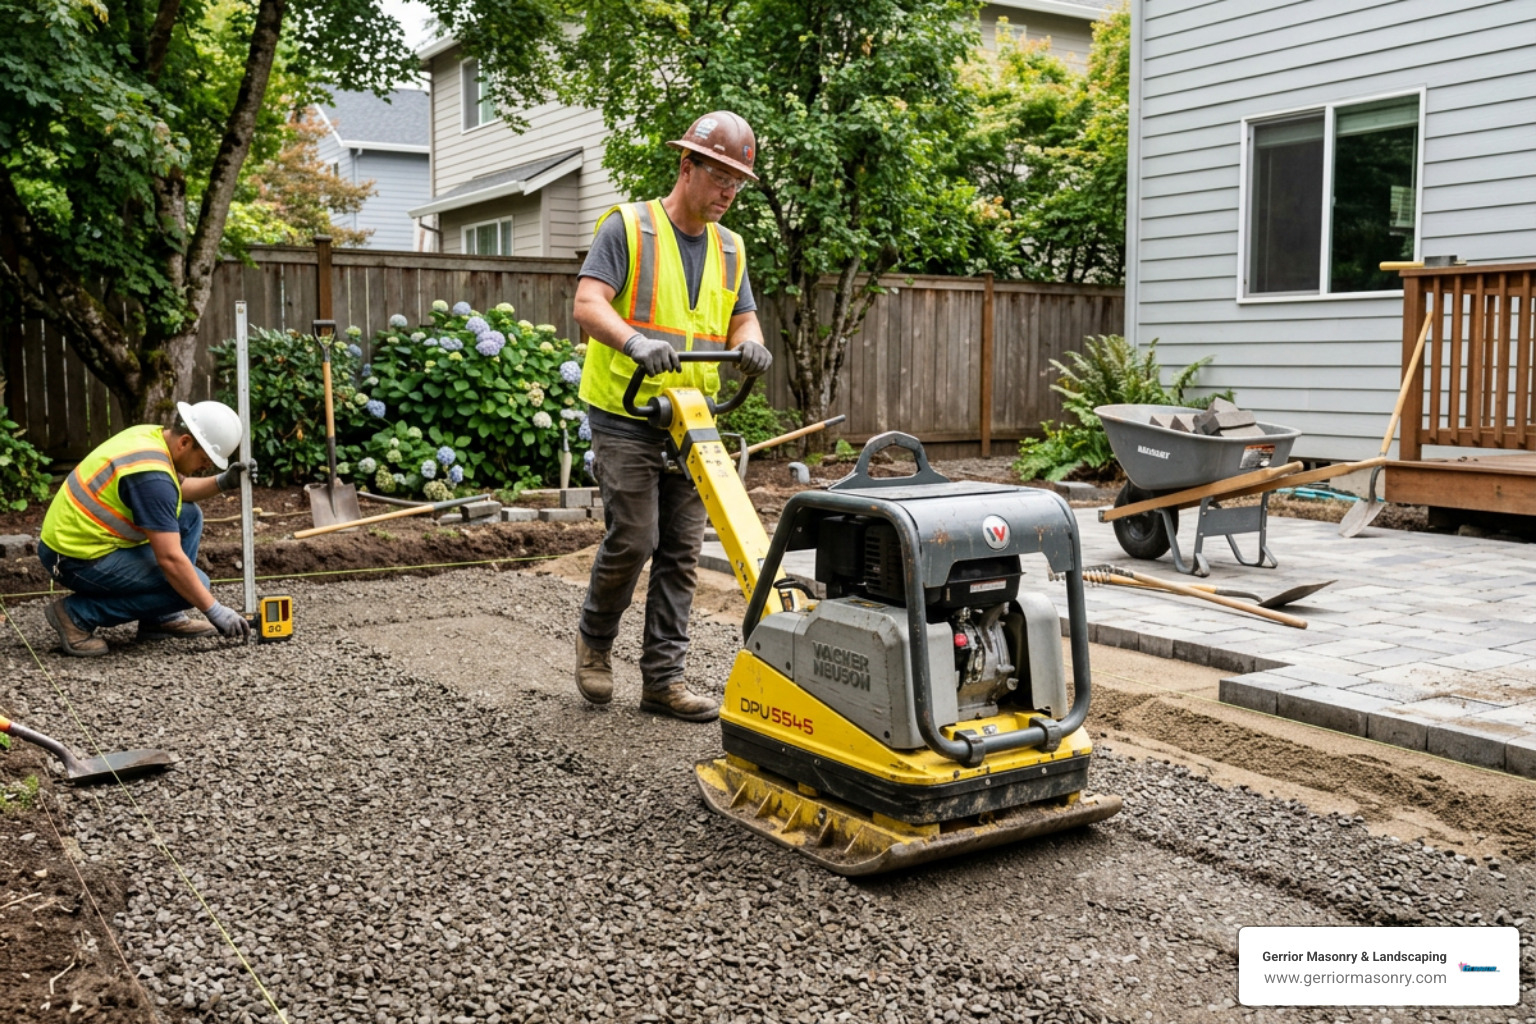
One of the most important pieces of equipment you’ll use is a plate compactor. While a hand tamper might work for a tiny 2×2 landing, anything larger requires the mechanical force of a plate compactor to ensure the gravel and sand layers are truly locked together.
Planning and Measuring for Your Installing Paver Patio Project
Before you pick up a shovel, you need a plan. Site selection is the first hurdle. You want a spot that is convenient for entertaining but also one that doesn’t sit in a natural basin where water collects. When marking your perimeter, use white marking paint for a rough outline before setting your stakes. This allows you to visualize the flow of the space. Consider how furniture will fit; a common mistake is building a patio that is too small for a dining table and chairs once they are pulled out. A good rule of thumb is to allow at least 3 feet of clearance around any table for chairs to be moved comfortably.
Calculating Materials To figure out how many pavers you need, calculate the total square footage (length x width) and add 10% for “wastage” (the pieces you’ll inevitably break or need to cut). For more complex patterns like a herringbone, we recommend adding 15%. Don’t forget the “fluff factor” for excavation; when you dig up soil, it occupies more volume than it did in the ground, so you’ll likely have 20-30% more debris to haul away than the hole’s dimensions suggest.
For a standard 10×10 foot patio (100 sq. ft.), you will typically need:
Approximately 4-5 tons of crushed gravel (for a 6-inch base).
1 ton of coarse bedding sand.
The pavers themselves.
Edge restraints and 10-inch spikes.
Safety and Regulations In Massachusetts, you must call 811 before digging. This is a free service that marks your underground utility lines. Trust us, hitting a gas line or a fiber-optic cable will ruin your weekend (and your bank account) much faster than a little rain. You should also check with your local building department in towns like Reading or Andover to see if you need a permit or if there are specific HOA regulations regarding hardscaping materials.
Excavation, Slope, and Base Layer Preparation
Now comes the “elbow grease” phase. For a standard pedestrian patio, you need to excavate to a depth of 6 to 8 inches. This accounts for 4 inches of compacted gravel, 1 inch of sand, and the thickness of the paver itself. Removing sod is often the most physically demanding part of the project. You can rent a motorized sod cutter to make this easier, which peels the grass back in neat rolls. As you dig, keep a close eye on the soil consistency. If you hit “soft spots” or organic matter like buried stumps or large roots, you must dig deeper and replace that material with extra gravel base to prevent future settling.
The Golden Rule of Drainage Never build a patio perfectly level. You need a slope to ensure water runs away from your home’s foundation. Aim for a 1/4-inch drop per foot. If your patio is 10 feet wide, the far edge should be 2.5 inches lower than the edge closest to the house. You can verify this using mason’s string and a line level.
Building the Foundation
Compact the Sub-grade: Once you’ve dug out the dirt, run the plate compactor over the native soil.
Landscape Fabric: Lay down a heavy-duty geotextile fabric. This prevents the expensive gravel from sinking into the Massachusetts clay over time while still allowing water to drain.
Gravel Lifts: Add your crushed stone in 2-inch “lifts.” For the base, use “3/4-inch minus” crushed stone. This specific mix contains both the larger rocks for structural strength and the “fines” (stone dust) that fill the gaps and allow for rock-hard compaction. Avoid rounded river stones or “pea gravel,” as these act like ball bearings and will never lock together. Compact each layer thoroughly before adding the next. Pro Tip: Expect your gravel base to shrink by about 15-20% after you compact it. If you need 4 inches of finished base, you’ll likely start with nearly 5 inches of loose stone.
Step-by-Step: Laying the Pavers and Cutting Edges
With your base compacted and your 1-inch layer of bedding sand screeded level (using PVC pipes as guides), it’s time for the fun part. Screeding is the most technical part of the prep. Use two 1-inch outside-diameter PVC pipes as your rails. Set them into the gravel and use a straight 2×4 board to “saw” the sand flat across the pipes. Once finished, remove the pipes and carefully fill the indentations with a trowel.
Choosing Your Pattern The pattern you choose affects both the look and the strength of the patio. A herringbone paver pattern is widely considered the strongest because the interlocking design prevents the pavers from shifting when weight is applied. If you’re looking for something simpler, a running bond pattern requires fewer cuts and is very beginner-friendly.
Laying Technique Start from a straight edge—usually the side against the house. Lay the pavers one by one using the “click-and-drop” method. You place the paver against the edge of the previously laid one and drop it straight down. This prevents sand from being pushed up into the joints. Do not slide them, or you’ll disturb your perfectly level sand bed. Use a rubber mallet to gently tap pavers into place, ensuring they are snug against their neighbors. Every 4-5 feet, use a long straightedge or a string line to check that your rows are staying straight. For more info about brick paver patio services, checking out professional layouts can give you great inspiration for borders and “soldier courses.”
Cutting for the Perfect Fit Unless your patio is a perfect multiple of your paver size, you will need to make cuts. Use a masonry saw with a diamond blade. Always wear safety goggles and a mask—breathing in silica dust is no joke. If you’re doing a curved edge, use a garden hose to mark the arc, then cut the pavers to follow that line.
Finishing Touches: Edge Restraints and Joint Sand
Once the bricks are down, you might think you’re done, but the patio isn’t “locked” yet. Without edge restraints, the pavers on the perimeter will eventually migrate into your lawn.
Securing the Perimeter Install plastic or metal edge restraints around the entire open perimeter. Secure them with 10-inch steel spikes driven into the gravel base every 8 to 12 inches. This creates a “frame” that holds everything together. You can find more info about paver patios and the different types of edging available through our service pages.
The Magic of Polymeric Sand Standard play sand will wash away in the first heavy rain. Instead, use polymeric sand. This is a high-tech mix of graded sand and binder (polymers) that hardens when wetted.
Sweep the sand into the joints until they are full.
Run the plate compactor (with a protective mat) over the pavers to vibrate the sand deep into the cracks.
Add more sand and repeat until the joints are filled to about 1/8 inch below the paver surface.
Crucial Step: Blow off every single grain of sand from the surface of the pavers. If sand stays on top when you add water, it will leave a permanent white haze.
Mist the joints lightly with water to activate the polymers. Use a light shower setting on your hose nozzle. You want to saturate the sand without creating puddles or washing the sand out of the joints. Allow the patio to dry for at least 24 hours before walking on it.
Is it worth doing it yourself? Let’s look at the numbers. Please note that these are average costs based on internet data and are not actual quotes for Gerrior Masonry services.
Item
DIY (10×10 Patio)
Professional (280 sq. ft. Avg)
Materials
$500 – $1,500
$1,500 – $4,000
Tool Rental
$200 – $400
Included
Labor
$0 (Your sweat equity)
$2,000 – $11,000
Total Range
$700 – $1,900
$3,500 – $15,000+
As you can see, the cost of a paver patio varies wildly. A DIY project saves you thousands in labor, but it requires significant physical strength and at least 2–4 full days of work. A professional team like ours can often complete a 280-square-foot project in a single day because we have the heavy machinery to move tons of material in minutes.
Maintenance and Long-Term Care
A well-installed patio is low-maintenance, but it isn’t “no-maintenance.” In our Middlesex and Essex County climate, the biggest threats are weeds, moss, and the freeze-thaw cycle.
Cleaning: Sweep regularly to remove organic debris. If leaves sit on the pavers and rot, they can leave tannins that stain the stone.
Washing: You can pressure wash your patio, but keep the pressure under 2,000 PSI and don’t aim the nozzle directly into the joints, or you’ll blast out your polymeric sand.
Resanding: Every 3 to 5 years, you may need to top off the polymeric sand in the joints.
Sealing: While optional, applying a sealer can enhance the color of your bricks and provide a barrier against oil and food stains.
Installing a paver patio is a major undertaking, but the result is a beautiful, durable space that adds significant value to your home. Whether you decide to tackle this as a DIY masterclass or decide that moving five tons of gravel isn’t your idea of a fun Saturday, the most important thing is that the job is done right. A professional installation doesn’t just look better; it functions better. We consider complex drainage patterns, soil composition, and the specific aesthetic of your home’s architecture. Whether it’s a classic brick look for a colonial home in Lexington or a modern large-format slab for a contemporary build in Wilmington, the foundation remains the most critical component.
At Gerrior Masonry & Landscaping, we’ve spent over 30 years perfecting the art of the New England patio. With owner oversight on every project and a team of dedicated craftsmen, we ensure that your “outdoor room” stands the test of time and the harshest winters. By following these steps, you ensure that your investment adds value to your property for decades to come.
If you’re ready to upgrade your backyard but want the peace of mind that comes with professional expertise, we’re here to help. You can find more info about patio design and installation on our website.
Gerrior Masonry & Landscape Construction is based in Woburn, MA, and services Middlesex and Essex County, Massachusetts, including communities like Winchester, Wilmington, Woburn, and beyond.
Finding the Right Hardscaping Company in Lexington, MA
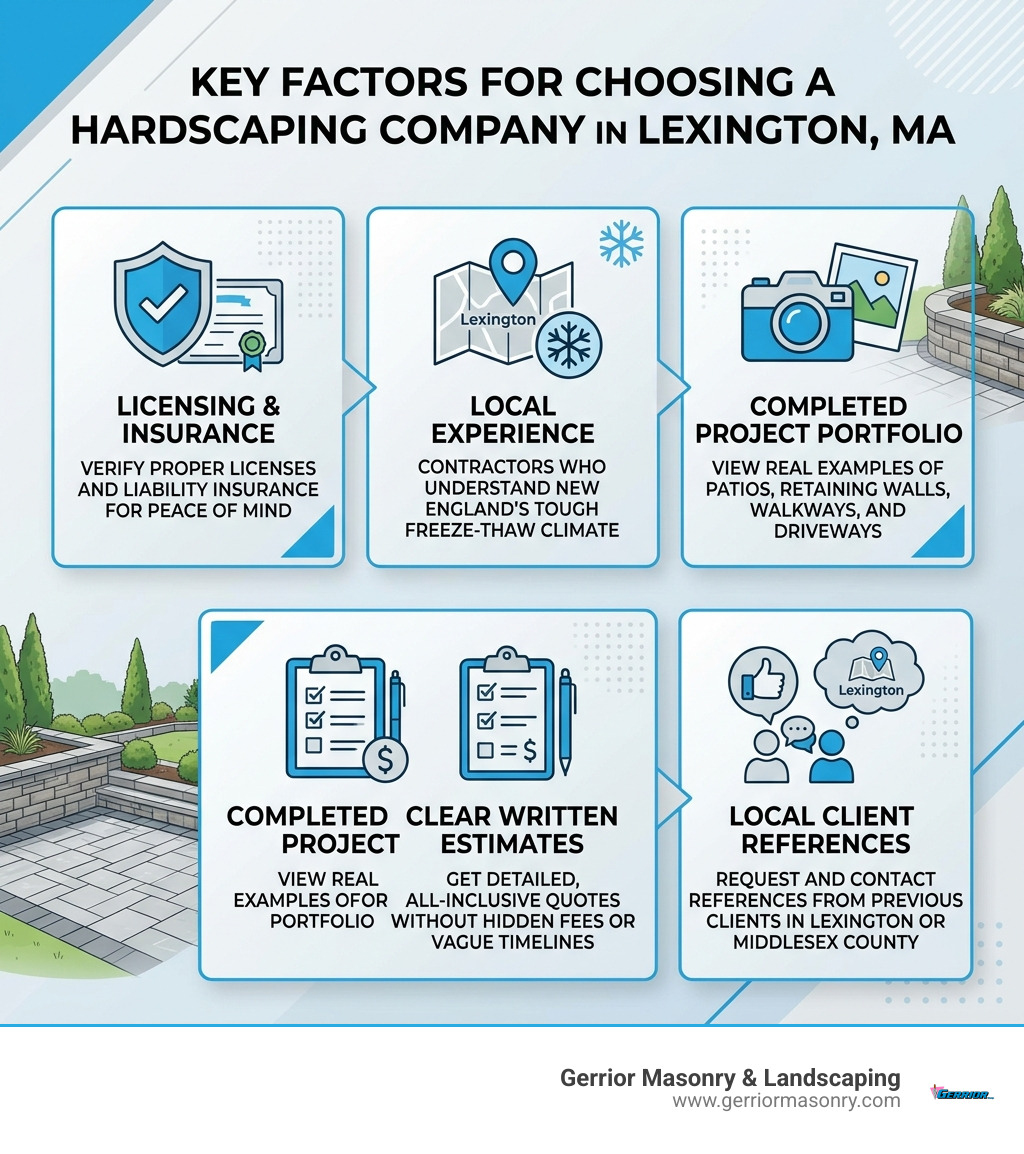
A Hardscaping company Lexington MA homeowners can trust should offer licensed crews, local material knowledge, and proven experience with New England’s tough freeze-thaw winters. Here’s a quick look at what to prioritize:
Licensing & insurance — always verify both before signing anything
Local experience — contractors who know Massachusetts soil and climate conditions
Portfolio of completed projects — patios, retaining walls, walkways, and driveways
Clear written estimates — no hidden fees, no vague timelines
References from local clients — ideally in Lexington or nearby Middlesex County towns
Finding the right fit takes more than a Google search. The contractor you choose will be reshaping the permanent, non-living features of your property — the stonework, walls, and paved surfaces that define how your outdoor space looks and functions for decades.
Lexington, MA homeowners face a specific challenge: the local climate is hard on hardscape materials. Frost heaving, ice, and wet springs can crack poorly installed patios or shift retaining walls within just a few seasons. Choosing a contractor who understands Massachusetts-specific conditions isn’t optional — it’s essential.
I’m Joe Gerrior, owner of Gerrior Masonry & Landscape Construction Corp., a family business based in Woburn, MA, with over 34 years of experience serving residential and commercial clients — including homeowners searching for a reliable Hardscaping company Lexington MA area. Our work spans masonry, hardscaping, drainage, and landscape construction across Middlesex and Essex County.
How to Choose the Right Hardscaping Company Lexington
Choosing between various Hardscape Companies can feel overwhelming. In a town as historic and aesthetically conscious as Lexington, MA, you aren’t just looking for someone to lay down some bricks; you are looking for Hardscape Designers who understand architectural harmony.
When we talk about the Hardscaping company Lexington homeowners need, we are talking about a team that understands the “unseen” work. This includes proper excavation, base preparation, and Drainage Systems Dry Wells to ensure your investment doesn’t wash away during a heavy April downpour. It also helps to work with a contractor who understands local zoning and site considerations, and homeowners can review general permit guidance through the Lexington, MA Building Department when planning larger structural work.
Local Regulations and Permits
Lexington has specific bylaws regarding lot coverage and runoff. A professional Hardscaping company Lexington must be familiar with these rules. If you install a massive non-permeable patio that directs water onto your neighbor’s property, you could face significant legal and financial headaches. We always recommend checking if your project requires a permit from the Lexington Building Department, especially for large retaining walls or structural masonry.
Material Comparison: Natural Stone vs. Concrete Pavers
One of the first decisions you’ll make with your Hardscape Company is the material. Both have pros and cons in the Massachusetts climate.
Feature
Natural Stone (Granite/Bluestone)
Concrete Pavers
Durability
Extremely high; lasts centuries
High; 20-50 years
Maintenance
Minimal; naturally resists salt
Low; may need occasional sealing
Climate Fit
Excellent for MA freeze-thaw
Good (if high-quality pavers used)
Appearance
Unique, high-end, timeless
Uniform, many colors/textures
Cost
Generally higher
Generally more affordable
For homeowners unfamiliar with the difference between materials, the general overview of natural stone and manufactured paving products can help clarify why installation method matters just as much as appearance.
Essential Services Offered by a Hardscaping Company Lexington
A full-service Hardscaping company Lexington should be able to handle everything from the initial Hardscape Landscaping design to the final stone placement. Here are the core services we provide to our neighbors in Lexington and the surrounding Middlesex County area:
Retaining Walls: Essential for the hilly terrain found in parts of Lexington. Hardscape Retaining Walls prevent soil erosion and create usable flat land out of steep slopes. For more complex needs, Retaining Wall Installation requires precise engineering.
Fire Pits and Features: Extending the outdoor season into the chilly Massachusetts autumn is easy with a custom fire pit.
Durable Materials for the Massachusetts Climate
The “Freeze-Thaw” cycle is the enemy of all masonry. In January, water gets into the joints; it freezes and expands, pushing stones apart. In March, it thaws and settles. If your Hardscaping company Lexington doesn’t use the right materials or techniques, your beautiful walkway will look like a roller coaster within three years.
Lets talk numbers. We know that budget is a primary concern for any homeowner. It is important to remember that the following figures are average costs for Massachusetts based on internet data and are not actual quotes for our specific services. Pricing in Lexington can vary wildly based on the complexity of the site, the materials chosen, and the amount of Excavation Services required.
Small Projects ($5,000 – $15,000): This might include a small paver walkway, a basic fire pit, or a small Front Stairs and Steps repair.
Mid-Range Projects ($15,000 – $45,000): This typically covers a standard-sized patio with some integrated Landscaping And Hardscaping elements, or a decorative retaining wall.
Large Transformations ($45,000 – $150,000+): These are full-scale backyard overhauls. Think Pool Decks Patios, outdoor kitchens, multiple levels of stonework, and integrated Waterfalls And Water Features.
Timeline expectations: A simple walkway might take 3-5 days. A comprehensive backyard renovation can take 3-6 weeks, depending on the weather and the scale of the masonry work.
While hardscaping is “low maintenance,” it isn’t “no maintenance.” To keep your Hardscape And Landscape looking sharp:
Sweep regularly: Keep organic debris like leaves and pine needles off the stone to prevent staining.
Power wash carefully: A light power wash every few years can revive the look, but be careful not to blast out the polymeric sand between the joints.
Check for shifting: After a particularly brutal winter, walk your property. If you see a stone that has heaved, call your Hardscaping company Lexington to address it before it becomes a tripping hazard.
Maximizing ROI with a Professional Hardscaping Company Lexington
Hardscaping offers one of the highest returns on investment (ROI) for home improvements. In the competitive Lexington real estate market, a professionally designed Hardscape Construction Service can be the deciding factor for a potential buyer. It improves Hardscaping And Landscaping aesthetics and provides structural integrity to the land.
Commercial Solutions and Winter Maintenance
Our expertise isn’t limited to residential backyards. We also provide robust solutions for business owners in the area. From Hardscaping Wakefield Ma commercial entries to large-scale masonry, we understand the needs of local businesses.
Note: We strictly provide commercial snow services; we do not offer residential snow removal.
For businesses, professional snow management is about more than just clearing a path; it’s about reducing liability and ensuring that your employees and customers can access your building safely, regardless of how many inches of snow the latest Nor’easter dropped on Middlesex County.
Partnering with Gerrior Masonry & Landscaping
When you are ready to stop searching for a Hardscaping company Lexington and start building, we are here to help. Based in Woburn, MA, Gerrior Masonry & Landscape Construction Corp. has spent over three decades perfecting the art of Massachusetts masonry.
What sets us apart?
30+ Years of Experience: We’ve seen every type of soil and every type of winter Massachusetts can throw at us.
Owner Oversight: I personally oversee our projects to ensure that the “Gerrior Standard” is met every single time.
Skilled In-House Team: We don’t just sub everything out. Our team consists of dedicated craftsmen who take pride in their work.
Gerrior Masonry & Landscape Construction is based in Woburn, MA, and services Middlesex and Essex County, Massachusetts. All pricing mentioned represents average costs for Massachusetts based on internet data and not actual costs for Gerrior Masonry services. Typical project costs range from $5,000 to $150,000 or more depending on scale and materials. For an accurate quote on your specific Lexington, MA project, contact us today.
Why Retaining Walls in Woburn, MA Matter for Your Property
Retaining walls Woburn MA homeowners rely on serve one critical purpose: holding soil in place on sloped or uneven ground. But they do much more than that. In a city like Woburn, where the landscape ranges from the steep inclines near Horn Pond to the rolling terrain of the West Side, these structures are essential for property stability and aesthetic appeal.
A well-built retaining wall can:
Stop erosion caused by heavy New England rain and the harsh freeze-thaw cycles that characterize our winters.
Create flat, usable outdoor space on otherwise unusable slopes, effectively increasing the square footage of your functional yard.
Boost curb appeal and add significant structural value to your landscape, making your property stand out in the neighborhood.
Protect your home’s foundation from soil movement and the immense pressure of water-saturated earth.
Define garden beds and separate lawn areas cleanly, providing a polished and professional look to your outdoor living space.
Woburn’s specific soil conditions, frost depth, and seasonal weather patterns make proper retaining wall construction especially important here. A poorly built wall doesn’t just look bad — it can lean, crack, or eventually collapse, causing real damage to your property and potentially creating safety hazards for your family.
I’m Joe Gerrior, owner of Gerrior Masonry & Landscape Construction Corp., a family-owned business based right here in Woburn, MA, with over 34 years of experience designing and building retaining walls Woburn MA homeowners trust. In this guide, I’ll walk you through everything you need to know to plan, build, and maintain a wall that lasts for decades, regardless of what the Massachusetts weather throws at it.
Planning and Designing Retaining Walls Woburn MA
Before we ever lift a shovel or move a single stone, the most important work happens on paper. Planning a retaining wall in Woburn requires a deep understanding of our local geography and geology. Our town isn’t exactly flat; from the rolling hills near the Winchester line to the tighter residential lots closer to the city center, every property presents a unique engineering challenge.
When we begin a site assessment, we look at several key factors that influence the longevity of the structure:
Slope Management: How steep is the incline? This determines if you need a simple gravity wall, which relies on its own weight to stay in place, or a more complex tiered system that breaks the elevation into manageable steps.
Soil Types: Woburn soil can vary from rocky glacial till to heavy, moisture-retaining clay. Clay is particularly challenging because it expands when wet and shrinks when dry, creating a “pumping” action that can destabilize a wall over several seasons if not accounted for in the initial design.
Property Lines and Setbacks: We always ensure your new wall respects property boundaries and doesn’t interfere with your neighbor’s drainage. Proper placement is key to avoiding future legal or maintenance headaches.
Aesthetic Goals: Do you want a rugged, natural look that blends into the New England woods, or a sharp, modern finish that complements a new patio? The design should reflect the architectural style of your home.
A well-designed wall does more than just hold back dirt; it transforms your yard. By leveling out a steep hill, we can turn a “dead zone” into a sprawling lawn or a beautiful stone patio. If you are looking for a design that is truly unique to your home, you can explore our options for custom retaining walls.
Choosing the Right Materials for Retaining Walls Woburn MA
The material you choose is the soul of the project. In Woburn, we have to pick materials that don’t just look good on day one, but still look great after twenty New England winters. The durability of the material is just as important as its appearance.
Natural Stone: This is the classic Massachusetts look. Whether it’s fieldstone or bluestone, natural stone offers a timeless beauty. It’s incredibly durable and manages the freeze-thaw cycle well because the small gaps between stones allow for natural movement and drainage.
Concrete Blocks (Segmental Walls): Brands like UniLock and Techo-Bloc have revolutionized how we build. These are interlocking blocks engineered for strength and precision. They come in hundreds of colors and textures, some of which mimic natural stone so closely you’d have to touch them to tell the difference. They are ideal for taller walls that require structural reinforcement.
Granite: If you want a wall that will literally last centuries, granite is the way to go. It’s heavy, expensive, and virtually indestructible, making it a favorite for high-end residential projects in the Greater Boston area.
Brick: Often used for smaller decorative walls or tiered garden beds to match the traditional brick architecture found in many historic Woburn neighborhoods.
When selecting products, we often source from local leaders like Martignetti Enterprises Inc. – Masonry Products, ensuring we have access to the highest quality materials available in the region. For more details on how these materials function in a landscape, check out our guide on hardscape retaining walls.
Permits and Engineering for Retaining Walls Woburn MA
One of the most common questions we get is: “Do I need a permit for this?” In many parts of Massachusetts, including Woburn, the 4-foot rule is the standard. Generally, any wall under 4 feet in height does not require a specific engineering permit. However, local codes can vary based on the wall’s proximity to the street, property lines, or protected wetlands.
If your wall needs to be taller than 4 feet, it usually requires a design stamped by a structural engineer. This threshold is set because the potential energy stored behind a wall increases exponentially with height. A five-foot wall isn’t just 25% more dangerous than a four-foot wall; it holds back significantly more mass and requires specialized reinforcement like geogrid—a synthetic mesh that stabilizes the soil behind the blocks.
Woburn Permit and Engineering Considerations:
The Frost Line: In our area, the frost line is typically around 4 feet deep. Your wall’s base needs to be prepared to handle the ground shifting as it freezes and thaws to prevent “heaving.”
Soil Compaction: If the soil behind the wall isn’t properly compacted in layers, the wall will eventually lean or bow outward.
Surcharge Loads: Is there a driveway, a heavy fence, or a swimming pool at the top of the hill? That extra weight requires a much stronger wall design to prevent structural failure.
Licensed Supervision: Ensure your contractor has foremen registered as licensed construction supervisors in Massachusetts to guarantee the work meets state building codes.
Average Installation Costs and Pricing Factors
Talking about money is important for planning. We want you to have a realistic expectation of what a professional retaining wall Woburn MA project costs. Please keep in mind that the figures below are average costs based on internet data and general industry trends in the Greater Boston area; they are not actual quotes for Gerrior Masonry services.
The cost of your wall depends on the material, the height, and how easy it is for our equipment to get to the site. If we have to move 20 tons of stone by hand through a narrow gate, the labor cost will be higher than if we can drive a skid-steer right to the spot. Additionally, the need for specialized drainage or soil removal can impact the final price.
Material Type
Estimated Cost Per Square Foot (Installed)
Poured Concrete
$30 – $90
Interlocking Concrete Blocks (UniLock/Techo-Bloc)
$25 – $75
Natural Stone (Dry Stack or Mortared)
$40 – $120
Granite Blocks
$60 – $150
Timber/Wood
$15 – $45
Note: These are average costs based on internet data and not actual costs for Gerrior Masonry services. Total project costs range widely from $15 to $150 per square foot depending on height, soil conditions, and site accessibility. We always provide a detailed, written estimate after a site visit.
Professional Installation and Maintenance
Building a wall that stands the test of time isn’t just about stacking blocks or stones. It’s about the parts you can’t see once the job is finished. At Gerrior Masonry & Landscaping, we treat the foundation of the wall with the same respect as the foundation of a house. A wall is only as strong as the ground it sits on.
The secret to a wall that doesn’t lean? Excavation and Base Preparation. We dig a deep trench, fill it with several inches of crushed stone, and compact it with heavy machinery until it’s rock-solid. This provides a level surface and prevents the wall from sinking into the mud during the spring thaw. To see how this fits into a larger property plan, you can read more about hardscaping Woburn MA.
The Construction Process from Estimate to Completion
When you work with a professional team, you should expect a clear, step-by-step process. Here is how we typically handle a project to ensure the highest quality results:
Initial Consultation: We meet at your property to discuss your needs, measure the slope, and look at your style preferences. We also identify any potential drainage issues.
Design Phase: We provide a plan that balances structural needs with your budget, selecting the best materials for your specific site conditions.
Site Preparation: This is the “messy” part. We excavate the area, remove old debris, and prepare the base trench. Proper excavation is the most labor-intensive part of the job.
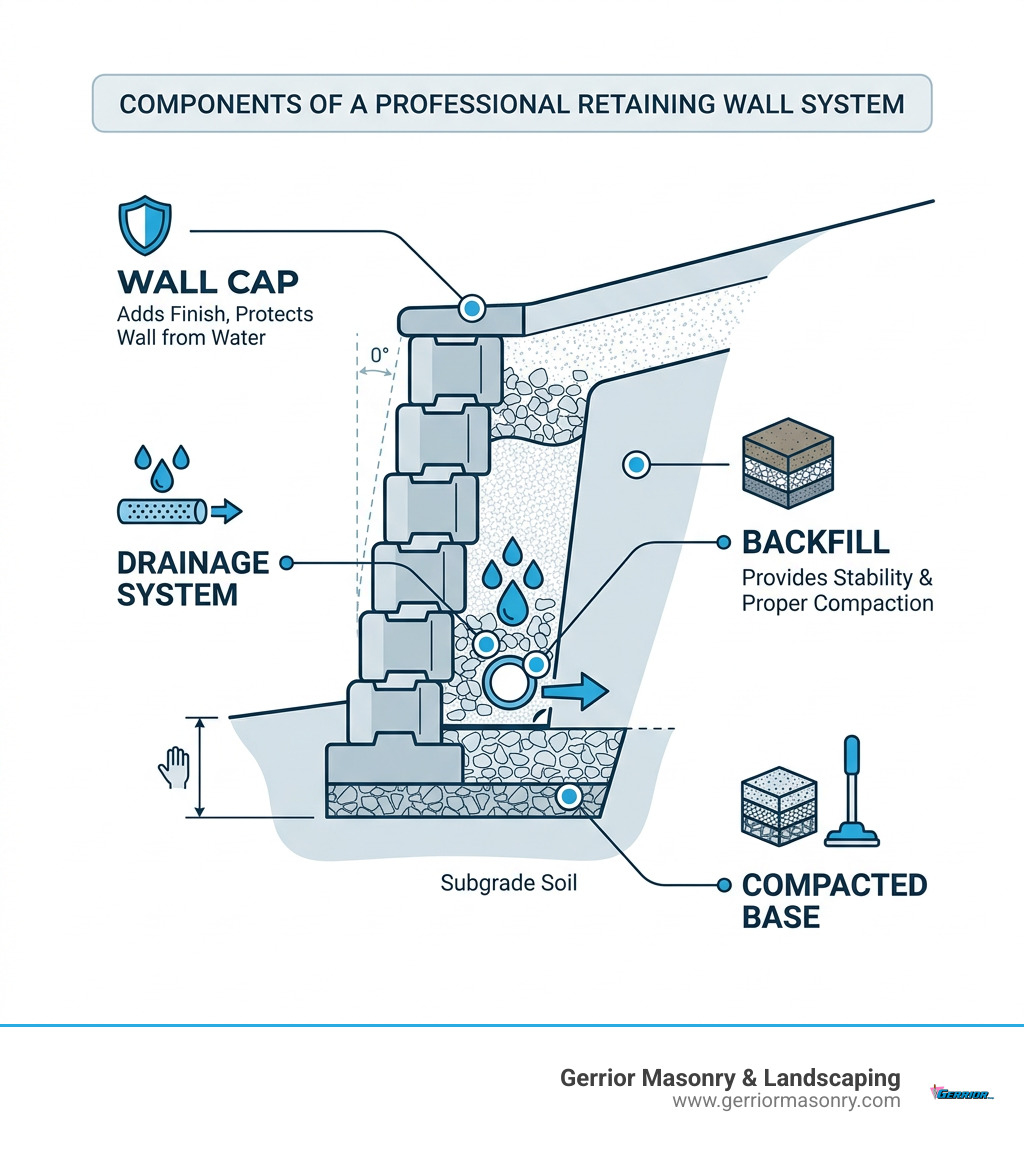
Drainage Installation: We install perforated drainage pipes behind the wall to carry water away. Without this, water builds up, freezes, and pushes your wall over. This is often called a French drain system.
The Build: We carefully stack or mortar the materials, ensuring every layer is level and plumb. For segmental walls, we ensure the interlocking mechanism is perfectly engaged.
Backfilling: We fill the space behind the wall with clean gravel (not dirt) to ensure water can reach the drain pipes quickly. We compact this gravel in 6-inch “lifts” to prevent settling.
Wall Capping: The final “cap” stones are installed and often glued with high-strength masonry adhesive to give the wall a finished look and protect the interior from rain.
Woburn weather is a retaining wall’s worst enemy. In January, the water in the soil freezes and expands with incredible force. In April, the heavy rains turn that soil into a heavy sludge. If your wall isn’t built to breathe and drain, it will fail. Hydrostatic pressure is the number one cause of wall failure in our region.
To ensure longevity, we focus on:
Weep Holes: Small openings in mortared walls that allow water trapped behind the wall to escape safely.
Gravel Backfill: Gravel doesn’t hold water like soil does, which significantly reduces the weight and pressure on the back of the wall.
Seasonal Inspections: We recommend homeowners take a quick look at their walls every spring. Look for new cracks, bulging sections, or stones that seem to be shifting. Catching a small movement early can save you from a total rebuild later.
Working with experienced retaining wall landscapers who understand the local climate is the best insurance policy for your investment. We build our walls to last for decades, not just a few seasons.
Expert Masonry Services in Middlesex and Essex County
Choosing a contractor is about trust and local reputation. At Gerrior Masonry & Landscaping, we’ve spent over 30 years building that trust one stone at a time. What sets us apart is our commitment to quality—I personally oversee our projects to ensure that the work meets my high standards and yours. As a family-owned business, our name is on every project we complete.
Beyond retaining walls, we offer a full suite of masonry and hardscaping services to keep your property looking its best. Whether you need a new driveway, a bulkhead replacement, or a custom outdoor kitchen, our team has the skills to get it done right the first time. During the winter months, we also provide reliable commercial snow removal to keep local businesses safe and accessible.
We are proud to serve our neighbors throughout the region, including:
Middlesex County: Woburn, Winchester, Burlington, Lexington, Reading, Stoneham, and more.
Essex County: Lynnfield, Peabody, Saugus, and surrounding North Shore towns.
If you’re ready to stop the erosion in your yard and start enjoying a beautiful, level landscape, we’re here to help. For more information about our full range of services, please visit our page for a masonry contractor Woburn MA.
Gerrior Masonry & Landscape Construction is based in Woburn, MA, and services Middlesex and Essex County, Massachusetts. Gerrior only provides commercial snow services and does not offer residential snow removal.
What Is a Dry Well and Why Does Your Yard Need One?
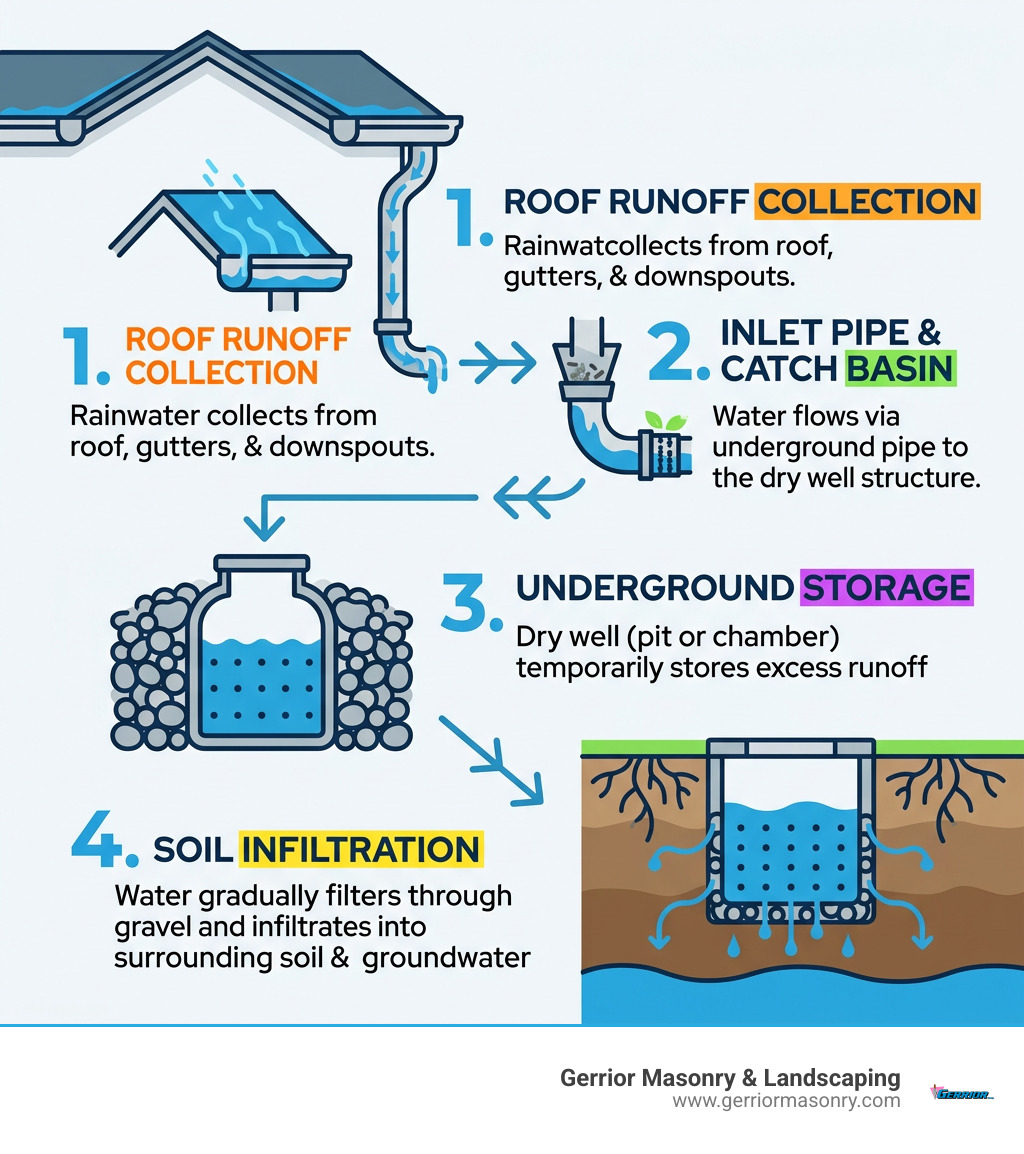
A dry well is an underground structure that collects excess rainwater and slowly releases it into the surrounding soil, keeping your yard, driveway, and foundation dry after heavy rain.
Here’s a quick summary:
What it is: A buried pit or chamber filled with gravel (or a perforated container) that holds stormwater runoff
How it works: Water flows in by gravity, then gradually filters down into the soil and recharges the groundwater below
Best for: Roof runoff, pooling driveways, soggy yards, and areas prone to flooding
Common sources it handles: Gutter downspouts, roof valleys, and paved surfaces
Key benefit: Prevents surface flooding while helping replenish local aquifers
If you’ve ever watched water pool in front of your garage or creep toward your foundation after a storm, a dry well may be exactly what your property needs.
Poor drainage is more than just an inconvenience. Standing water can damage your foundation, kill your plants, breed mosquitoes, and wash away your landscaping. A dry well quietly solves these problems underground — with little maintenance and no eyesore on your lawn.
I’m Joe Gerrior, owner of Gerrior Masonry & Landscape Construction, with over 34 years of experience helping Massachusetts homeowners solve drainage problems — including the design and installation of dry well systems tailored to New England’s soil and weather conditions. In this guide, I’ll walk you through everything you need to know, from how dry wells work to whether one is right for your yard.
At its core, a dry well is a passive, gravity-fed system. Think of it as an underground “staging area” for rainwater. When a heavy New England storm hits, the soil often can’t absorb water as fast as it falls. Instead of letting that water pool on your lawn or flood your basement, we direct it into a subsurface chamber. In urban and suburban environments, much of the ground is covered by ‘impervious surfaces’ like roofs and asphalt. These surfaces prevent water from soaking into the ground naturally. A dry well acts as a bypass, taking that concentrated flow and delivering it directly to the subsoil layers where it can be processed naturally. This is especially important in preventing ‘combined sewer overflows’ (CSOs), where heavy rain overwhelms city pipes and sends untreated waste into local rivers.
Inside the dry well, the internal volume is initially filled with air. This allows it to accept a sudden, massive inrush of water very quickly. Once the water is inside the chamber, it begins the process of infiltration. It dissipates through small openings in the sides and bottom of the structure, passing into the surrounding soil and eventually merging with the local groundwater.
This process is vital for the environment. In many parts of the country, including the Northeast, a significant portion of the population relies on groundwater for drinking water. By using a dry well, you aren’t just fixing a puddle; you are actively participating in aquifer recharge. A single well can transmit up to 5 acre-feet of water per year to underlying aquifers—that is roughly the amount of water needed to sustain 10 households for an entire year!
Not every yard requires a massive concrete bunker. We choose the design based on how much water you need to move and the specifics of your landscape.
Mini-drywells: These are the “scouts” of the drainage world. Usually around 2 feet in diameter, they are perfect for handling runoff from smaller areas, like a single 500-square-foot roof section.
Plastic Chambers (Flo-Wells): These are popular for residential DIY and professional projects alike. They are lightweight, perforated plastic tanks that can be stacked or connected in series to increase capacity.
Precast Concrete: These are the heavy hitters. Often used in commercial settings or for large residential estates, these reinforced concrete cylinders offer huge storage volumes.
Aggregate Pits: The simplest form of a dry well. This is essentially a large hole filled with washed stone or riprap. While they don’t have the “empty air” storage capacity of a chamber, they are effective and resist collapsing. For aggregate pits, we often use 1.5-inch washed crushed stone. The ‘washed’ part is critical; if the stone has ‘fines’ or dust, that dust will eventually settle at the bottom and create an impermeable layer of mud, effectively killing the well’s ability to drain.
Common Dry Well Materials Include:
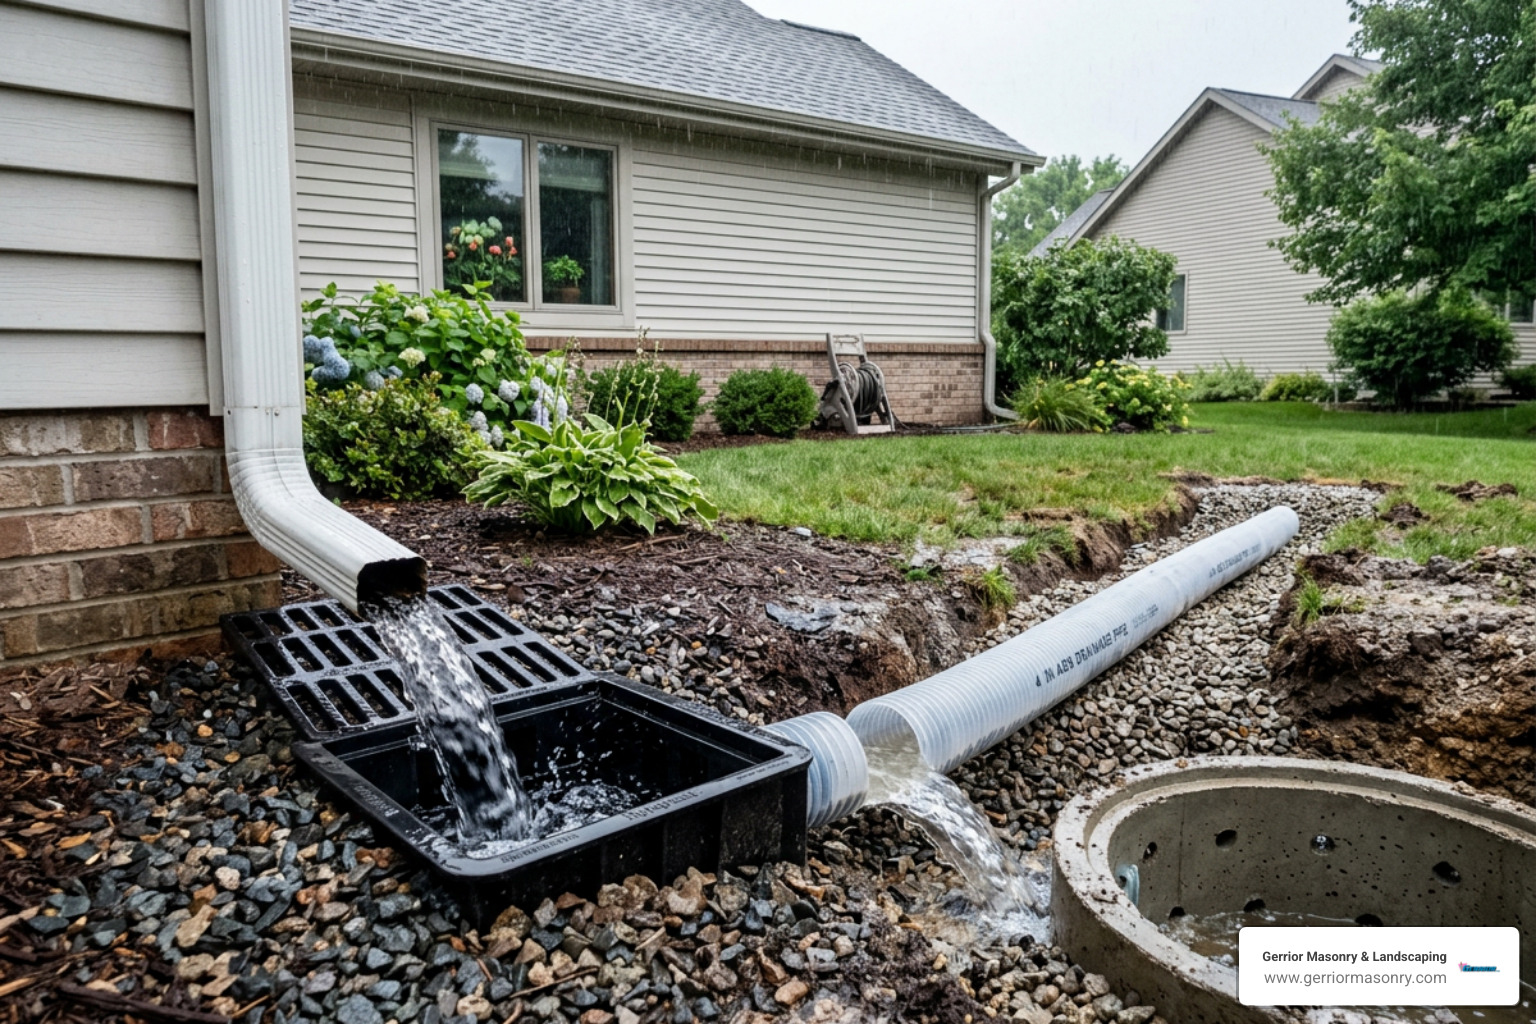
Perforated Piping: Typically 4-inch PVC or corrugated pipe to move water from the source to the well.
Washed Stone: Usually 3/4″ to 1.5″ stones that provide structural support while leaving 40% of the space open for water.
Geotextile/Landscape Fabric: This is the “skin” of the system. It prevents soil from migrating into your gravel and clogging the well.
Catch Basins: A small box with a grate that sits at the surface to catch water and trap heavy sediment before it enters the pipe.
Benefits of Installing a Dry Well
Why go through the effort of digging a giant hole in your yard? The benefits go far beyond just removing a puddle.
Foundation Protection: Water pooling against your house is the number one cause of foundation cracks and basement mold. A dry well pulls that water away before it can do damage.
Flood Prevention: By giving water a place to go, you prevent issues like “garage flooding,” where water flows down a sloped driveway and right under your door.
Erosion Control: Concentrated water from downspouts can act like a pressure washer on your mulch and topsoil. A dry well captures that energy and puts it safely underground.
Aquifer Recharge: As mentioned, you are helping the local water table. In states like Washington, there are over 100,000 dry wells in use specifically for this purpose. Even here in Massachusetts, keeping our groundwater levels healthy is a priority.
Mosquito Reduction: Standing water is a nursery for mosquitoes. By eliminating surface pooling, you’re making your backyard a lot more comfortable for summer BBQs.
Before we start digging, we have to do a little math and some “dirt detective” work. A dry well is only as good as the soil around it.
The Percolation Test (Perc Test): We need to know the infiltration rate of your soil. If you have heavy clay, the water will just sit in the well like a bowl of soup. We look for a minimum drainage rate of at least 0.5 inches per hour. Ideally, the well should empty completely within 24 hours of a storm.
Calculating Runoff: Did you know that one inch of rain produces about 62 gallons of runoff for every 100 square feet of drainage area?
A typical 3’x3’x3’ dry well stores about 11 cubic feet of water.
This is roughly enough to handle the runoff from a 132-square-foot roof area during a standard 1-inch rain event.
If you’re trying to drain a 2,000-square-foot roof, you’re going to need a much larger system or multiple wells connected together.
Installing a dry well is a labor-intensive process that requires precision. If the slope of your pipes is off by even an inch, the water might flow back toward your house instead of away from it!
Safety Precautions Before You Dig
Before we even think about touching a shovel or an excavator, we follow the “Call Before You Dig” rule. In Massachusetts, this means contacting 811 to have your utility lines marked. Hitting a gas line or a fiber-optic cable will turn a simple drainage project into a very expensive nightmare.
The Installation Steps:
Excavation: We dig a pit that is typically 3 to 6 feet wide. For professional systems, these can go 30 to 100 feet deep to reach permeable sand layers, though residential wells are usually much shallower. Beyond utilities, we also consider the ‘angle of repose’ for the soil. In sandy soils, the walls of a deep pit can collapse easily. Professional crews use shoring or specific excavation angles to ensure the safety of the workers inside the pit.
Lining: We line the entire pit with non-woven geotextile fabric. This is a critical step. Without it, dirt will eventually fill the gaps in your gravel, and your dry well will stop working.
Bedding: We create a 3-4 inch bed of washed gravel at the bottom for the chamber to sit on.
Placement: We drop in the barrel or precast chamber and ensure it is level.
Connection: We trench from your downspouts or catch basins to the well, ensuring a downward pitch of at least 1/4 inch per foot.
Gravel Surround: We fill the space around the chamber with at least 6 inches of gravel.
Backfill: We cover the top with fabric, then a foot of soil, and finally sod or plantings.
Can you do this yourself? If you’re handling a single downspout and have a strong back, a DIY kit using a 55-gallon plastic drum can be a fun weekend project. However, there are times when you absolutely need to call in the pros.
Call a Professional If:
Your drainage area is larger than 5,000 square feet.
You need a well deeper than 4 or 5 feet.
Your soil infiltration is slow (less than 2 inches per hour).
You are dealing with complex topography or need to install the well near a property line or septic field.
Professional installers like our team at Gerrior Masonry have the heavy equipment to dig through the “hard-as-rock” soil often found deep underground in New England. We also ensure all connection points are watertight and that the pipe slope is calculated perfectly to prevent freezing in the winter.
When it comes to pricing, there is a wide range based on the size of the system and the complexity of the excavation. Based on internet data, the average cost to install a dry well ranges from $500 to $6,500.
However, for large-scale residential systems or those requiring deep excavation into specialized soil layers, costs can reach $15,000 to $20,000 or more. Please keep in mind that these are average costs based on internet data and not actual costs for Gerrior Masonry services. Every property in Middlesex County has unique soil and grading that impacts the final quote.
Permits and the Law: Dry wells are often regulated under the EPA’s Underground Injection Control (UIC) rules. In many cases, residential wells for single-family homes don’t require a federal permit, but you may still need a local plumbing permit if you are connecting to your home’s gutter system. Some areas also have strict “setback” requirements, meaning the well must be a certain distance (often 10-20 feet) from foundations and property lines.
A well-installed dry well can last up to 30 years, but it isn’t “set it and forget it.” The biggest enemy of a drainage system is silt.
Best Management Practices (BMPs):
Pretreatment: Use a catch basin or a silt trap. This allows heavy debris to settle in a box that you can easily clean out with a shovel, rather than letting that muck flow into your buried well.
Gutter Maintenance: Keep your gutters clean! If your downspouts are sending roof shingles, grit, and decomposed leaves into your dry well, it will clog prematurely.
Annual Inspections: Once a year, pop the lid on your catch basin or the observation port of your well. Look for standing water that hasn’t drained or a buildup of sediment. In New England, the freeze-thaw cycle is a major factor. If water sits in the pipes leading to the dry well during a cold snap, it can freeze and cause the pipes to burst or back up. Ensuring a consistent downward pitch is the only way to prevent this ‘ice damming’ inside your drainage lines.
Avoid Heavy Loads: Don’t park cars or build sheds on top of your dry well area, as the weight can compress the soil or crush the chamber.
At Gerrior Masonry & Landscaping, we don’t just dig holes; we build long-term infrastructure for your home. Whether you’re in Woburn, Lexington, or Newton, we understand the local regulations and the specific drainage challenges our climate presents.
Why Patio Pavers Installation Is One of the Best Outdoor Upgrades You Can Make
Patio pavers installation is a proven way to add beauty, function, and lasting value to your outdoor space. Here’s a quick overview of how it’s done:
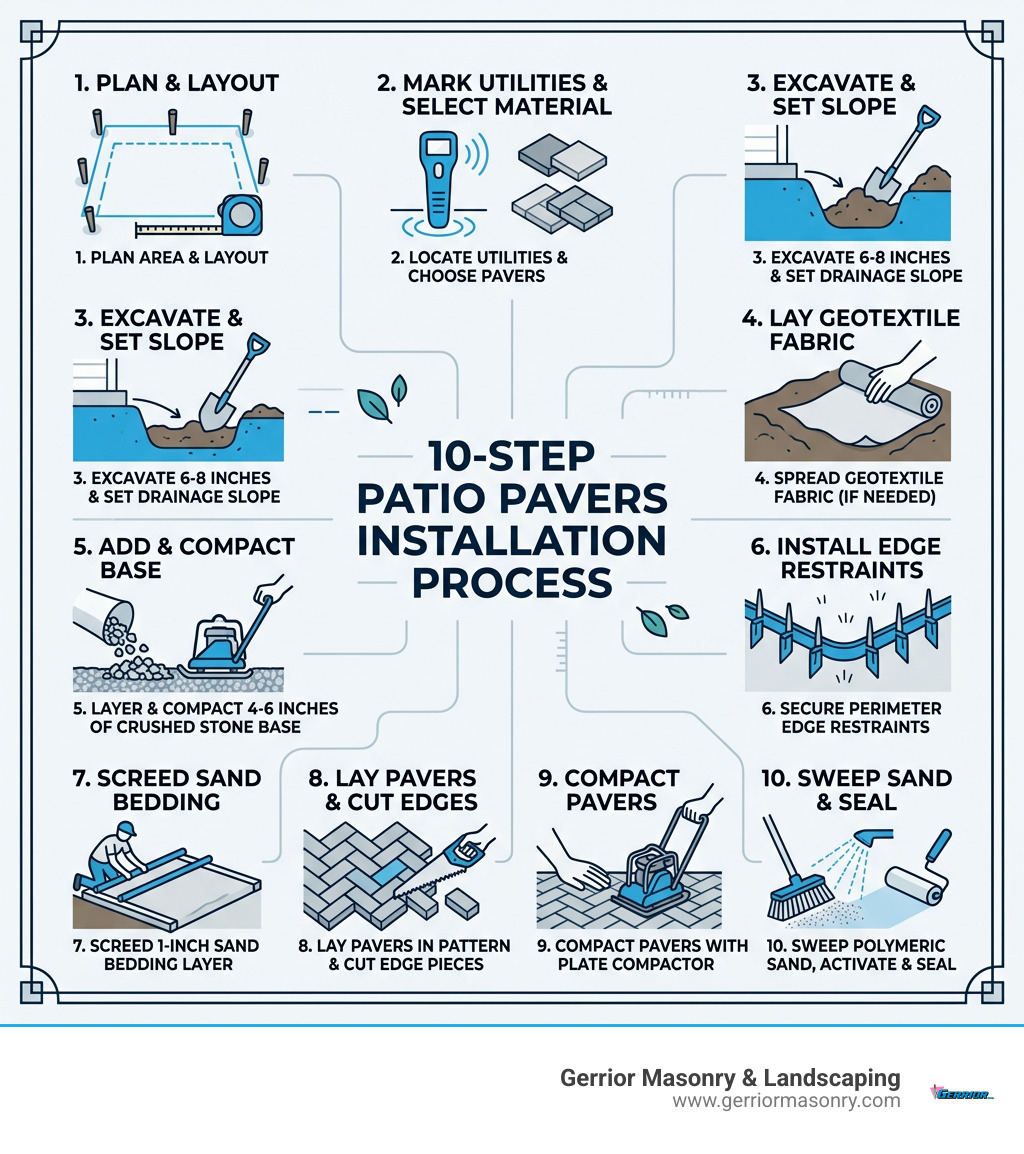
How to install patio pavers (10 steps):
Plan and lay out your patio area with stakes and string
Mark utilities and choose your paver material
Excavate 6–8 inches deep and set a drainage slope
Lay geotextile fabric over the subgrade if needed
Add and compact 4–6 inches of crushed stone base in layers
Install edge restraints to lock the perimeter
Screed a 1-inch sand bedding layer for a flat, even surface
Lay pavers in your chosen pattern, cutting pieces to fit edges
Compact pavers into place with a plate compactor
Sweep in polymeric sand, activate with water, and seal
A well-built paver patio can last for decades with minimal upkeep. It handles foot traffic, handles New England weather, and looks great doing it. Whether you’re creating a backyard gathering space or upgrading your outdoor living area, getting the installation right from the start is what separates a patio that holds up from one that shifts, cracks, or floods.
This guide walks you through every step — no guesswork, no shortcuts.
I’m Joe Gerrior, owner of Gerrior Masonry & Landscape Construction Corp., with over 34 years of hands-on experience in hardscaping and patio pavers installation across Massachusetts. In this guide, I’ll share the same process my team uses on every project to ensure a stable, beautiful result that stands the test of time.
Planning and Preparation for Patio Pavers Installation
Before we pick up a shovel, we have to start with a solid plan. A successful patio pavers installation begins long before the first stone is laid. We need to define the project scope: Are you looking for a simple sitting area in Burlington, or a sprawling multi-level entertainment space in Lexington?
First, select your site. It should be relatively level and, most importantly, away from low-lying areas where water pools. Once you have a spot, you must mark your utilities. In Massachusetts, calling 811 is a non-negotiable step to ensure you don’t hit any underground lines during excavation. This service, often referred to as ‘Dig Safe,’ is essential for safety and legal compliance.
When it comes to ordering materials, math is your best friend. A cubic yard of paver base covers approximately 108 square feet at a 3-inch depth. To avoid project delays, we always recommend ordering a 10%–15% overage. This accounts for pavers that will be cut to fit curves or odd spaces, as well as any potential breakage during transport. If your design has a lot of intricate curves, lean toward that 15% mark.
Choosing the Right Materials
The type of paver you choose dictates the look and longevity of your patio. Here is a quick comparison of the most popular options we use in Middlesex and Essex County:
Paver Type
Durability
Maintenance
Best For
Concrete Pavers
High
Low
Uniform looks, driveways, and modern patios.
Brick Pavers
Moderate-High
Low
Classic aesthetic, historical homes in Salem or Concord.
Based on internet data, the average cost for patio pavers installation ranges from $15 to $65 per square foot. That high-end natural stones or complex patterns can easily push costs toward the higher end of that spectrum, sometimes exceeding $100 per square foot depending on the site conditions and material rarity.
Essential Tools for the Job
To do this like a pro, you’ll need more than just a hammer. Here are the essentials:
Plate Compactor: Essential for a stable base.
Masonry Saw: For clean, professional cuts.
Screed Pipes and Board: To level the sand bedding.
Rubber Mallet: For setting pavers without cracking them.
Geotextile Fabric: To separate soil from your base material.
Layout, Excavation, and Drainage for Patio Pavers Installation
Layout is where your vision meets the dirt. Use stakes and mason’s line to outline the perimeter. We recommend marking about 8 inches outside the actual patio edge to give yourself room to work and space for the edge restraints.
Excavation depth is critical. For pedestrian areas like a patio or walkway, you need to dig 6–8 inches deep. If you were building a driveway, you’d need 8–12 inches. The quality of your sub-base soil also matters. In areas like Woburn or Burlington, you may encounter heavy clay. Clay retains moisture, which requires a slightly deeper gravel base to prevent shifting during the freeze-thaw cycles. Conversely, sandy soil provides excellent drainage but may require more compaction effort to ensure a rock-solid foundation.
Drainage is the most overlooked part of DIY projects. You must ensure water runs away from your home’s foundation. We follow a standard slope of 1 inch of drop for every 4 feet of distance. This keeps your basement dry and your patio stable. For homes with existing water issues, you might want to look into more advanced drainage systems or dry wells to handle heavy New England rains.
Step-by-Step Execution and Maintenance
With the hole dug and the slope set, it’s time for the heavy lifting. The secret to a patio that doesn’t sink is the base. We use a crushed stone base, typically 4–6 inches thick for patios.
Preparing the Base and Edge Restraints
Don’t just dump all your gravel in at once! Most plate compactors can only handle 3–4 inches of material at a time. If you dump 6 inches and try to compact it, the bottom layers will remain loose, leading to uneven settling later.
Base Preparation Tips:
Moisture is Key: If the base material is bone dry, spray it lightly with a hose. This helps the particles lock together during compaction.
Geotextile Over Plastic: We get asked this a lot: “Should I use plastic to stop weeds?” The answer is a firm no. Plastic traps water, which can cause the base to shift and pavers to heave during the freeze-thaw cycles we see in Woburn and North Andover. Instead, use a geotextile fabric. It allows water to pass through but prevents the soil from mixing with your clean gravel base.
Lateral Stability: Once the base is compacted, install your edge restraints. These are typically plastic or metal rails held in place by long spikes. They prevent the pavers from “creeping” outward over time.
For those interested in the technical details of why these layers matter, you can check out this scientific research on paver installation which highlights the importance of seasonal care and proper base mechanics.
Screeding Sand and Laying the Paver Pattern
Once the base is rock hard, it’s time for the bedding layer. We use a 1-inch thick layer of coarse sand. To get this perfectly flat, lay down two 1-inch PVC pipes as guides, spread your sand, and “screed” it across the pipes using a straight board. Once done, remove the pipes and carefully fill the indentations with sand. Do not walk on this sand once it is leveled!
Now comes the fun part: laying the pavers. Start from a straight edge (usually the house) and work your way out.
Running Bond: The easiest for DIYers; it’s just offset rows like bricks on a house.
Herringbone: Great for high-traffic areas because the interlock is very strong, but it requires more cutting.
Random/Modular: Uses different sizes for a natural look.
If you’re looking for inspiration, we have plenty of paver walkway ideas that utilize these patterns to create stunning visual flow.
Finishing Touches for a Successful Patio Pavers Installation
As you reach the edges, you’ll likely need to cut pavers to fit. A masonry saw with a diamond blade is the best tool for this. Once all pavers are laid, run the plate compactor over the surface. This “sets” the pavers into the bedding sand.
Next, we apply polymeric sand. This isn’t regular sand; it contains binders that activate with water to create a glue-like bond.
Sweep the sand into the joints while the pavers are completely dry.
Use the plate compactor again to shake the sand down into the gaps.
Sweep off all excess sand from the surface (if it stays on top and gets wet, it will stain!).
Mist the patio with water to activate the polymers.
For a visual walkthrough of this process, the How To Install Pavers guide from This Old House is an excellent resource.
Long-Term Care and Troubleshooting
Even the best patio pavers installation requires a little love. Proper maintenance ensures that your investment remains beautiful and functional for decades.
Common Issues and Solutions
Efflorescence: This is a white, powdery salt that sometimes appears on new pavers. It’s natural and usually washes away with time, but specialized cleaners can speed up the process.
Weeds: If you used polymeric sand correctly, weeds shouldn’t grow from the bottom. Most “weeds” actually start from seeds blowing into the top of the cracks. Regular sweeping and occasional re-sanding keep them at bay.
Uneven Settling: This usually happens because the base wasn’t compacted in layers or the drainage was poor. If a few pavers sink, you can pry them up, add a bit of sand, and reset them.
Winter Maintenance and Snow Removal
For homeowners in the North Shore, winter is the ultimate test of a patio. When clearing snow, avoid using metal shovels or ice chippers, which can scratch or gouge the surface of your pavers. Instead, use a plastic shovel or a snow blower with a rubber-edged paddle. When it comes to de-icing, avoid rock salt (sodium chloride), as it can penetrate the pores of the stone and cause pitting over time. Instead, use calcium chloride-based products or simple sand for traction, which are safer for the masonry and your surrounding landscape.
Can You Build a Fire Pit?
Yes! A paver patio is a perfect spot for a fire pit. However, you must use fire-resistant pavers or a steel fire ring insert to protect the stone from heat stress. Always keep the fire pit at a safe distance from your house and low-hanging trees. If you’re planning a full outdoor kitchen, consulting a professional patio contractor is a smart move to ensure gas lines and heavy structures are handled safely.
Should You Seal Your Pavers?
Sealing has its pros and cons.
Pros: Enhances color (the “wet look”), protects against oil stains, and further stabilizes joint sand.
Cons: It needs to be reapplied every 3–5 years and can make the surface slightly more slippery when wet. If you choose to seal, ensure you use a breathable, high-quality sealer designed for the specific type of stone or concrete you have installed.
For a visual walkthrough of this process, the How To Install Pavers guide from This Old House is an excellent resource.
Professional Oversight for Your Massachusetts Home
While many homeowners in places like Reading, Peabody, and Saugus successfully tackle patio pavers installation as a DIY project, it is a labor-intensive process that requires precision equipment. Mistakes in compaction or drainage can lead to costly repairs just a few seasons down the road.
At Gerrior Masonry & Landscaping, we’ve spent three decades perfecting this craft. Whether you need a simple brick paver patio or a complex multi-tiered stone design, our team provides owner-oversight on every job to ensure it meets our high standards. We understand the specific soil conditions of the North Shore and the challenges our winters present to hardscape structures.
If you’re ready to transform your backyard but want the peace of mind that comes with professional experience, we are here to help. From the initial excavation to the final sweep of sand, we handle the heavy lifting so you can just enjoy the results.
Gerrior Masonry & Landscape Construction is based in Woburn, MA, and services Middlesex and Essex County, Massachusetts. We provide expert masonry and hardscaping services to communities including Winchester, Wilmington, Wakefield, and beyond. Contact us today to discuss your next outdoor project!
Why Burlington Homeowners Are Turning to Landscape Retaining Walls
Landscape Retaining Walls Burlington MA are one of the most practical upgrades you can make to a sloped or uneven yard — and one of the most rewarding for curb appeal and property value.
Here’s a quick snapshot of what you need to know:
Topic
Key Facts
What they do
Hold back soil, prevent erosion, create usable flat space
Required for walls over 4 ft; engineering needed over 6 ft
Frost protection
Footings must go at least 36 inches deep (40+ for clay soils)
Drainage
Crushed stone (#57 aggregate) backfill is the top choice
Cost range
Roughly $3,000–$45,000+ depending on size and materials
Who to hire
Licensed local masonry and landscape contractors
Burlington’s hilly terrain and harsh New England winters make retaining walls more than a design choice — they’re often a necessity. Without proper support, sloped yards lose soil to rain runoff, foundations can shift, and usable yard space stays frustratingly out of reach.
Done right, a retaining wall doesn’t just solve a problem. It transforms your backyard into a tiered, livable outdoor space — think patios, fire pits, garden beds, and seating areas where there used to be a muddy slope.
I’m Joe Gerrior, owner of Gerrior Masonry & Landscape Construction Corp., and with over 30 years of hands-on experience building and designing landscape retaining walls in Burlington, MA and across greater Middlesex County, I’ve seen what separates a wall that lasts decades from one that fails after the first hard winter. In this guide, I’ll walk you through everything you need to know to get it right.
Simple guide to Landscape Retaining Walls Burlington MA terms:
Engineering Durable Landscape Retaining Walls Burlington MA
When we talk about Landscape Retaining Walls Burlington MA, we aren’t just talking about stacking stones. We are talking about engineering a structure that can hold back thousands of pounds of saturated earth. In Burlington, our soil can be a mix of sandy loam and heavy clay, both of which behave differently when the ground freezes.
The Massachusetts Building Code and Local Regulations
The 4-Foot Rule: Any retaining wall that exceeds 4 feet in height (measured from the bottom of the footing to the top of the wall) requires a building permit.
The 6-Foot Rule: If your wall is going to be taller than 6 feet, the state requires a professional engineering design.
We always recommend checking with the Burlington building department before starting, as local zoning or conservation commissions (especially if you are near wetlands) may have additional say in your project.
The Battle Against Frost Heave
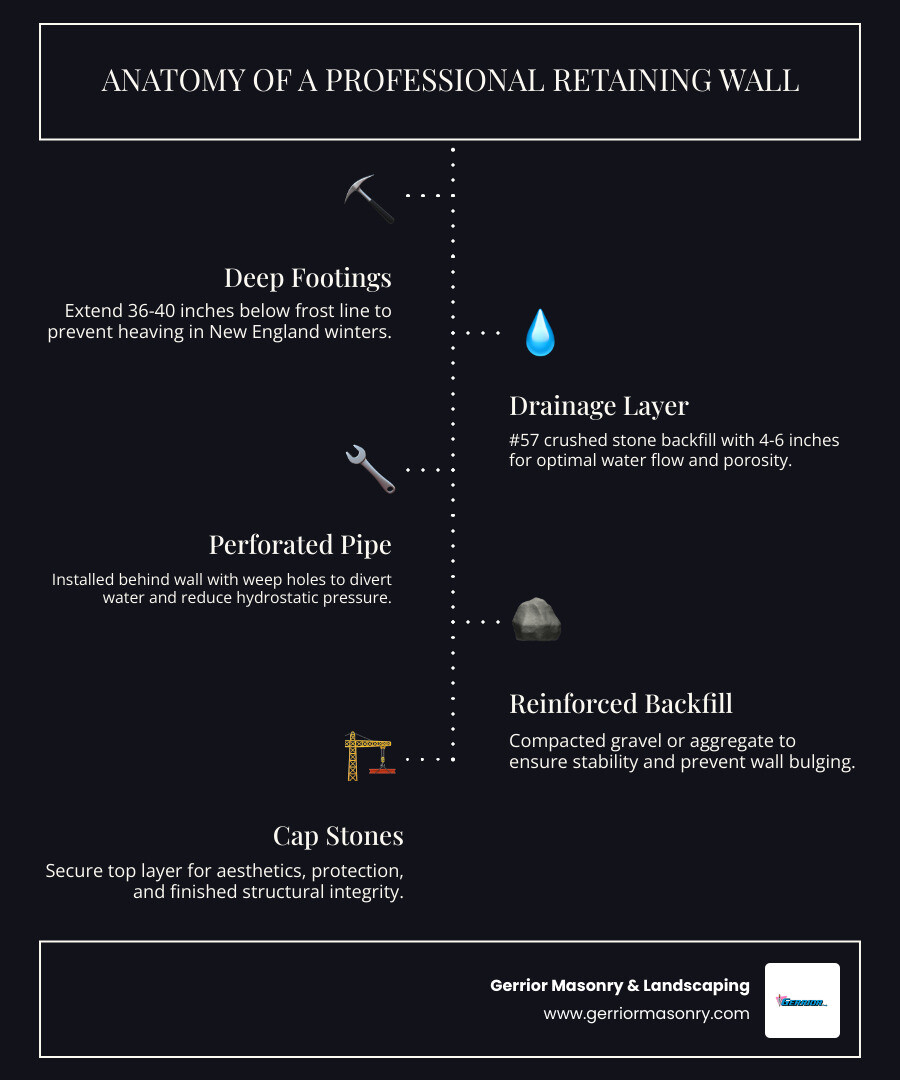
In Burlington, the “frost line” is typically 36 inches deep. This is the depth to which the ground is expected to freeze. If your wall’s footing is too shallow, water under the wall freezes, expands, and pushes the entire structure upward. This is called “frost heave,” and it is the primary cause of leaning or “tipping” walls in New England.
For walls in clayey or mixed soils, we often extend footings to 40 or 42 inches to ensure absolute stability. A solid base for retaining wall construction is non-negotiable.
The Importance of Porosity and Drainage
Water is the enemy of a retaining wall. When rain falls, it soaks into the soil behind the wall. If that water has nowhere to go, it creates “hydrostatic pressure”—essentially a heavy, wet weight pushing against the back of your masonry. This is consistent with geotechnical research on hydrostatic pressure, which identifies water buildup as the primary cause of wall rotation and failure.
We use #57 angular crushed stone for backfill because of its superior drainage capabilities. Compared to other materials, the void spaces between angular stones allow water to flow freely down to the drainage pipes.
Drainage Material Comparison Table
Material Type
Porosity (Drainage Space)
Performance Rating
Angular Crushed Stone (#57)
40%
Excellent
Pea Gravel
35%
Good
Recycled Concrete
30%
Fair
Native Soil/Clay
5-10%
Poor (Avoid!)
Best Materials for Landscape Retaining Walls Burlington MA
Choosing the right material is a balance between the architectural style of your home and the structural needs of the slope.
Natural Stone: For that classic New England look, nothing beats fieldstone or granite. These walls offer a “permanence” that manufactured products can’t quite replicate. You can learn more info about natural stone retaining to see how it fits into traditional Burlington landscapes.
Segmental Concrete Blocks: These are modern, interlocking units. They are incredibly strong and designed specifically for high-pressure situations. They come in various textures that mimic natural stone.
Pavers and Brick: Often used for smaller decorative walls or “seating walls” around patios. Check out more info about brick retaining wall ideas for inspiration on formal designs.
Gabion Walls: These are wire cages filled with stone. They are excellent for drainage and offer a unique, industrial aesthetic. We have extensive experience installing a gabion retaining wall for clients looking for something different.
Critical Drainage and Frost Protection in Burlington
As we mentioned, drainage is the “lungs” of your wall. Without it, the wall can’t breathe or shed the weight of water.
Perforated Pipes: We install a perforated drain pipe retaining wall system at the base of the wall, wrapped in filter fabric. This collects water and carries it away to a safe exit point.
Weep Holes: These are small gaps left in the face of the wall to allow internal moisture to escape.
French Drains: For properties with severe water issues, we often recommend a retaining wall with French drain to manage surface runoff before it even hits the wall.
Planning a Landscape Retaining Walls Burlington MA project involves looking at the “big picture.” Are you just trying to stop erosion, or do you want to reclaim your yard for summer BBQs?
Enhancing Outdoor Living with Landscape Retaining Walls Burlington MA
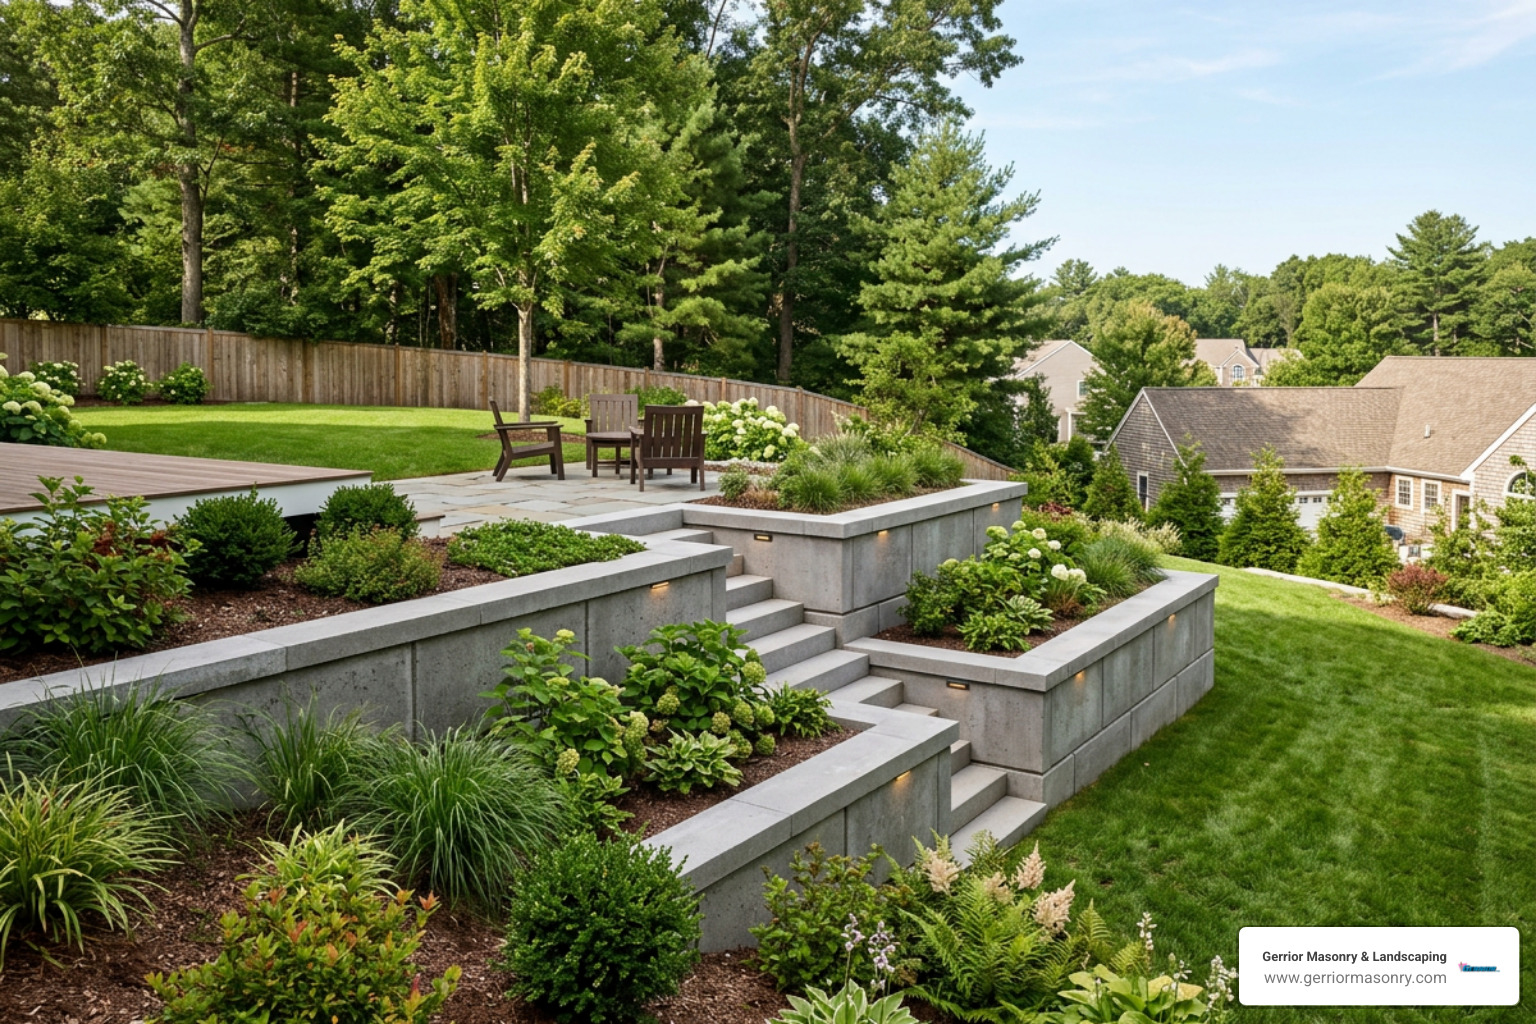
Retaining walls are the “bones” of a great landscape. They allow us to create “outdoor rooms” by carving flat tiers into a hill.
Terraced Gardens: Instead of one giant wall, we can build two or three smaller walls to create levels for planting.
Level Lawn Space: If your kids have nowhere to kick a soccer ball because the yard is a 45-degree angle, a retaining wall can create that flat “play zone.”
Seating Walls: Walls built at 18-22 inches high are perfect for extra seating around a fire pit or patio.
It’s important to have a realistic idea of the investment required. Based on internet data and industry averages (not specific Gerrior Masonry quotes), a professional retaining wall project typically ranges from $3,000 to over $45,000.
Why such a wide range?
Height and Length: A 2-foot decorative wall is vastly different from a 6-foot structural wall.
Materials: Precast concrete blocks are generally more budget-friendly, while imported granite or hand-dressed natural stone sits at the higher end of the scale.
Excavation and Access: If we have to bring heavy machinery through a narrow gate or dig through solid ledge, the labor costs will increase.
Permits and Engineering: Walls requiring structural engineering add a layer of professional fees.
A typical project in Burlington takes about 1 to 2 weeks from the first scoop of dirt to the final capstone being set.
Common Installation Mistakes to Avoid
We are often called for retaining wall repair near me to fix walls that were installed incorrectly by DIYers or inexperienced contractors. Here are the most common “wall killers”:
Shallow Footings: As we discussed, if you don’t get below that 36-inch frost line, the wall will move.
Poor Backfill: Using the same dirt you dug out to fill in behind the wall is a recipe for disaster. That soil holds water; you need crushed stone.
Ignoring the “Surcharge”: If there is a driveway or a shed at the top of the hill, that’s called a “surcharge” load. The wall has to be designed to handle that extra weight, not just the dirt.
No Filter Fabric: Without a geotextile layer, fine silt from the yard will eventually clog your expensive drainage stone, rendering it useless.
If you are dealing with a difficult slope, it is best to build a retaining wall on a slope using professional methods from the start.
Choosing a Professional Contractor in Burlington
When you’re ready to move forward with Landscape Retaining Walls Burlington MA, you want a team that knows the local terrain. At Gerrior Masonry & Landscaping, we bring over 30 years of experience to every job site.
What makes us different?
Owner Oversight: Joe Gerrior is involved in every project, ensuring that the high standards we’ve built our reputation on are met every single day.
Skilled Craftsmanship: Our team isn’t just “labor”; they are masons who understand the artistry of stone and the science of engineering.
Comprehensive Service: From the initial landscape design to the final hardscaping, we handle the heavy lifting so you can just enjoy the results.
We’ve seen every type of Burlington backyard—from the rocky hills near the Lexington line to the clay-heavy soils near the town center. We know how to build walls that stand the test of time.