Why Paver Retaining Wall Installation Can Transform Your Yard
Paver retaining wall installation is a premier landscaping project that controls erosion, levels sloped ground, and creates usable outdoor space. A well-built wall can turn an awkward hillside into a functional patio edge, planting terrace, or safer walkway transition. It also adds definition to the landscape, helping separate lawn, garden, and hardscape areas in a clean and durable way. Beyond the immediate visual upgrade, these structures serve as the backbone of a property’s drainage and stability system, preventing soil loss and protecting the foundation of your home from water-related issues.
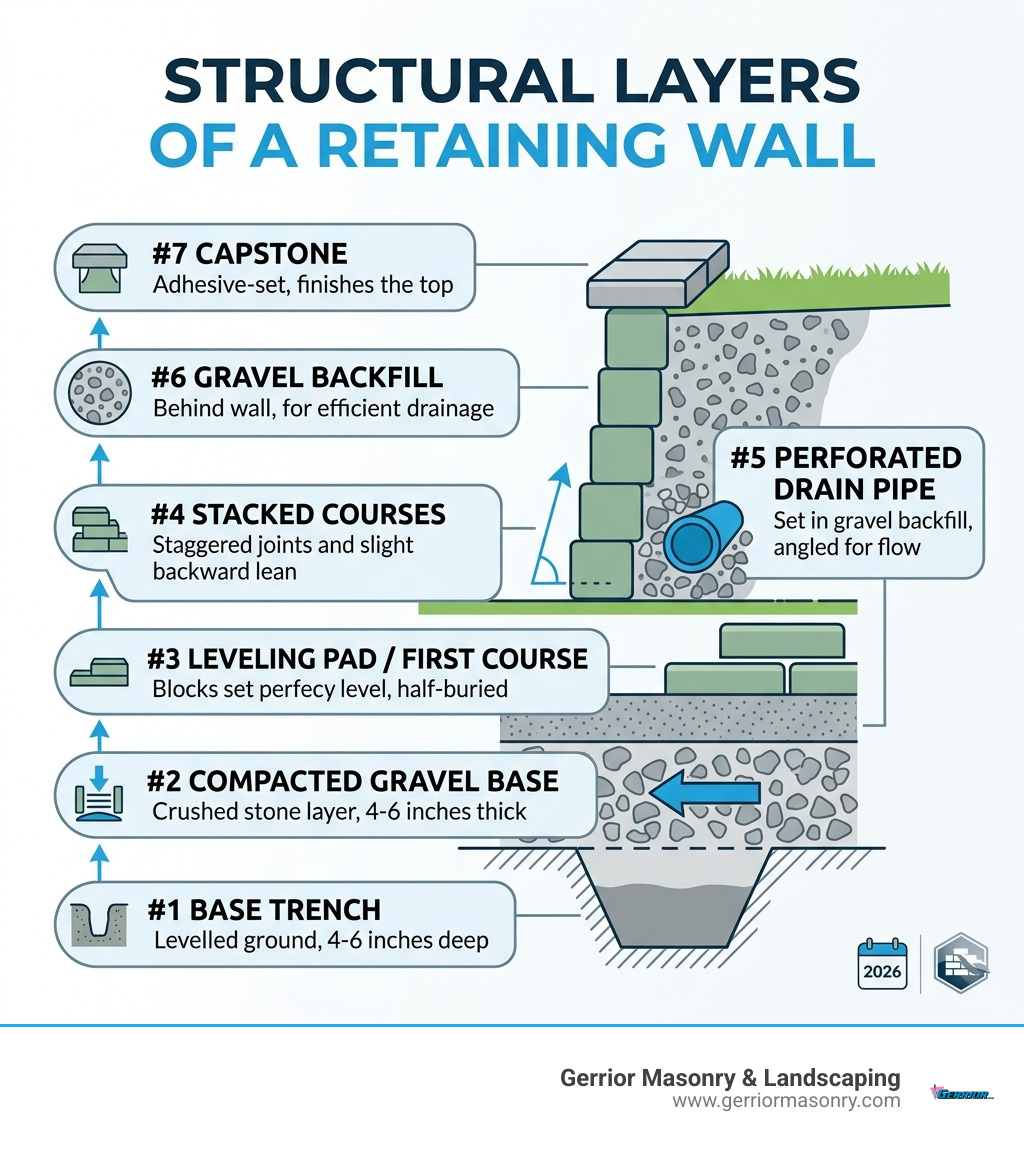
Core steps include:
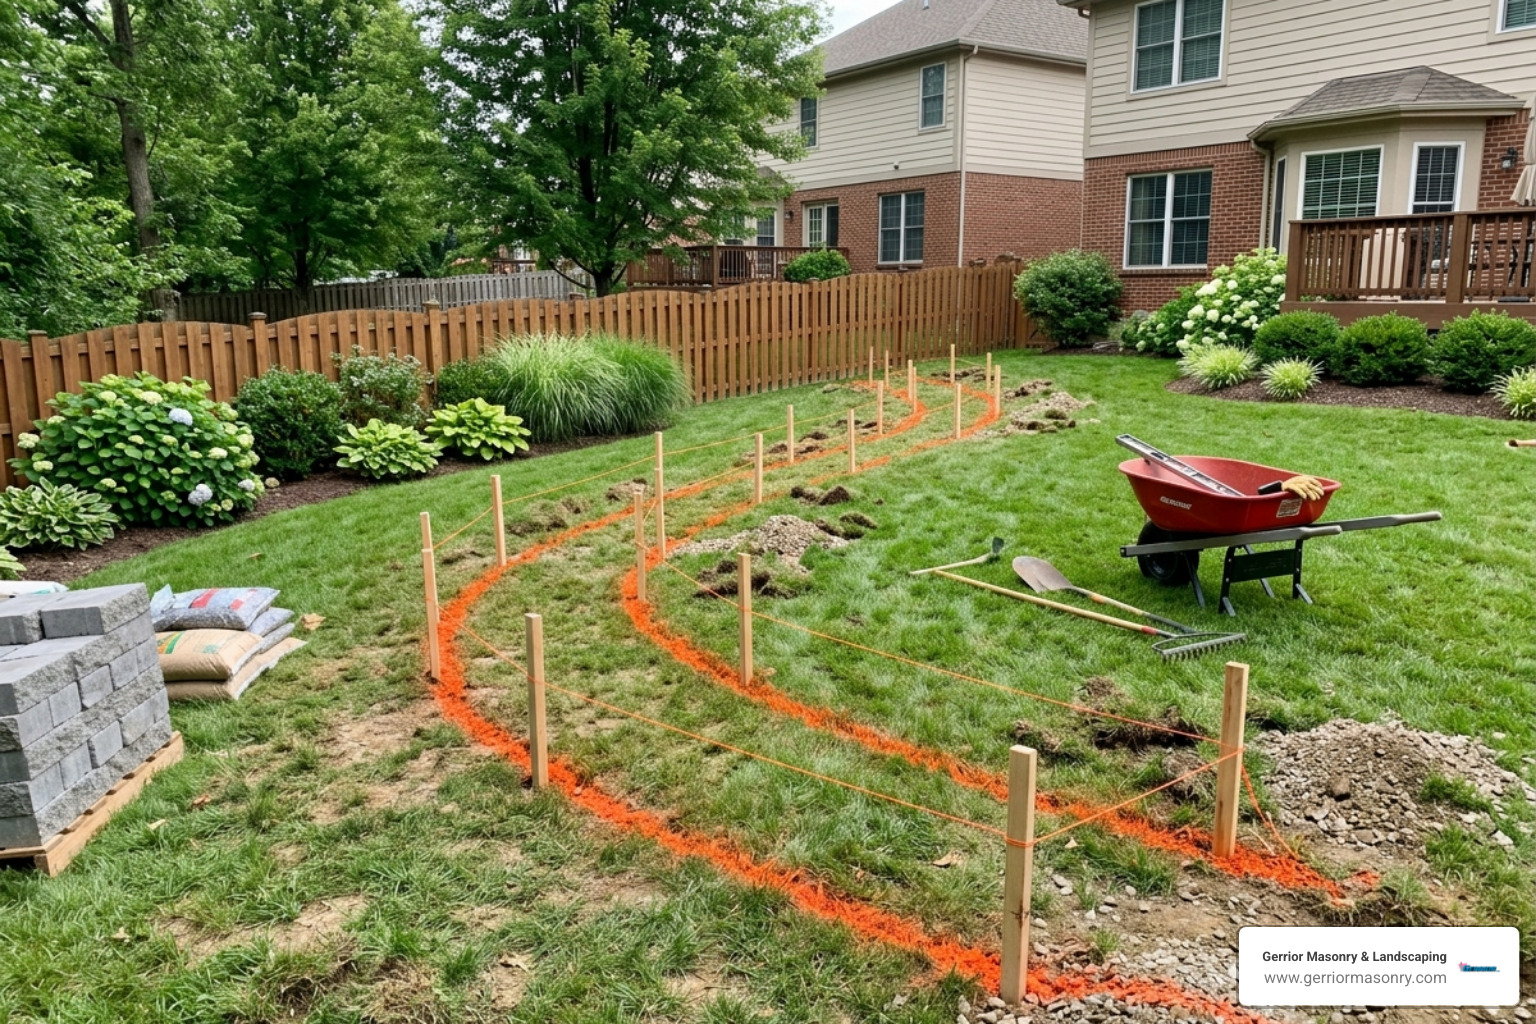
Plan and mark the layout using stakes and string lines.
Dig a trench 4-6 inches deep, plus the height of the buried block.
Compact a gravel base 4-6 inches thick using a plate compactor.
Lay the first course perfectly level to ensure the entire wall stays straight.
Stack courses with staggered joints to maximize structural integrity.
Install drainage using perforated pipe and clean drainage gravel.
Cap the wall with heavy-duty masonry adhesive for a finished look.
According to the National Association of Realtors, landscape redesigns like retaining walls can recover 105% of their value upon home sale. This makes it one of the few home improvement projects that can actually pay for itself. Beyond resale, homeowners often appreciate the everyday benefits right away: reduced washout after storms, better use of uneven ground, and a more finished appearance that complements patios, stairs, and walkways. However, poor installation leads to collapse, which can be a costly and dangerous liability. Success depends on meticulous preparation and advanced drainage planning.
I’m Joe Gerrior, owner of Gerrior Masonry & Landscape Construction Corp. With over 34 years of experience in Massachusetts, I’ve led hundreds of paver retaining wall installation projects. This guide ensures your wall stands the test of time. In New England, that means building for drainage, frost movement, and seasonal weather swings rather than focusing only on appearance. Our local climate is particularly harsh on masonry; the constant freeze-thaw cycles can heave a poorly built wall out of the ground in just one or two seasons. We focus on deep bases and flexible drainage systems to counteract these natural forces.
A retaining wall is only as strong as the layers behind it. The visible block face matters far less than the buried base, compacted stone, and drainage components that relieve pressure. When those hidden elements are installed correctly, the finished wall stays straighter, lasts longer, and requires less maintenance over time. Think of the wall as a filter: it must allow water to pass through the drainage zone while holding back the weight of the earth.
Step-by-Step Guide to Paver Retaining Wall Installation
Most DIY-friendly walls under 3 feet are segmental retaining walls using interlocking blocks. Water is the primary cause of failure; saturated soil creates immense pressure, making gravel and drainage pipe essential. Before any digging starts, take time to evaluate where runoff currently travels, whether nearby downspouts discharge toward the wall area, and how the finished grade will move water away from the structure. Understanding the soil type is also vital; clay soils retain more water and expand, requiring more robust drainage than sandy soils.
The Installation Process
Choose Wall Type: Decorative walls are shorter; true retaining walls hold back slopes. Walls over 36 inches usually require permits and potentially an engineer’s stamp.
Pick Block System: Interlocking lip blocks are easiest for DIYers to maintain consistent setback and ensure the wall leans slightly into the hill for stability.
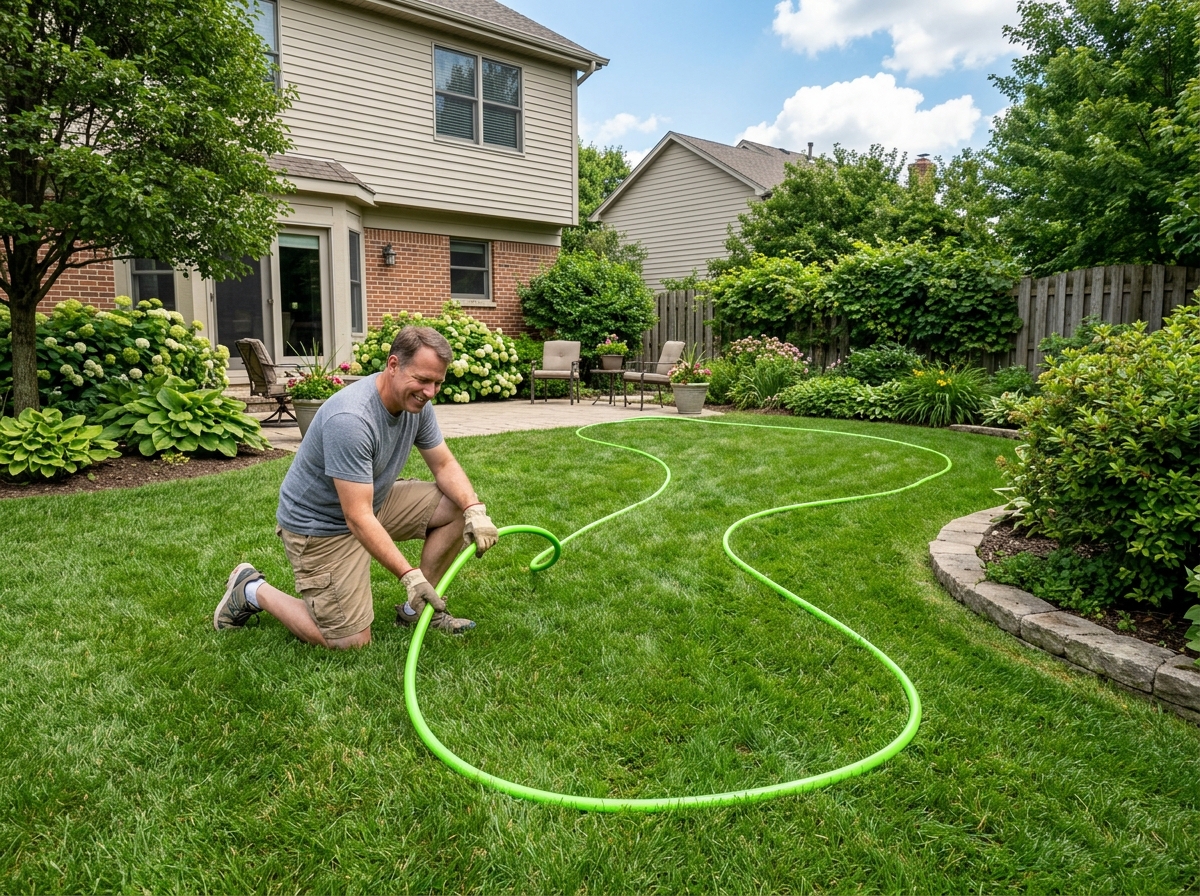
Plan Layout: Use strings for straight walls and garden hoses for curves. Always start at the lowest elevation point to ensure the base remains level as you move uphill.
Excavate: Remove organic soil (grass and roots) and dig a trench for the compacted crushed-stone leveling pad. The trench should be twice as wide as the block.
First Course: This must be perfectly level to prevent structural issues later. If the first row is off by even a fraction of an inch, that error will be magnified by the time you reach the top.
Stacking: Use a running bond pattern to stagger joints. This ensures that no vertical seam runs through the wall, which would create a weak point.
Drainage: Install a gravel zone, landscape fabric, and perforated pipe behind the wall. The fabric prevents soil from clogging the gaps between the drainage stones.
Finish: Secure capstones with high-quality masonry adhesive and grade the soil to direct water away from the top of the wall.
Each step supports the next one. If layout is off, the excavation will be inconsistent. If the trench is uneven, the first course will rock. If drainage is skipped, even a good-looking wall can lean or bulge after heavy rain or winter freeze-thaw cycles. That is why experienced installers spend so much time on the parts of the project that disappear once backfilled. The “invisible” work is what determines if the wall lasts 5 years or 50 years.
Essential Tools and Materials
Blocks: Use specific retaining wall pavers designed for weight-bearing. These are denser and more durable than standard garden edging.
Base Material: 3/4-inch crushed stone (angular, not round) for the pad. See our guide on base for retaining wall.
Drainage: 4-inch perforated pipe and non-woven landscape fabric.
Tools: Shovel, pickaxe, wheelbarrow, 4-foot level, torpedo level, hand tamper or plate compactor, rubber mallet, and a masonry saw with a diamond blade.
You may also need stakes, string line, marking paint, a transit or laser level for larger jobs, and personal protective equipment such as gloves, eye protection, and hearing protection when cutting block. Having the right compaction equipment is especially important because loose base stone will settle later and telegraph problems through the entire wall. A plate compactor is highly recommended over a hand tamper for any wall over 10 feet long.
Foundation and First Course
The base is the most critical element. For walls under 4 feet, a trench 18 inches wide and 4-6 inches deep (plus block burial depth) is standard. Burying at least one full block (or 10% of the wall height) provides necessary stability against “toe kick,” where the bottom of the wall slides outward. Level the base side-to-side and front-to-back meticulously using a screed pipe or a long straightedge. For more on methods, see Build Retaining Walls.
Take extra time with this course. Check each block individually, then check across multiple blocks as the row grows. Small errors compound quickly, especially on curved walls or long runs. If one section is high, resist the urge to fix it by adding loose material underneath; remove the block, correct the base, recompact, and reset it properly. The first course is the only one that needs to be perfectly level; subsequent courses will follow its lead.
Managing Drainage and Backfill
Hydrostatic pressure—the weight of water trapped in the soil—causes walls to bulge and eventually fail. To prevent this:
Gravel Chimney: Maintain a 12-inch wide gravel zone of clean, 3/4-inch crushed stone directly behind the blocks.
Compaction: Backfill with gravel in 6-inch lifts and compact thoroughly. Avoid using heavy machinery directly against the wall, as the lateral pressure can push the blocks out of alignment.
Landscape fabric helps separate soil from the gravel zone so fines do not clog drainage over time. The top of the wall should also be considered part of the drainage plan. If topsoil is pitched toward the wall, runoff can still saturate the backfill, so final grading should always move water outward and away. In areas with heavy rainfall, consider a “swale” or a shallow trench behind the wall to catch surface water before it reaches the structure.
Safety and Reinforcement
Call 811 before digging to locate utilities. For walls exceeding 3-4 feet, geogrid reinforcement and professional engineering are typically required to handle the load. Geogrid is a high-strength synthetic mesh that is sandwiched between layers of block and extended back into the soil to create a larger, unified mass. Learn more at Build Retaining Walls.
Additional caution is needed if the wall supports a driveway, sits near a foundation, or carries surcharge loads such as parked vehicles, sheds, or steep slopes above. In these cases, professional design is often the safest path because soil conditions and loading can change the wall requirements significantly. A wall holding back a flat lawn is under much less stress than a wall holding back a slope that continues to rise behind it.
Planning Your Project: Costs, Materials, and Professional Help
Calculating Materials
To find the number of blocks: (Wall Length x Height) / Square-foot coverage per block. Always add 10% extra for cuts, breakage, and future repairs. Also account for cap units, which are often sold separately, as well as base stone, drainage gravel, and pipe. Don’t forget the masonry adhesive; you’ll typically need one tube for every 10-15 linear feet of capping.
Common Mistakes
Skipping compaction: This is the #1 cause of settling and wavy walls.
Using soil for backfill: Soil holds water; gravel allows it to drain. Never use dirt behind the blocks.
Using pea gravel: Round stones like pea gravel act like ball bearings and do not lock together for stability.
Ignoring Surcharge: Failing to account for the weight of a car or a shed near the top of the wall.
Failing to bury the first course: A wall sitting on top of the ground has no resistance to sliding.
Finishing Touches
Clean the top course thoroughly with a brush before applying construction adhesive to caps. A 1 to 1.5-inch overhang helps shed water away from the face of the wall, preventing staining and erosion. Grade the final topsoil so water runs away from the wall structure, and consider planting low-maintenance groundcover to further stabilize the soil.
Estimating Costs for Your Paver Retaining Wall Installation
Note: These are average costs based on internet data and not actual costs for Gerrior Masonry services.
DIY is suitable for low, dry-site walls. Hire a professional if the wall is over 3 feet, supports a driveway, or involves complex drainage. Professional masons have access to heavy compaction equipment and laser levels that ensure a level of precision difficult to achieve with hand tools. Gerrior Masonry & Landscaping provides expert oversight to ensure walls survive New England’s freeze-thaw cycles.
Gerrior Masonry & Landscape Construction is based in Woburn, MA, and services Middlesex and Essex County, Massachusetts. We specialize in creating durable, beautiful structures that enhance both the utility and the value of your property.
Why Building a Dry Well for Drainage Could Save Your Yard (and Your Foundation)
Building a dry well for drainage is one of the most effective ways to stop standing water from damaging your yard, foundation, and landscaping. Here’s a quick overview of how it works:
How to build a dry well for drainage — quick summary:
Test your soil — Dig a 12-inch hole, fill it with water, and measure how fast it drains. You need at least 0.5 inches per hour.
Pick your location — At least 10 feet from your foundation, away from septic systems and utility lines.
Dig the pit — Typically 3–4 feet deep and 3–4 feet wide, depending on your drainage area.
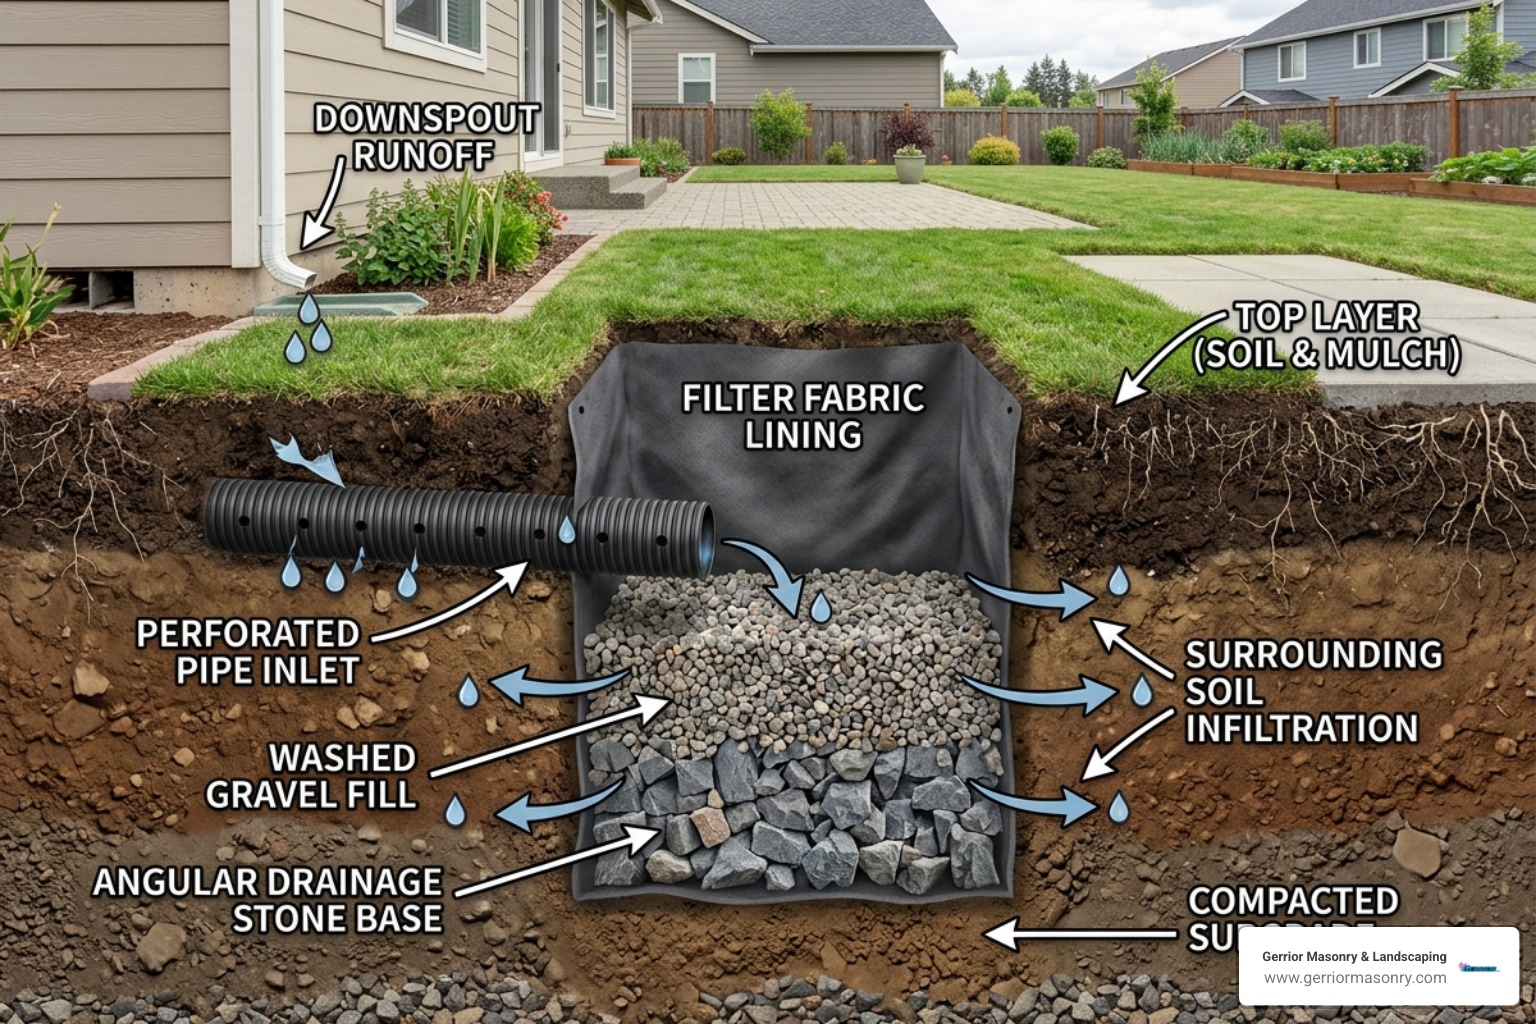
Line with filter fabric — Wrap the hole in non-woven geotextile fabric to keep soil out.
Fill with washed stone or install a prefab unit — Gravel or a perforated plastic barrel collects and slowly releases water into the soil.
Connect your inlet pipe — Slope it at least 1/4 inch per foot from the water source (downspout, sump pump, etc.).
Backfill and restore — Cover with soil, sod, or plants.
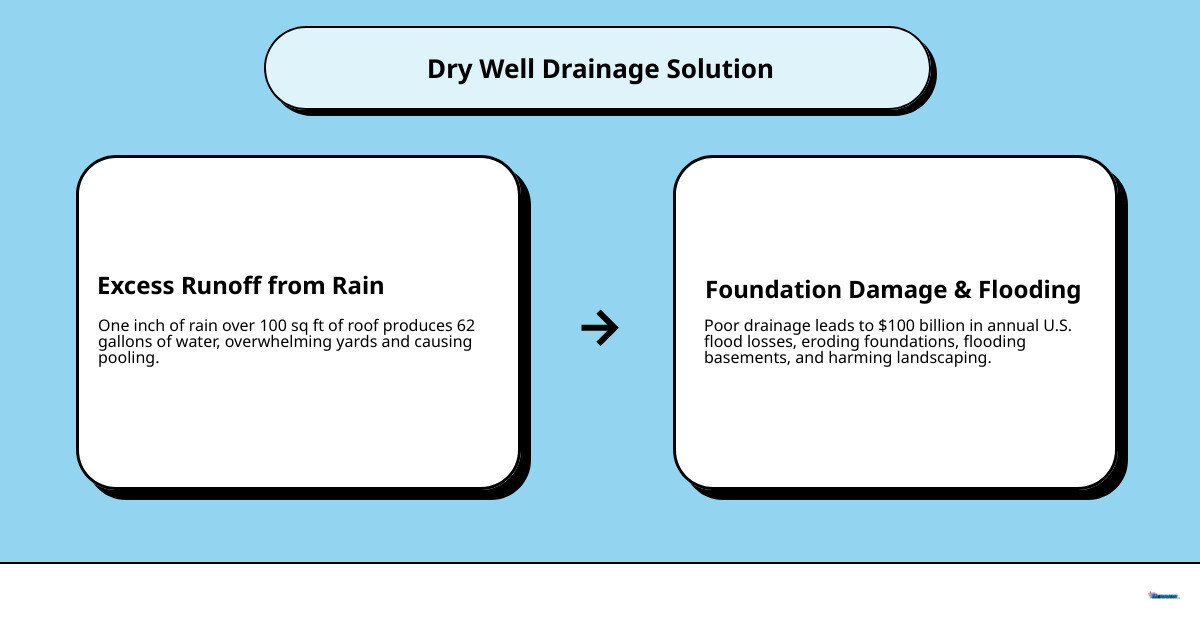
Every year, poor drainage causes billions of dollars in property damage across the United States. In fact, flood-related losses run an estimated $100 billion annually — and a waterlogged backyard is often the first warning sign. What most homeowners don’t realize is that just one inch of rain produces roughly 62 gallons of runoff for every 100 square feet of roof or hard surface. That water has to go somewhere — and if your yard can’t handle it, your foundation, landscaping, and even your basement will pay the price.
In suburban environments like those found in Woburn or Burlington, the prevalence of impermeable surfaces—driveways, patios, and roofs—means that rainwater has nowhere to go. This leads to “sheet flow,” where water moves across the surface, picking up pollutants and eroding topsoil. By building a dry well, you are essentially creating a localized groundwater recharge station, which is a cornerstone of modern Low Impact Development (LID) practices. Instead of pooling on the surface or seeping toward your home, it gets directed underground, where it slowly infiltrates the soil and recharges the groundwater below.
I’m Joe Gerrior, owner of Gerrior Masonry & Landscape Construction Corp., and after 34 years of solving drainage problems for Massachusetts homeowners, building a dry well for drainage is one of the most practical and cost-effective solutions I recommend. In this guide, I’ll walk you through everything you need to know — from soil testing to final installation.
The Essentials of Building a Dry Well for Drainage
When we talk about building a dry well for drainage, we are essentially talking about creating an underground storage tank for rainwater. Think of it as a “waiting room” for runoff. During a heavy Middlesex County thunderstorm, the ground often can’t absorb water as fast as it falls. The dry well catches that surge, holds it safely away from your home, and lets it “wait” until the surrounding soil is ready to soak it up.
There are two primary ways to construct these systems: traditional gravel-filled pits and modern prefabricated systems.
Feature
Traditional Gravel Well
Prefabricated (Plastic) Well
Storage Capacity
Lower (~40% void space)
Higher (Empty hollow chamber)
Installation Effort
High (Moving tons of stone)
Moderate (Lightweight barrel)
Longevity
Moderate (Prone to silting)
High (Easier to protect/clean)
Best For
Small runoff areas
Large roofs or sump pumps
Traditional wells rely on the “void space” between rocks. If you fill a hole with washed stone, about 40% of that hole is still empty air where water can sit. A typical 3’x3’x3’ traditional well provides about 11 cubic feet of actual water storage. Modern prefabricated systems, like perforated plastic barrels, offer nearly 100% void space inside the unit, meaning you get much more storage in a smaller footprint.
To size your well correctly, you need to estimate the volume of water it will receive. A common rule of thumb is to design for a 1-inch rain event. If you are draining 500 square feet of roof, that’s about 310 gallons of water. Since one cubic foot holds about 7.48 gallons, you would need roughly 41 cubic feet of storage. If using a prefab unit like an NDS Flo-Well, which holds about 50 gallons, you might need multiple units connected in a series to handle a large roof section.
Determining Soil Suitability and Percolation Rates
Before you start swinging a pickaxe, we need to make sure your soil can actually handle the water. If you have heavy clay—common in parts of Essex County—a dry well might just turn into an underground pond that never empties.
To check this, you must perform a percolation test (or “perc test”):
Dig a hole about 12 inches deep in the area where you want the well.
Fill it with water and let it drain completely to saturate the area.
Refill it and measure how far the water level drops in one hour.
For a dry well to be effective, the soil must infiltrate at a rate of at least 0.5 inches per hour. Sandy soils are the “gold standard,” typically draining within 24–48 hours. If you’re dealing with heavy clay, it could take 3–7 days to empty, which might lead to overflow during back-to-back storms. For a deep dive into the physics of this, you can check out this Scientific research on dry well design.
Site Planning and Setbacks for Building a Dry Well for Drainage
Location is everything. We’ve seen DIY projects where the homeowner installed a dry well too close to the house, effectively injecting water directly into their own basement. To avoid this, follow these strict setbacks:
Septic Systems: Keep at least 50 feet away from any septic tanks or leach fields to prevent interference.
Property Lines: Usually at least 3–5 feet away to avoid dumping your water onto the neighbor’s lawn.
Water Table: The bottom of your well should be at least 4 feet above the seasonal high water table.
Crucial Step: Before you dig, call 811 (DigSafe). In Massachusetts, hitting a gas or power line isn’t just dangerous; it’s an expensive mistake that will ruin your weekend faster than a flooded basement.
Step-by-Step Guide to Installation and Maintenance
Is building a dry well for drainage a feasible DIY project? For a healthy homeowner with a strong back and a few weekends to spare, yes. However, it is labor-intensive. You’ll be moving hundreds of pounds of soil and stone. If the thought of digging a 4-foot deep pit makes your joints ache, you might want to consider professional help.
Safety is paramount. Ensure the sides of your excavation are stable so they don’t cave in while you’re working. If you’re digging a trench for the inlet pipe, remember the “golden rule” of drainage: water doesn’t flow uphill. You need a consistent slope of 1/4 inch per foot leading toward the well.
Materials and Tools for Building a Dry Well for Drainage
To do the job right, we recommend gathering all your materials beforehand. You don’t want to be stuck with an open pit in your yard when a surprise rainstorm hits.
Essential Tool List:
Shovel and pickaxe (or rent a small power excavator).
Level (to check pipe pitch).
Hacksaw (for cutting PVC).
Landscape fabric staples.
Wheelbarrow.
Required Materials:
Landscape Fabric: Use non-woven geotextile fabric. This is the “skin” of your dry well; it lets water through but keeps soil from clogging your stones. Never use woven weed barrier; it will clog instantly.
PVC Piping: 4-inch diameter is standard. Use solid pipe near the house and perforated pipe once you’re at least 10 feet away.
Catch Basins: These act as a “pre-filter” to catch leaves and sediment before they enter the well. Check out More info about dry well catch basins for details.
Washed Stone: 3/4-inch to 1.5-inch rounded stones are best. Avoid “crusher run” or stone with “fines” (dust), as these will clog the system.
The 5-Step Installation Process
Here is how we typically handle a dry well project at Gerrior Masonry:
Excavation: Dig your pit. For a standard residential prefab unit, a hole 4 feet wide and 4 feet deep is common. Dig your connecting trench from the downspout or soggy area.
Lining: Line the entire pit with landscape fabric. Leave enough extra at the top to fold over like a present once the well is full.
Assembly: If using a prefab unit, knock out the drainage ports and place it in the center. If building a traditional gravel well, fill the bottom 6 inches with stone. Connect your inlet pipe, ensuring the 1/4-inch-per-foot pitch. Pro Tip: Prefab units need to breathe. If air can’t escape, water can’t get in, so ensure you install an air vent.
Backfilling: Fill the space around the prefab unit with washed stone. If it’s a gravel well, fill the entire pit with stone to within 6–12 inches of the surface. Fold the landscape fabric over the top of the stone.
Restoration: Top the fabric with a final layer of stone or cover with soil and sod. We often recommend adding an overflow emitter—a pop-up valve that lets water escape safely to the surface if the well ever completely fills up during a “once-in-a-century” storm. For more on managing roof water, see More info about gutter runoff solutions.
Estimating Costs and Professional Considerations
When planning your budget, keep in mind that these are average costs based on internet data and not actual costs for Gerrior Masonry services. Prices can vary wildly based on your soil type and how much manual labor is involved.
DIY Installation: Generally ranges from $950 to $3,500. This covers the prefab unit ($150–$500), gravel, pipe, fabric, and tool rentals.
Professional Installation: For a small residential system, you might see quotes between $1,200 and $5,000. For large-scale residential drainage or commercial-grade systems, costs can range from $6,000 to over $20,000.
Why the wide range? If we hit a ledge (solid rock) or have to navigate complex underground utilities, the price goes up. You can find More info about dry well installation costs to help you plan your project.
Long-Term Maintenance and Troubleshooting
A dry well is mostly “set it and forget it,” but it isn’t immortal. Over time, fine silt and sediment can build up.
Annual Check: Every autumn, clean your gutters and check the catch basins. If the catch basin is full of gunk, that’s gunk that didn’t go into your dry well—which is a good thing!
Slow Drainage: If you notice water pooling over the well days after a rain, the fabric or the soil may be clogged. Sometimes a high-pressure flush with a garden hose can help, but eventually, the stone may need to be replaced.
Winter Concerns: In Massachusetts, the ground freezes. If your inlet pipe is too shallow, water can freeze inside it and back up. We ensure pipes are buried deep enough and sloped perfectly to prevent standing water from turning into an ice plug.
The environmental benefits of building a dry well for drainage are significant. By keeping water on your property, you’re reducing the load on municipal storm sewers and preventing local stream erosion. It’s a sustainable choice that pays dividends in property value and peace of mind.
If you’re unsure about the soil or the scale of the project, it’s always wise to consult with More info about professional dry well installers. We can help ensure the system is sized correctly for your roof area and local rainfall patterns.
Gerrior Masonry & Landscape Construction is based in Woburn, MA, and services Middlesex and Essex County, Massachusetts.
Why an Outdoor Paver Patio Is the Smartest Upgrade for Your Home
An outdoor paver patio is one of the highest-value improvements you can make to your Massachusetts home. Here’s a quick summary of what you need to know:
What it is: A paved outdoor surface made from interlocking concrete, natural stone, or brick units
Key advantage over concrete: Pavers handle up to 8,000 PSI — twice the strength of poured concrete (4,000 PSI)
Lifespan: Up to 100 years with proper installation, vs. 10 years or less for improperly installed concrete
Maintenance: Simple — sweep regularly, pressure wash annually, reseal every 3-5 years
Cost range: Roughly $8–$50+ per square foot installed, depending on materials and complexity
Best for: Patios, pool decks, walkways, driveways, and outdoor kitchens
Your backyard should be a place you actually want to spend time in. But cracked concrete slabs, muddy grass patches, and dated surfaces make that hard. An outdoor paver patio solves all of that — with a surface that’s durable, beautiful, and built to last for generations.
Unlike poured concrete, pavers are interlocking. That means they flex with the ground as it shifts through New England’s freeze-thaw cycles, instead of cracking under pressure. And if one paver does get damaged? You replace just that piece — not the whole patio.
The design options are nearly endless: dozens of colors, shapes, textures, and patterns that can match any home style, from classic colonial to modern contemporary.
I’m Joe Gerrior, owner of Gerrior Masonry & Landscape Construction Corp., and I’ve been designing and installing outdoor paver patios for homeowners across Massachusetts for over 34 years. In this guide, I’ll walk you through everything — from choosing the right materials to understanding real costs — so you can make a confident, informed decision.
When we sit down with a homeowner in Middlesex or Essex County to plan a new outdoor paver patio, the first thing we discuss is the “why.” Are you looking for a quiet spot for morning coffee in Arlington, or a massive entertainment hub for summer barbecues in Reading?
The design phase is where your property’s aesthetics truly come to life. Hardscaping isn’t just about utility; it’s about creating a “visual feast” that complements your home’s architecture. Whether you want a raised patio that overlooks a lake in Wakefield or a simple, elegant transition from your back door in Woburn, the materials you choose are the foundation of your success.
Choosing the Right Materials for Your Outdoor Paver Patio
Selecting the right material is a balance of budget, durability, and style. In our three decades of experience, we’ve seen how different materials react to the harsh Massachusetts winters.
Material Type
Durability
Aesthetic
Maintenance
Concrete Pavers
Extremely High (8,000 PSI)
Versatile; mimics stone or brick
Low; easy to clean and replace
Natural Stone
High (Varies by stone)
Elegant, unique, high-end
Moderate; may require specific cleaners
Brick Pavers
High
Classic, rustic, timeless
Low; develops a beautiful patina
Porcelain Pavers
Very High
Modern, sleek, skid-resistant
Very Low; frost and stain resistant
Concrete Pavers
Concrete pavers are the workhorse of the industry. They are engineered to be incredibly strong—often twice as strong as a standard concrete slab. They come in modular sizes, making them perfect for creating intricate patterns. Many top-tier concrete pavers are even guaranteed for the life of your home, providing peace of mind for homeowners in towns like Lexington and Winchester. We also offer permeable paver options, which allow rainwater to filter through the joints and back into the ground, reducing runoff and protecting your local watershed.
Natural Stone
If you want a one-of-a-kind look, natural stone is the way to go. Flagstone, granite, and marble offer textures and colors that manufactured products simply can’t perfectly replicate. While they might require a bit more care, the elegance they bring to a property in Concord or Belmont is unmatched.
Brick Pavers
For that classic New England charm, brick is a staple. Brick pavers offer rich, earthy tones and a rustic texture that looks better as it ages. If you are interested in the technical side of how these are laid, you can check out this scientific research on brick patios. We also offer specialized brick paver patio services tailored to the local climate.
Customizing Your Outdoor Paver Patio Design
One of the most exciting parts of building an outdoor paver patio is the level of customization available. You aren’t stuck with a gray rectangle. You can play with:
Shapes: Beyond squares and rectangles, we use hexagonal, round, and even irregular “natural” shapes to create interest.
Textures: You can choose from smooth, modern finishes to “tumbled” surfaces that look like they’ve been there for centuries.
Color Palettes: From cool grays and deep blacks to warm tans and variegated multi-colors, we can match your home’s siding or stone foundation perfectly.
Patterns: The way pavers are laid changes the entire vibe.
Herringbone: A classic 45 or 90-degree angle pattern that is excellent for high-traffic areas because it locks the pavers together tightly.
Basketweave: A timeless look that evokes early American streets.
Running Bond: Simple and clean, often used to make a space feel longer or wider.
We often suggest adding a “paver rug”—a section of the patio with a different pattern or color—to define a dining area or a fire pit zone. Integrated lighting is another popular upgrade; we can install low-voltage LED lights directly into the pavers or along the perimeter to enhance safety and ambiance after the sun goes down. For more inspiration on layouts, see our patios designs page.
Professional Installation and Versatile Applications
While we love a good DIY spirit, installing a patio that lasts 30 to 100 years requires precision. A professional installation ensures that the drainage is handled correctly (usually a 1/4-inch slope per foot away from the house) and that the base is compacted enough to prevent the “waves” you see in amateur jobs.
The process typically involves:
Excavation: Digging down 6 to 8 inches to clear out organic material.
Base Layer: Adding 4 to 6 inches of crushed gravel, compacted in 2-inch layers.
Bedding Sand: A 1-inch layer of coarse sand to provide a smooth surface for the pavers.
Laying Pavers: Placing the units in your chosen pattern.
Joint Sand: Sweeping polymeric sand into the cracks and misting it with water to lock everything in place.
Pavers aren’t just for patios, either. We frequently install them for:
Walkways: Creating a safe, non-slip path from the driveway to the front door.
Pool Decks: Using cool-to-the-touch natural stone or skid-resistant porcelain. Check out our work on pool decks patios for examples.
Driveways: Using heavy-duty interlocking pavers that can handle the weight of multiple vehicles without cracking.
When you invest in an outdoor paver patio, you aren’t just buying a place to put your grill. You are investing in a long-term asset. Unlike wood decks that rot or concrete that cracks, a well-built paver patio is a “legacy” feature. It increases curb appeal and significantly boosts property value in competitive markets like Newton and North Andover.
Durability and Essential Maintenance Requirements
The durability of pavers is legendary. Most concrete pavers can withstand 8,000 PSI (pounds per square inch) of pressure. To put that in perspective, standard poured concrete is usually rated at 4,000 PSI. This high strength is why pavers are the preferred choice for driveways and high-traffic commercial spaces.
To keep your patio looking brand new, we recommend a simple maintenance schedule:
Regular Cleaning: A quick sweep or a spray with a garden hose keeps debris from settling in the pores.
Annual Inspection: Check the joints to see if the sand has washed away.
Resealing: We recommend applying a high-quality sealant every 3-5 years. This protects against UV rays, prevents staining from spilled wine or grill grease, and keeps the colors vibrant. You can opt for a “natural look” or a “wet look” finish depending on your aesthetic preference.
Weed Prevention: Using polymeric sand during installation creates a hard barrier that makes it nearly impossible for weeds to take root.
For more tips on keeping your backyard looking sharp, visit our page on backyard patio pavers.
Budgeting for Your Hardscaping Project
We believe in transparency when it comes to costs. While we can’t give you a final quote without seeing your yard, we can provide industry averages to help you plan. Investing in a professional installation also saves money over time by avoiding the costly repairs associated with shifting bases or poor drainage that often plague DIY projects.
Important Note: The following figures are average costs based on general internet data and are not the actual prices for Gerrior Masonry & Landscaping services. Every project is unique, and factors like soil condition, accessibility, and chosen materials will influence the final price.
A typical project can range from $2,400 to $25,000+, with a wide variety of factors at play:
Materials: You might find individual stepping stones for as low as $0.68, while high-end natural stone or large-scale projects can exceed $1,500 to $5,000 just for material delivery.
Square Footage: On average, expect to pay between $8 and $50 per square foot for a professionally installed patio.
Labor: Professional labor typically ranges from $50 to $80 per hour, or $4 to $15 per square foot, depending on the complexity of the pattern and the amount of excavation required.
Choosing a contractor is the most important decision you’ll make. You want a team that knows the difference between the soil in Danvers and the ledge in Lynnfield. We invite you to view our portfolio of completed projects to see the level of detail we bring to every job site, from small garden paths to expansive multi-level entertainment areas.
At Gerrior Masonry & Landscaping, we are Woburn-based experts with over 30 years of experience serving the local community. What sets us apart?
Owner Oversight: Joe Gerrior is personally involved in every project, ensuring that our high standards are met from the first shovel in the ground to the final sweep of sand.
Skilled Team: We don’t just hire seasonal help; our crew consists of experienced masons who understand the nuances of stone and concrete.
Commercial Reliability: During the winter, we transition to commercial snow removal for businesses across the region. (Note: We do not offer residential snow services).
If you’re ready to stop dreaming and start building, search for paver patio installation near me and you’ll find us ready to help. We’ve transformed hundreds of backyards into functional, beautiful retreats, and we’d love to do the same for yours.
Whether you are in Acton, Beverly, or right here in Woburn, your dream outdoor paver patio is just a phone call away.
Gerrior Masonry & Landscape Construction Corp. is based in Woburn, MA, and proudly services Middlesex and Essex County, Massachusetts. Contact us today to discuss your next hardscaping project!
Why Outdoor Islands Are the Fastest Way to Transform Your Backyard
Outdoor islands are freestanding or built-in kitchen structures designed for cooking, prep, and entertaining outside. If you’re looking to buy one, here’s a quick overview of your best options (please note these are average costs based on internet data and not actual costs for Gerrior Masonry services):
Type
Best For
Price Range (avg. internet data)
Prefab modular island
Quick setup, portability
$2,400 – $10,000+
Complete prefab unit
All-in-one convenience
$8,000 – $24,000+
Custom masonry island
Permanent, high-end look
$15,000 – $45,000+
The appeal is simple. You get a dedicated outdoor cooking and entertaining space without tearing up your yard or waiting months for a contractor. Many prefab units ship mostly assembled and can be set up in a single day. Others, like stone-based systems, bring a permanent, high-end feel that integrates seamlessly with existing hardscaping.
From lightweight polymer builds to 1,000-pound engineered stone systems, the range of outdoor islands on the market today covers almost every budget, style, and backyard size.
I’m Joe Gerrior, owner of Gerrior Masonry & Landscape Construction Corp., and after 34+ years building hardscapes and outdoor living spaces across Massachusetts, I’ve seen how the right outdoor island can completely change how a family uses their backyard. In this guide, I’ll walk you through the best options available so you can make a confident, informed choice.
Key Features and Benefits of Modern Outdoor Islands
When we talk about outdoor islands, we aren’t just talking about a place to plop a grill. Modern designs are built to be the “command center” of your backyard. One of the biggest reasons these units have exploded in popularity is what we call “multitasking.” In a traditional setup, the cook is often isolated at a standalone grill while the guests are on the patio. With a well-designed island, you can cook up a storm while remaining part of the conversation. This social integration is the primary reason homeowners in Massachusetts are moving away from simple carts toward permanent island structures.
Durability is the cornerstone of any quality island. Because these units sit through the harsh New England winters—from the heavy snows in Andover to the salt air in Beverly—the materials must be top-tier. High-quality outdoor islands use weather-resistant materials like 304 stainless steel, engineered stone panels, and UV-stabilized HDPE poly lumber. These materials are specifically chosen because they do not expand and contract at the same rate as cheaper alternatives, preventing the cracking and warping that often plagues lower-end DIY kits.
The benefits of adding an island to your space go beyond just convenience:
Increased Property Value: A functional outdoor kitchen is a high-ROI upgrade that many home buyers in towns like Lexington and Concord actively look for. It extends the usable square footage of the home without the cost of a full interior addition.
Entertainment Ease: Units like the Outdoor Island from Kauffman Lawn Furniture double as buffet tables or bars, making it easy to serve large groups without cluttering your main dining table.
Organization: Instead of running back and forth to your indoor kitchen, a built-in outdoor kitchen keeps your tools, spices, and cold drinks all in one place, reducing foot traffic through your back door.
Expansion Options: Many modern systems are segmental, meaning you can start with a basic grill island and later add a bar height counter or a pizza oven module as your budget allows.
Prefab vs. Custom-Built Outdoor Islands
Choosing between a prefab kit and a custom outdoor kitchen often comes down to your timeline and how specific your needs are.
Prefabricated outdoor islands are the “fast track” to backyard upgrades. Companies like BBQGuys or Paradise Grills offer units that can be assembled in just a few hours. These are incredibly cost-effective because they eliminate the need for extensive on-site masonry work. Furthermore, some prefab units are surprisingly portable; if you decide to move from Woburn to Winchester, a professional moving company can often transport your island to your new home, protecting your investment.
On the other hand, a customizable outdoor kitchen provides a level of integration that prefab units can’t always match. When we build a custom island, we ensure the stone matches your home’s foundation or your existing walkways. You aren’t limited to standard 8-foot dimensions; we can wrap an island around a specific corner of your patio or build it to accommodate a specific high-end appliance suite that might not fit in a standard cutout.
Essential Components for Your Kitchen Island
To get the most out of your outdoor islands, you need to think about the “work triangle”—the distance between your cooking surface, your prep area, and your refrigeration. A well-planned triangle minimizes movement and makes cooking more efficient.
Premium Grills: This is the heart of the island. Look for 32-inch or 36-inch built-in models with at least 4 burners. High-end units often feature illuminated control knobs, which are a game-changer for evening grilling.
Integrated Sinks: Having a sink means you can wash your hands or rinse vegetables without heading inside. This requires plumbing, but the convenience is unmatched.
Stainless Storage: Double access doors and trash pullouts keep your space clean and organized. Look for sealed pantries to keep pests and moisture away from your dry goods.
Refrigeration: Outdoor-rated mini-fridges keep drinks cold and prevent perishable ingredients from sitting out in the sun. Ensure the unit is specifically rated for outdoor use to handle temperature fluctuations.
Lighting: Proper lighting is essential for safety and ambiance. We always recommend checking out lighting tips for your outdoor kitchen and patio to ensure you have the right mix of task and mood lighting.
For those looking at specific specs, the Nantucket Kitchen Island by Nicolock is a great example of a system that balances size and features, often featuring pre-cut openings for Sizzler Pro grills and single access doors.
Sizing and Placement for Outdoor Islands
Before you buy, you must measure your space carefully. A common mistake we see in Lexington, MA is homeowners choosing an island that is too large for their patio, disrupting the flow of foot traffic and making the space feel cramped.
Standard Sizes: Most standard prefab islands are about 8 feet long (96 inches). This size typically accommodates a grill, a small prep area, and a side burner or sink. If you have a smaller patio, 6-foot models are available but offer significantly less counter space.
Weight Considerations: This is the most overlooked factor. A polymer-based island might only weigh 200 lbs, but an engineered stone unit like the Nantucket can weigh 1,000 lbs. Heavy-duty stone islands, such as the Grill Island Deluxe with Verona Wall, can even reach weights of 6,500 lbs.
Foundation Requirements: Because of these weights, you cannot simply place a stone island on grass. It requires a solid, level outdoor kitchen patio or a reinforced concrete pad to prevent sinking or cracking over time. Proper site preparation is the difference between an island that lasts 30 years and one that shifts after the first winter.
Choosing and Maintaining Your Island for Long-Term Value
Investing in outdoor islands is a long-term commitment to your home’s lifestyle and value. To ensure your island looks as good in year ten as it does on day one, you need to choose the right configuration for your usage needs and commit to a basic maintenance schedule.
Modular vs. Complete Prefab Configurations
Feature
Modular Islands
Complete Prefab Units
Customization
High – add pieces as needed
Low – fixed configuration
Setup Time
Moderate
Very Fast (1 day)
Portability
High
Moderate
Appliances
Often sold separately
Usually included
Modular systems allow you to grow your kitchen over time. You might start with a grill module and later add a bar module or a “Big Green Egg” cutout module. This is ideal for homeowners who want to spread out the investment. Complete units are better for those who want a “plug and play” solution where the grill, fridge, and countertop are all pre-selected and guaranteed to fit perfectly without any guesswork.
Durable Materials for Every Climate
In Massachusetts, our weather is the ultimate test for outdoor kitchens. Here is how common materials stack up against the elements:
Paving Stones & Masonry: These are the gold standard for durability. They handle freeze-thaw cycles exceptionally well and offer a timeless aesthetic that complements New England architecture.
304 Stainless Steel: This is the only grade of steel you should accept for your outdoor appliances and drawers. It resists rust and corrosion, even in coastal towns like Marblehead or Salem where salt air is a constant factor.
HDPE Poly Lumber: Used in brands like Berlin Gardens, this material is made from recycled plastic. It’s virtually maintenance-free—it won’t rot, crack, or fade, and you can clean it with a simple garden hose and mild soap.
Granite Countertops: Granite is naturally heat-resistant and hard to scratch, making it the perfect surface for heavy outdoor use. We recommend sealing it once a year to prevent staining from food or leaves.
When budgeting for outdoor islands, it is important to look at the total cost of ownership, including delivery, site preparation, and utility hookups. Many homeowners forget to budget for the gas line or electrical work required to make the island functional.
Average Costs (Based on Internet Data – Not Actual Gerrior Masonry Pricing):
Entry-Level Prefab: $2,500 – $7,500 (Often smaller units with basic grills)
Mid-Range Modular: $8,000 – $24,000+ (Includes stone veneers and multiple appliances)
High-End Custom Masonry: $20,000 – $60,000+ (Fully integrated with existing hardscape and premium appliances)
Note: These are average costs based on internet data and not actual costs for Gerrior Masonry services.
Fuel Types:
Propane (LP): Most prefab islands ship propane-ready. This is the easiest setup as it uses a standard tank hidden inside the island. It’s great for portability but requires monitoring tank levels.
Natural Gas (NG): This requires a professional gas line to be run to the island. While it has a higher upfront cost, you never have to worry about running out of fuel in the middle of a steak sear, and it is generally cheaper to operate over time.
If you are searching for custom outdoor kitchens near me, professional installation ensures your gas and water lines are safely buried and up to local Massachusetts building codes, which is vital for insurance and safety.
Professional Installation and Customization
While some kits claim to be DIY-friendly, the sheer weight and technical requirements of high-end outdoor islands often require a professional touch. At Gerrior Masonry & Landscaping, we bring over 30 years of experience to every project. Whether you are installing a pre-engineered Nicolock system or a completely custom outdoor kitchen, our skilled masonry team provides the stability and finish that a DIY project often lacks.
One of our unique selling points is owner oversight. I personally ensure that every stone is level and every utility connection is planned for before the first pallet arrives. We don’t just “install” a unit; we integrate it into your landscape so it feels like a natural extension of your home. This includes ensuring proper drainage around the base of the island so water doesn’t pool and damage your patio.
Maintenance is also simplified when things are built correctly. Masonry islands might require occasional outdoor kitchen repair or re-pointing over the decades, but they far outlast temporary wooden structures. For seasonal care, we recommend covering your appliances during the winter and blowing out any water lines to prevent pipes from bursting during a deep freeze. Regularly cleaning the stainless steel with a dedicated cleaner will also prevent surface tea-staining from environmental pollutants.
Our Service Areas: We are proud to serve homeowners and businesses across Middlesex and Essex Counties, including:
Acton, Amesbury, Andover, Arlington, and Ayer.
Bedford, Belmont, Beverly, Billerica, Boxford, and Burlington.
Carlisle, Chelmsford, Concord, and Danvers.
Dracut, Dunstable, Essex, Georgetown, and Hamilton.
Hudson, Ipswich, Lexington, Lincoln, and Lowell.
Lynnfield, Malden, Manchester-by-the-Sea, Marblehead, and Medford.
Melrose, Middleton, Natick, Newton, and North Andover.
North Reading, Peabody, Reading, Rowley, and Salem.
Saugus, Stoneham, Sudbury, Swampscott, and Tewksbury.
Topsfield, Wakefield, Waltham, Watertown, and Wayland.
Wenham, West Newbury, Westford, Weston, Wilmington, Winchester, and our home base of Woburn.
Gerrior Masonry & Landscape Construction is based in Woburn, MA, and services Middlesex and Essex County, Massachusetts.
Why Stone Walkway Ideas Can Transform Your Home’s Curb Appeal
Stone walkway ideas are one of the most impactful upgrades you can make to your outdoor space. A well-designed path does more than connect two points — it frames your landscape, boosts curb appeal, and adds lasting value to your property.
Here are the most popular stone walkway ideas to consider:
Flagstone — irregular, natural-looking slabs for a classic or cottage feel
Bluestone pavers — clean, blue-gray tones that suit both formal and modern homes
Cobblestone — rounded, old-world charm for curved or historic-style paths
Stepping stones — spaced stones over grass, gravel, or mulch for a relaxed garden path
Brick-bordered flagstone — a mixed-material look that adds structure and character
Concrete pavers — budget-friendly, uniform, and easy to install
Permeable paver walkways — eco-friendly paths that manage stormwater runoff
Mixed material paths — combine stone, gravel, and ground cover for a custom design
Natural stone walkways can last 25 years or more when properly installed — making them one of the smartest long-term investments for your yard.
I’m Joe Gerrior, owner of Gerrior Masonry & Landscape Construction Corp., with over 34 years of hands-on experience designing and installing stone walkways across Massachusetts. In this guide, I’ll share the most effective stone walkway ideas to help you create a path that’s beautiful, durable, and built to last.
When we think about stone walkway ideas, we aren’t just looking at where to put your feet. We are looking at how to create harmony between your home’s architecture and the natural world surrounding it. A walkway is the “handshake” of your home; it’s the first thing guests experience as they move through your landscape.
Integrating a walkway into your garden requires a balance of aesthetics and functionality. For high-traffic areas, such as the path from the driveway to the front door, you need a solid, wide surface. For a quiet stroll through a perennial garden in Lexington or Winchester, a winding, irregular path might be more appropriate. A well-placed path can also serve as a visual guide, drawing the eye toward specific architectural features or garden focal points like a specimen tree or a water feature.
Selecting Materials for Stone Walkway Ideas
The first step in any project is choosing the right “ingredients.” Not all stones are created equal, especially when you consider the harsh freeze-thaw cycles we experience here in Middlesex County. The density and porosity of the stone will determine how well it survives decades of New England winters.
Bluestone and Flagstone: These are the heavyweights of the industry. Bluestone pavers are a type of sandstone known for their sophisticated blue coloration. They are incredibly durable and provide a flat, stable surface. If you prefer a more organic look, fieldstone walkway ideas often utilize irregular shapes that look like they’ve been part of the landscape for centuries.
Granite and Limestone: For those seeking ultimate durability, granite is nearly indestructible and highly resistant to salt damage, which is vital if you plan to de-ice your path in the winter. Limestone offers a more uniform, often lighter color palette that can brighten up shaded garden areas, though it requires sealing to prevent staining.
Specialty Pavers: For those who want something unique, there are many modern options. Terracotta pavers offer a warm, Mediterranean vibe, while wood-look pavers provide the aesthetic of timber with the durability of stone. If you want a coastal feel even if you’re miles from the North Shore, shellstone pavers incorporate actual seashells into the mix.
Luxury and Texture: Onyx pavers can offer a translucent, glowing effect, though they are a higher-end investment. For a more rugged, rustic appearance, split-face pavers provide a rough, slip-resistant surface that is excellent for safety when wet.
Classic Brick: Don’t overlook brick walkway ideas. Brick offers a timeless “heirloom” quality that pairs beautifully with natural stone accents. It is particularly effective for historic homes in Concord or Bedford where maintaining a period-accurate look is essential.
Pro Tip: For a long-lasting walkway, we recommend materials with a Mohs hardness of at least 6. Additionally, for regular foot traffic, stones should be 2-3 inches thick to prevent cracking and shifting under the weight of pedestrians or garden equipment.
Popular Patterns and Layouts
The layout of your stones dictates the “mood” of the path. The pattern you choose should complement the lines of your home.
Straight Paths: These are formal and direct. They lead the eye quickly to a focal point, like a front door or a statue. They work best with modern or colonial-style architecture.
Curved Paver Walkway: A curved paver walkway feels more natural and exploratory. It encourages people to slow down and enjoy the surrounding garden. Curves can also help soften the sharp angles of a rectangular house.
Running Bond and Herringbone: These are structured patterns often used with rectangular pavers or bricks. Staggering joints in a running bond pattern provides better structural integrity. Herringbone is particularly strong as the interlocking stones resist shifting in multiple directions.
Irregular or “Crazy-Pave”: This uses flagstones of various shapes and sizes fitted together like a puzzle. It’s one of the most popular landscape walkway ideas for cottage-style homes or woodland paths.
Circular Patterns: Often used at the intersection of two paths or as a landing area, circular patterns create a sense of arrival and can serve as a beautiful base for a central planter or birdbath.
Standard Dimensions: We generally recommend a walkway width of at least 36 inches for a single person. If you want two people to be able to walk comfortably side-by-side, 48 inches is the way to go. For main entry paths, 60 inches provides a grand, welcoming feel.
Installation Essentials: Base and Drainage
We always say that a walkway is only as good as what’s underneath it. In Massachusetts, if you skip the base, the winter will make sure you regret it by spring. Proper excavation and compaction are the most labor-intensive but critical parts of the process.
Excavation: You need to dig deep enough to accommodate the base layers and the stone. Typically, this means excavating 9-10 inches to ensure you reach stable subsoil.
Geotextile Layer: Laying down permeable landscape fabric is a critical step. It separates the soil from your gravel, preventing the stones from sinking into the mud over time while still allowing water to drain through.
The Base: A proper base for flagstone walkway consists of 4-6 inches of compacted gravel (3/4-inch minus is best). You should compact this in layers (lifts) of 2 inches at a time until it’s rock-hard.
Bedding: On top of the gravel, we add a 1-2 inch layer of sand or fine stone dust to allow for final leveling of the stones. This layer acts as the “cushion” that allows for micro-adjustments.
Edge Restraints: To prevent the stones from “creeping” outward over time, we install hidden edge restraints made of heavy-duty plastic or metal, secured with long steel spikes.
Drainage: To prevent water from pooling against your foundation or creating ice patches, the walkway must have a slope of at least 1/4 inch per foot away from any structures.
Professional walkway installation ensures these technical details are handled correctly, protecting your investment for decades.
Dry-Laid vs. Mortar-Set Methods
There are two primary ways to set your stones: dry-laid or mortar-set.
Dry-Laid: This is our preferred method for most residential stone walkway ideas in New England. Because the stones sit on a bed of gravel and sand, they can “flex” during the freeze-thaw cycle. If a stone shifts, it’s easy to lift and reset. To keep weeds away and stabilize the stones, we use a jointing resin compound or GFTK Xtreme Joint Compound, which is water-permeable but hard enough to resist erosion and ants.
Mortar-Set: This involves setting stones in concrete with mortared joints. While it looks very formal and “finished,” it is prone to cracking in our climate. Once a mortared joint cracks, water gets in, freezes, and causes more damage. It requires much higher maintenance over time and a much deeper concrete footing to be successful.
Maintenance and Longevity
To keep your stone walkway looking its best, a small amount of annual maintenance goes a long way. Natural stone is incredibly resilient, but it isn’t completely “set it and forget it.”
Cleaning: Sweep your walkway regularly to prevent organic debris like leaves from staining the stone. A gentle power wash once a year can remove built-up grime, but be careful not to blast out the jointing sand or resin.
Sealing: While not always necessary, applying a breathable sealer can protect porous stones like limestone or certain sandstones from oil stains and salt damage. It can also enhance the natural color of the stone, giving it a “wet” look if desired.
Weed Control: If you used traditional sand in your joints, you may need to treat for weeds occasionally. Using polymeric sand or resin-based compounds significantly reduces this chore.
Creative Enhancements and Stone Walkway Ideas
Once the structural work is done, it’s time to add the “wow” factor.
Lighting: Safety doesn’t have to be boring. Integrating outdoor lights along the edges or even tucked into the stone risers can create a magical evening atmosphere and prevent trips.
Stepping Stones: Sometimes a full path is overkill. Installing flagstone stepping stones spaced about 18 to 24 inches apart (center-to-center) creates a charming, low-impact trail through a lawn or wooded area.
Living Edges: Soften the look of your stone by planting low-growing ground covers like creeping thyme, moss, or sedum in the gaps. This creates a beautiful “aged” look that feels like it belongs in an English cottage garden.
Mixed Materials: Try bordering a flagstone path with a soldier course of bricks or using pea gravel to fill wide joints between large granite slabs for a high-contrast, modern look.
Budgeting and Professional Installation
Understanding the costs involved helps you plan your project effectively. Below is a comparison based on internet average data.
Feature
DIY Installation (Avg)
Professional Installation (Avg)
Cost per Sq. Ft.
$2.50 – $3.50
$12 – $85
Time Investment
Multiple Weekends
2 – 5 Days
Complexity
High (Heavy Lifting)
Handled by Experts
Durability
Variable
25+ Year Lifespan
Equipment
Rental Needed
Included
While DIY is a more inexpensive stepping stone walkway ideas route, the physical toll is significant. Large flagstones can weigh between 100 and 300 lbs each. A professional cost to install stone walkway covers the heavy machinery, the expertise in drainage, and the guarantee that the path won’t turn into a roller coaster after the first winter.
Conclusion
A stone walkway is more than just a place to walk; it is a permanent improvement to your home’s character and a legacy piece for your landscape. Whether you choose the formal elegance of bluestone or the rustic charm of irregular flagstone, the key to success lies in the preparation and the quality of the masonry. A well-built path will not only increase your property value but will also provide a safe and beautiful passage for your family for decades to come.
At Gerrior Masonry & Landscaping, we bring over 30 years of experience to every project. Our team, led by owner oversight, ensures that every stone is placed with precision and every base is built to withstand the unique challenges of the Massachusetts climate. We understand the local geology and the specific needs of New England homeowners. From paver walkways in Lexington, MA to historic restorations in Concord, we take pride in creating hardscapes that stand the test of time and enhance the natural beauty of your outdoor living space.
Gerrior Masonry & Landscape Construction is based in Woburn, MA, and services Middlesex and Essex County, Massachusetts. Average costs listed are based on internet data and are not actual costs for Gerrior Masonry services. Professional installation typically ranges from $12 to $85 per square foot depending on material and site conditions. Contact us today to discuss how we can bring your stone walkway ideas to life.
Why Putting in a Brick Walkway Is One of the Best Weekend Projects You Can Do
Putting in a brick walkway is a straightforward DIY project that can transform a muddy yard trail into a durable, attractive path in a single weekend.
Here’s a quick overview of the core steps:
Plan your path – Choose width, shape, and brick pattern
Call 811 – Check for underground utility lines before digging
Excavate – Dig 6-8 inches deep along the path
Lay the base – Add 4 inches of compacted gravel, then 1 inch of sand
Lay the bricks – Set bricks in your chosen pattern, tap level with a mallet
Add edging and polymeric sand – Lock everything in place
Compact and finish – Use a plate compactor, mist the sand to activate it
A typical 20-foot walkway costs $200-$900 in materials and takes 8-10 hours to complete. You’ll need roughly 4.5 to 5 bricks per square foot.
Brick is a popular choice because it’s durable, ages beautifully, and won’t crack the way poured concrete can. Unlike gravel, it stays put underfoot and handles heavy foot traffic with ease.
I’m Joe Gerrior, owner of Gerrior Masonry & Landscape Construction Corp., with over 34 years of experience in masonry and hardscaping in Massachusetts — including putting in a brick walkway for dozens of residential and commercial properties. In this guide, I’ll walk you through everything you need to know to get it done right the first time.
Planning and Preparing for Putting in a Brick Walkway
Before you ever pick up a shovel, you need a solid plan. In our three decades of working across Middlesex and Essex County, we’ve seen that the best walkways are the ones that were visualized before they were built. A well-thought-out path doesn’t just look better; it functions better and lasts longer against the elements.
Start by considering the purpose of the path. Is this a main entrance walkway? If so, it should be at least 3 to 4 feet wide to allow two people to walk side-by-side comfortably. For a simple garden path that meanders through your flower beds in Lexington or Winchester, 2 to 3 feet is usually sufficient. You should also consider the soil type in your yard. In many parts of Massachusetts, we deal with heavy clay or rocky ‘glacial till.’ Clay holds onto moisture, which means you might need a slightly deeper gravel base—up to 6 inches—to ensure proper drainage and prevent the bricks from shifting during the winter freeze-thaw cycles.
To visualize the shape, we recommend using garden hoses or long ropes. Lay them out on the ground to define the edges. This allows you to adjust the curves until they look “just right” to your eye. If you prefer a straight path, use wooden stakes and mason’s string to keep your lines perfectly parallel. Take the time to walk the proposed route several times to ensure the flow feels natural and doesn’t cut off important access points to your lawn or driveway.
The Golden Rule: Call 811
In Massachusetts, you must call 811 before you dig. Whether you are in Woburn or Beverly, there could be shallow utility lines, irrigation pipes, or cable wires right where you plan to excavate. It’s a free service, and it prevents a “weekend project” from turning into a “neighborhood power outage.” When you call, technicians will mark your yard with color-coded paint: red for electric, yellow for gas, and blue for water. Never dig within 24 inches of these marks without extreme caution.
Material
Durability
Maintenance
DIY Friendliness
Cost
Brick
High
Low
High
Moderate
Concrete
Medium
Moderate (Cracks)
Low
High
Gravel
Low
High (Shifts)
Very High
Low
Essential Materials and Tools for Putting in a Brick Walkway
To ensure your walkway lasts through New England’s harsh freeze-thaw cycles, you cannot cut corners on materials.
Paver Bricks: Do not use regular “wall bricks.” Wall bricks are porous and will crack when the ground freezes. You need paving bricks or brick pavers. Look for “Severe Weather” (SW) rated bricks. You’ll need about 5 bricks per square foot.
Crushed Gravel: This is your foundation. We recommend “3/4-inch minus” crushed stone. You’ll need roughly 1 ton per 100 square feet. This material packs down into a solid, stable base while still allowing water to percolate through.
Coarse Sand: This provides the “bed” for the bricks. Plan on 1 cubic yard for every 80 square feet. Use concrete sand rather than play sand, as the sharper edges of concrete sand lock together better.
Polymeric Sand: This is a special sand that contains a binding agent. Once misted with water, it hardens like mortar but stays flexible enough to prevent weeds and shifting.
Landscape Fabric: A heavy-duty stabilization fabric prevents the gravel from sinking into the soil over time.
Plate Compactor: You can rent this at most hardware stores in places like Burlington or Danvers. It is essential for a professional finish.
Masonry Saw or Angle Grinder: If your path has curves, you will need to cut bricks. A wet saw is the cleanest and safest option.
Estimated Budget: Based on internet data, homeowners can expect to spend between $200 and $2,700 for a 20-foot walkway. The lower end reflects a basic DIY sand-set path, while the higher end accounts for high-end pavers, professional tool rentals, and potentially a mortared base. Please note that these are average costs based on internet data and not actual costs for Gerrior Masonry services.
Timeline: Plan for 8-10 hours of active labor for a 20-foot path. This is a perfect project to start on a Saturday morning and finish by Sunday afternoon. If you have a helper, you can significantly speed up the brick-laying phase.
Design Patterns: The pattern you choose dictates the “feel” of the walkway and the difficulty of the installation.
Running Bond: Bricks are laid end-to-end in rows, with the joints offset by half a brick. This is the easiest for beginners and looks very professional.
Herringbone: Bricks are laid at 45 or 90-degree angles to each other. It’s incredibly strong and handles heavy loads well, but it requires more cutting at the edges. This is the preferred pattern for driveways or high-traffic areas.
Basketweave: Bricks are laid in pairs (two horizontal, two vertical). It’s a classic look that requires very little cutting if your path width is an exact multiple of your brick length.
Step-by-Step Guide to Installing Your Path
Now it’s time to get to work. The longevity of your path depends entirely on the base preparation. If the base is weak, the bricks will eventually dip and heave, creating a tripping hazard.
Step 1: Excavation Dig out the area defined by your hoses or strings. For a standard walkway in Middlesex County, you should excavate 6 to 8 inches deep. This allows for 4 inches of gravel, 1 inch of sand, and the thickness of the brick itself. Make sure the trench is about 6 inches wider than the path on both sides to provide room for your edging. During excavation, you may encounter large tree roots. Never cut a root larger than 2 inches in diameter without consulting an arborist, as it could destabilize the tree. Instead, try to gently curve your path around the root system.
Step 2: Drainage Slope Water is the enemy of masonry. Your walkway must slope away from your house or any permanent structures. A good rule of thumb is a 1/4-inch drop for every foot of width. This ensures that heavy rain runs off the surface rather than pooling and seeping into your foundation. If your yard has major drainage issues, you might want to look into drainage systems and dry wells to prevent washouts.
Step 3: The Gravel Base Lay down your landscape fabric first. This prevents the stone from mixing with the dirt. Add your crushed gravel in 2-inch increments. After each layer, use the plate compactor. It helps to lightly spray the stone with water during this process; the moisture ‘lubricates’ the particles, allowing them to slide into a tighter configuration. You’ll know the base is ready when the sound of the compactor changes from a dull thud to a sharp “rap,” indicating the stone is fully seated.
Step 4: The Sand Bed Once the gravel is rock-hard and level, lay down two 1-inch thick pipes parallel to each other. Pour sand between them and use a straight board (a “screed”) to slide across the pipes. This creates a perfectly flat 1-inch sand bed. Do not walk on the sand once it is leveled! If you accidentally step in it, you must re-screed that section to ensure the bricks sit perfectly flat.
Laying the Bricks and Cutting Edges
Start laying your bricks at a straight edge, such as a driveway or a doorstep. If you are doing a running bond pattern, simply place the bricks side-by-side, keeping the joints as tight as possible. Use a rubber mallet to gently tap each brick into the sand. Use a level frequently to ensure you aren’t creating any “trippers” (bricks that stick up higher than the others).
If your path curves, you will eventually reach a point where a full brick won’t fit.
Safety First: When using a masonry saw, always wear safety goggles and ear protection. If using a wet saw, ensure the water flow is consistent to keep dust down.
The Cut: Mark the brick with a pencil, place it on the saw, and make a slow, steady cut. Take your time; a clean cut makes the difference between a DIY look and a professional finish.
For more professional tips on patterns and alignment, see our detailed guide on brick-paver-installation.
Finishing Touches: Edging and Polymeric Sand
Without edging, your walkway will eventually “spread” and the bricks will shift. We recommend using professional-grade plastic or aluminum paver edging. Place it tightly against the bricks and drive 10-inch landscape spikes into the ground every 12 inches. This creates a rigid frame that holds the entire assembly together.
The Magic of Polymeric Sand: Once the edging is secure, it’s time to fill the joints. Timing is everything here; check the forecast to ensure you have at least 24 hours of dry weather ahead.
Ensure the bricks are completely dry. If they are damp, the sand will stick to the surface and stain.
Pour polymeric sand over the walkway.
Use a push broom to sweep the sand into the joints. Sweep diagonally to ensure the cracks are filled to the top.
Run the plate compactor over the bricks one last time (with a protective mat or piece of carpet underneath to prevent scratching the bricks). This vibrates the sand deep into the joints, eliminating air pockets.
Sweep off all excess sand from the surface. This is critical—any sand left on top will stick to the bricks forever once wet.
Set your hose to a light “mist” and dampen the walkway. Do not soak it, as you don’t want to wash the sand out. The water activates the polymers, turning the sand into a flexible “glue.”
Long-Term Maintenance and Cold Climate Tips for Putting in a Brick Walkway
In Massachusetts towns like Andover, North Reading, and Lynnfield, the winter weather is the ultimate test for any walkway. The constant expansion and contraction of the ground can ruin a poorly built path in a single season.
Frost Heave Prevention: The reason we insist on a 4-to-6-inch compacted gravel base is to prevent “frost heave.” When the water in the soil freezes, it expands. A thick gravel base allows that water to drain away before it can freeze and push your bricks out of alignment. This is why the quality of your base material is more important than the bricks themselves.
Maintenance Checklist:
Weed Prevention: If you used polymeric sand, weeds shouldn’t be an issue for several years. If you see a weed, pull it immediately to prevent the roots from breaking the polymer bond.
Resealing: Every 2-3 years, you may want to apply a paver sealer. This protects the color of the bricks from UV fading and adds another layer of protection against salt and ice-melt chemicals.
Settling: If a specific area settles over time (common in very soft soils), you can simply pry up the bricks in that section, add a bit more sand, level it, and replace the bricks. That’s the beauty of a sand-set walkway!
If putting in a brick walkway feels like more heavy lifting than you bargained for, we are here to help. Our team has the equipment and experience to handle everything from excavation to the final sweep. You can learn more about our walkway installation services to see how we can bring your vision to life.
Whether you choose the DIY route or decide to hire a professional, a brick walkway is a timeless addition that adds value and charm to any home.
Gerrior Masonry & Landscape Construction is based in Woburn, MA, and services Middlesex and Essex County, Massachusetts.