Understanding Retaining Wall Batter Slope and Calculations
Definition and Structural Purpose of Retaining Wall Batter Slope
When engineering hardscape retaining walls, achieving vertical stability requires accounting for active lateral earth pressure. Soil naturally wants to shift downhill, exerting thousands of pounds of pressure against structural barriers. Unreinforced vertical soil faces inevitably experience shear failure over time due to gravitational forces, fluctuating moisture contents, and freeze-thaw cycles common across Massachusetts region landscapes.
A wall batter fundamentals approach introduces an intentional backward tilt toward the retained embankment. This structural geometry shifts the wall’s center of gravity backward, using gravity and the weight of the backfill material to anchor the structure into the slope. By sloping the inclination, the gravity force vector of the wall material tilts inward, actively counteracting the horizontal thrust generated by the retained soil mass. Key structural mechanisms include:
Force Redistribution: Sloping the wall face changes the angle at which horizontal earth pressure strikes the barrier, redirecting a portion of those lateral forces downward into the foundation base rather than horizontally against the wall face.
Base Stability Enhancement: Widening the effective functional base relative to the top minimizes localized point-load stresses and optimizes resistance against overturning forces, sliding failure, and toe crushing.
Counteracting Natural Settling: Most structural walls settle approximately 1 degree after backfilling and soil consolidation. Building with a defined backward angle ensures that natural earth movement brings the wall toward engineered alignment rather than pushing it into a dangerous, structurally compromised forward lean.
Friction Angle Optimization: Interlocking block units benefit from increased normal forces between courses when laid at a batter angle, enhancing shear resistance between adjacent structural layers.
For projects across Lexington, MA and Winchester, MA, implementing proper face setbacks ensures long-term structural integrity while maintaining uniform aesthetic lines across complex landscape elevations and variable regional soil profiles.
How to Calculate Retaining Wall Batter Slope Ratios
Calculating the correct retaining wall batter slope requires converting linear field measurements into accurate ratios, angles, or course setbacks. Accurate field layout prevents costly re-work and eliminates structural inaccuracies before materials are permanently set.
Field engineers and site contractors calculate batter using standard geometry principles and precise site layout tools:
Horizontal-to-Vertical (H:V) Ratio: Expressed as horizontal setback units per vertical rise units. For example, a 1:12 ratio means a 1-inch horizontal step-back for every 12 inches (1 foot) of vertical wall rise. A 1:8 ratio represents a steeper 1.5-inch setback per vertical foot.
Angular Measurement (Degrees from Vertical): Using trigonometry, the angle relative to plumb is calculated via the arctangent formula:
$$theta = tan^{-1}left(frac{text{Horizontal Run}}{text{Vertical Height}}right)$$
A standard 1:12 setback ratio yields an incline angle of approximately 4.76 degrees from absolute vertical, whereas a steeper 1:6 batter ratio yields an incline angle of 9.46 degrees.
Course Setback Checkpoints: Commercial installers verify layout accuracy on-site using a line level, batter board frame, and plumb reference stake. Rather than measuring row by row, field checks are typically verified every four block courses (typically 1.5 inches of setback across a 24-inch vertical rise for standard segmental systems).
Targeted Height Calculations: To determine total horizontal setback at the top of a 6-foot wall with a 1:12 batter, multiply the vertical height by the ratio fraction (72 inches vertical height divided by 12 equals 6 inches of total backward setback).
Contractors planning projects can utilize a retaining wall slope calculator to quickly verify structural geometry before excavation begins.
Standard Batter Values Across Masonry and Block Types
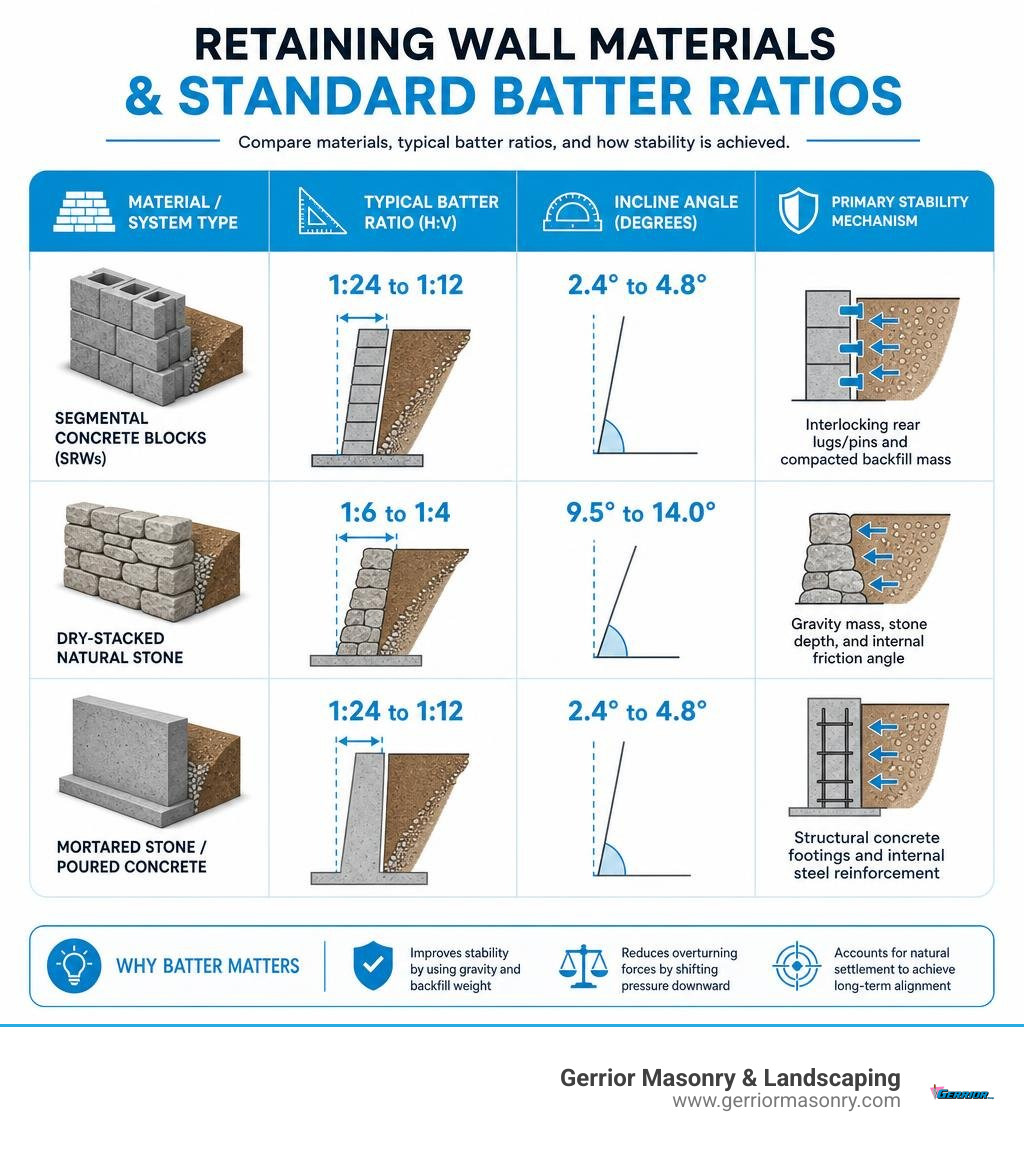
Required face inclination angles vary significantly based on material composition, unit weight, internal friction angles, and interlocking mechanical designs.
Material / System Type
Typical Batter Ratio (H:V)
Incline Angle (Degrees)
Primary Stability Mechanism
Segmental Concrete Blocks (SRWs)
1:24 to 1:12
2.4° to 4.8°
Interlocking rear lugs/pins and compacted backfill mass
Dry-Stacked Natural Stone
1:6 to 1:4
9.5° to 14.0°
Gravity mass, stone depth, and internal friction angle
Mortared Stone / Poured Concrete
1:24 to 1:12
2.4° to 4.8°
Structural concrete footings and internal steel reinforcement
Structural Heavy Rockeries
1:12 to 1:3
4.8° to 18.4°
Heavy individual mass stones resting on backwards-sloped base pads
Selecting appropriate materials for custom retaining walls in Woburn, MA or Burlington, MA dictates whether stability relies purely on gravity unit mass, structural concrete footings, or engineered geogrid soil reinforcement.
Design Best Practices for Battered Retaining Wall Construction
Impact on Wall Stability, Drainage, and Soil Reinforcement
A retaining wall batter slope cannot stabilize a hillside independently; it relies on integrated structural sub-systems, proper backfill compaction, and efficient water management to achieve long-term performance.
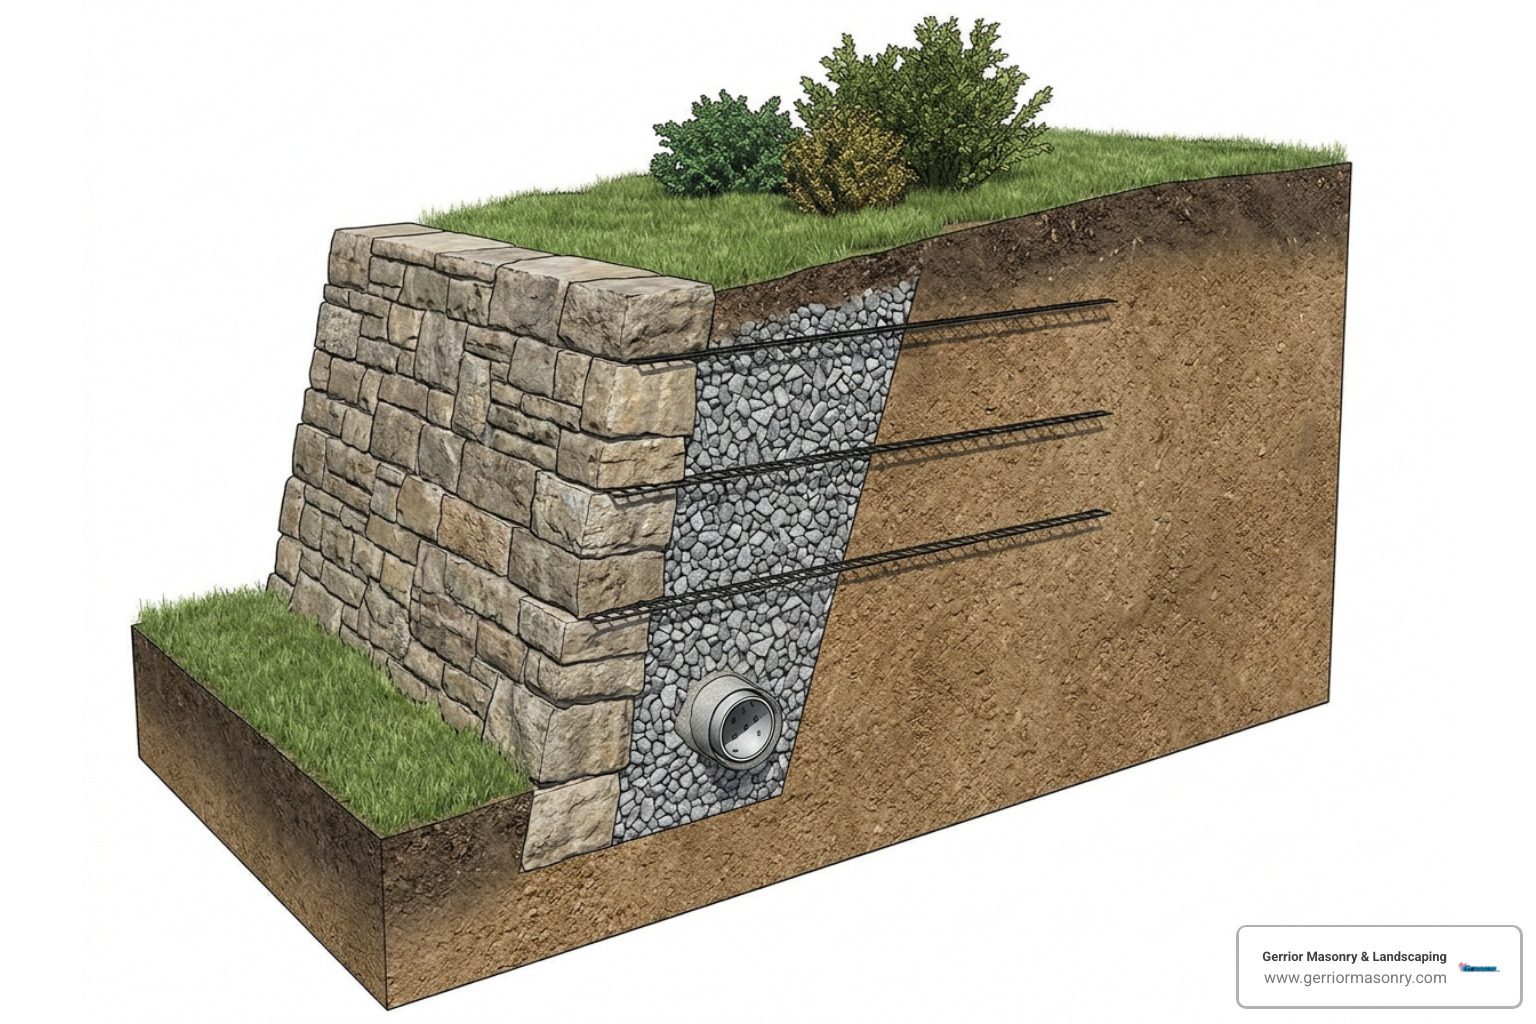
Hydrostatic Pressure Mitigation: Trapped groundwater is the single leading cause of retaining wall displacement, sliding, and structural failure. Backfilling directly behind the wall with clean, 3/4-inch angular crushed stone creates a high-permeability drainage layer that rapidly conveys groundwater downward. Combining this aggregate layer with non-woven geotextile fabric and perforated drain pipes routes water away to daylight or dedicated drainage basins, effectively preventing hydrostatic pressure buildup behind the wall face. Review our comprehensive retaining wall stability guide to explore hydrological management principles.
Geogrid Soil Reinforcement: For retaining walls exceeding critical height thresholds (typically 3 to 4 feet), horizontal layers of high-tensile geogrid are extended into the reinforced soil zone behind the block units. Geogrid locks with surrounding compacted aggregate to transform the retained soil mass into a unified gravity block. This engineered mechanical bond allows the wall face to maintain a stable, uniform setback angle without bowing, bulging, or forward shear movement.
Sub-Base and Compaction Standards: Proper wall longevity depends entirely on establishing a rigid, unyielding foundation base. Base trenches must feature thoroughly compacted aggregate pads (typically 3/4-inch dense-grade crushed stone or process gravel) laid to precise depth and level. Backfill soil must be installed and mechanically compacted in maximum 6-inch horizontal lifts to achieve a minimum of 95% Standard Proctor dry density. Learn more about foundational trench preparation in our guide to retaining wall base preparation.
Common Installation Mistakes and Code Regulations
Improper wall construction often leads to costly repairs, structural displacement, or catastrophic failure during intense weather events. Avoid these common engineering and installation errors:
Constructing Zero-Batter Vertical Walls: Building unreinforced gravity walls completely vertical (0-degree batter) without specialized structural engineering almost guarantees forward tilting over time as backfill soil consolidates and expands during freeze-thaw cycles.
Ignoring the Foundation’s Slope: Placing base blocks on an unlevel or soft subgrade leads to uneven joint gaps, concentrated load points, differential settlement, and localized structural tipping.
Compacting Backfill Improperly: Dumping uncompacted backfill soil behind wall units creates settlement voids, allowing rainwater to collect and exponentially increase lateral earth pressure against the block column.
Exceeding Unengineered Municipal Height Limits: Building code regulations across local jurisdictions dictate strict height limits. Retaining structures exceeding 4 feet in total vertical height (measured from the bottom of the base pad to the top of the cap) typically require structural engineering plans, soil stability calculations, and municipal building permits.
Encroaching on Structural Zones of Influence: Walls built within 1.5 times their height from house footings, driveways, swimming pools, or patio structures require specialized engineering analysis to prevent surcharge loads from compromising structural stability.
Professional Masonry Solutions for Massachusetts Properties
Executing precise retaining wall batter slope geometry on complex, sloped terrain requires professional experience, specialized heavy equipment, and detailed site evaluation. Gerrior Masonry & Landscaping is based near Woburn, MA and serves residential and commercial properties across Massachusetts communities such as Winchester, Burlington, and Lexington. The company specializes in masonry and hardscaping services, including patios, walkways, retaining walls, foundation repair, bulkhead replacements, chimney repairs, and commercial snow removal. With more than 30 years of experience and owner oversight on projects, Gerrior Masonry & Landscaping delivers durable, code-compliant results for complex grade changes and structural wall needs.
Whether you are building retaining walls on slopes in Burlington, MA or require structural repairs on existing hardscape retaining walls in Lexington, MA, Gerrior Masonry & Landscaping’s owner-supervised crews deliver long-lasting, code-compliant results.
Based on current online data and regional hardscaping benchmarks, local installation costs for structural retaining walls average:
Segmental Concrete Block Walls: Average estimated cost of $25 per square foot of face area, with typical industry ranges extending from $50 (2x average) to $125+ per square foot (5x average).
Natural Stone & Structural Gravity Walls: Average estimated cost of $35 per square foot of face area, with typical industry ranges extending from $70 (2x average) to $175+ per square foot (5x average).
Note: All prices mentioned are average costs sourced from publicly available internet data and are not actual Gerrior Corp prices. Project costs vary based on site accessibility, wall height, soil conditions, and engineered drainage needs.
To schedule a structural evaluation or discuss your upcoming property development needs, call Gerrior Masonry & Landscaping directly at +781-713-1225 or request an estimate online. Discover how the company’s professional custom retaining wall services protect and enhance your real estate investment.
Understanding the Basement Gutter Drainage System and How It Works
A basement gutter drainage system is one of the most effective ways to protect your home from water damage, mold, and structural deterioration. Here’s a quick overview of what it is and how it works:
What is a basement gutter drainage system?
An interior perimeter channel installed along the base of your basement walls
It collects water that seeps through the wall-floor joint and redirects it to a sump pump
The sump pump then discharges the water safely away from your home
It relieves hydrostatic pressure — the force of groundwater pushing against your foundation
Who needs one?
Homeowners with damp, musty, or visibly wet basements
Properties with water stains, efflorescence, or mold on basement walls
Homes in areas with heavy clay soil or high groundwater tables
This matters more than most homeowners realize. According to the Environmental Protection Agency (EPA), over 50% of the air you breathe upstairs originates from your basement or crawl space. A wet, moldy basement doesn’t stay in the basement.
Here in Massachusetts — from Woburn and Burlington to Winchester — homes face significant hydrostatic pressure from clay-heavy soils, freeze-thaw cycles, and seasonal heavy rainfall. These conditions make basement water intrusion a common and serious problem for homeowners across the region.
I’m Joe Gerrior, owner of Gerrior Masonry & Landscaping, and over 34 years of foundation repair and drainage work in Massachusetts, I’ve seen how the right basement gutter drainage system protects homes from costly water damage. In this guide, I’ll walk you through everything you need to know — from how these systems work to what installation really involves.
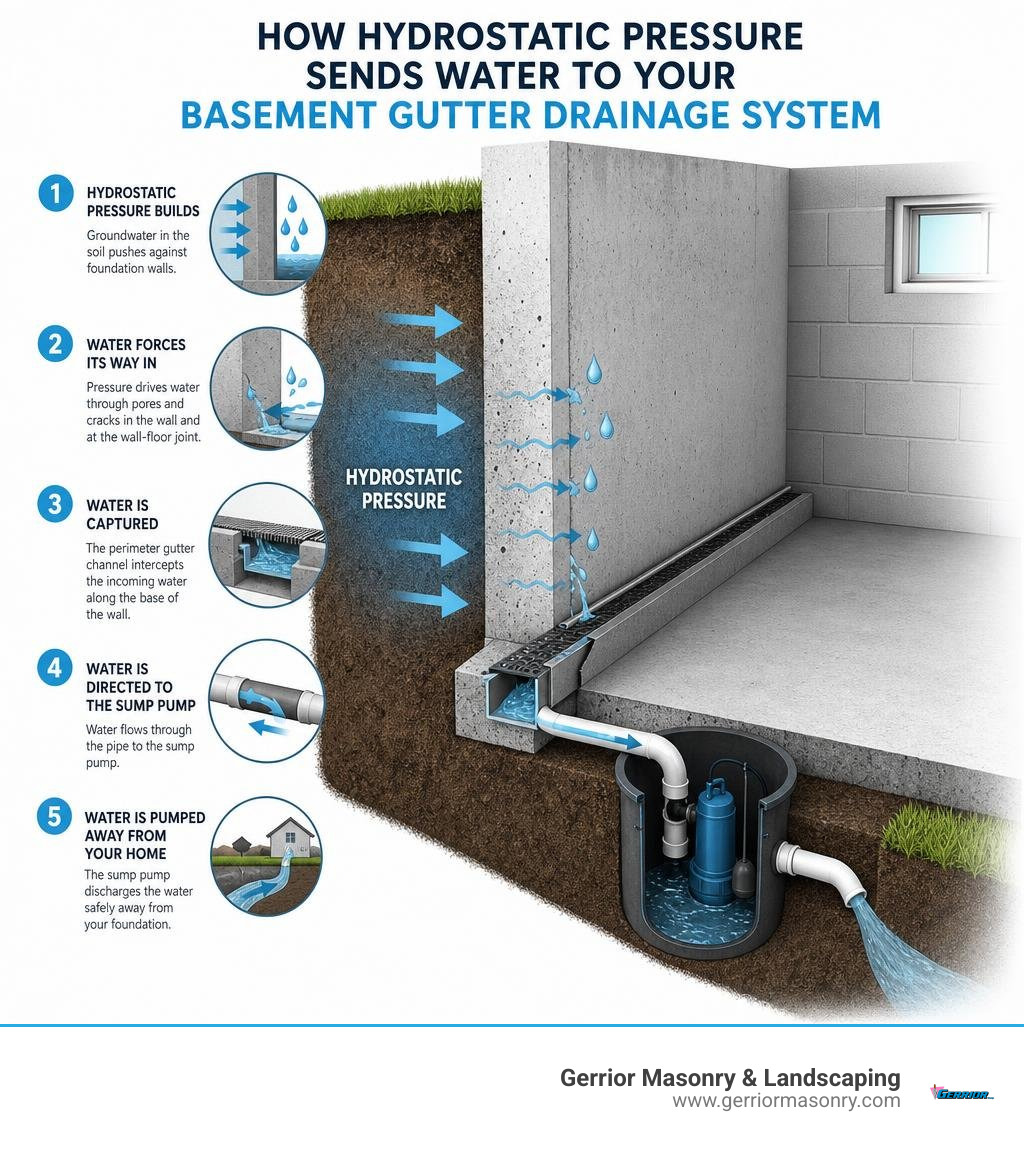
To understand why a basement gutter drainage system is so effective, we first have to look at how water enters your basement. The most common entry point is the “cold joint” or the floor-wall joint. When your home was built, the concrete foundation walls and the concrete floor slab were poured separately, leaving a tiny gap between them.
During heavy rains or spring snow thaws in towns like Woburn and Burlington, groundwater accumulates in the soil surrounding your foundation. This creates hydrostatic pressure—a heavy force that pushes water through any microscopic crack, porous concrete block, or the floor-wall joint itself.
An interior perimeter drainage system works by relieving this pressure. Instead of trying to create an absolute, unrealistic barrier against the water, we create a controlled path of least resistance. The system catches the water the moment it seeps inside and channels it safely beneath the floor to a sump pump, which then ejects it from the home. If you want to permanently resolve these issues, working with an experienced Basement Waterproofing Company for professional Basement Waterproofing is the most reliable path forward.
Interior vs. Exterior Foundation Drainage Solutions
When evaluating your options, you will generally choose between interior and exterior drainage systems. Both have their place, but they differ significantly in cost, disruption, and application:
Exterior Drainage Systems: This method requires excavating the soil all the way down to your foundation footings. While highly effective for block walls, it is incredibly disruptive to your property. It requires tearing up mature landscaping, patios, walkways, and driveways. Because of the heavy excavation, the process can take weeks and is highly labor-intensive. Furthermore, exterior drains are susceptible to soil shifting, clogging from outdoor debris, and root intrusion from nearby trees.
Interior Drainage Systems: These systems utilize sub-floor channels installed along the interior perimeter. Because we do not have to dig up your yard, interior systems are vastly more cost-effective and typically take only one to two days to install. They capture wall and floor seepage directly at the source, offering a clean, fast, and highly reliable solution. Because they are protected inside the home, they are completely shielded from external environmental hazards like tree roots and soil erosion.
For most established homes in Massachusetts, especially those with beautiful mature landscaping, interior channels are the preferred choice. For more details on managing exterior water before it reaches your basement, read about Drainage Around Foundation and Drainage Around House Foundation.
Key Components of an Interior Basement Gutter Drainage System
A high-performing interior drainage system relies on several engineered components working seamlessly together:
Sub-Floor Drainage Channel: A rugged, specially designed PVC channel that sits on top of the foundation footing rather than down in the dirt, preventing it from clogging with mud and sediment.
Wall Flange: A built-in 3/8-inch flange that extends slightly up the wall to collect any water trickling down the foundation face or weeping from block cores.
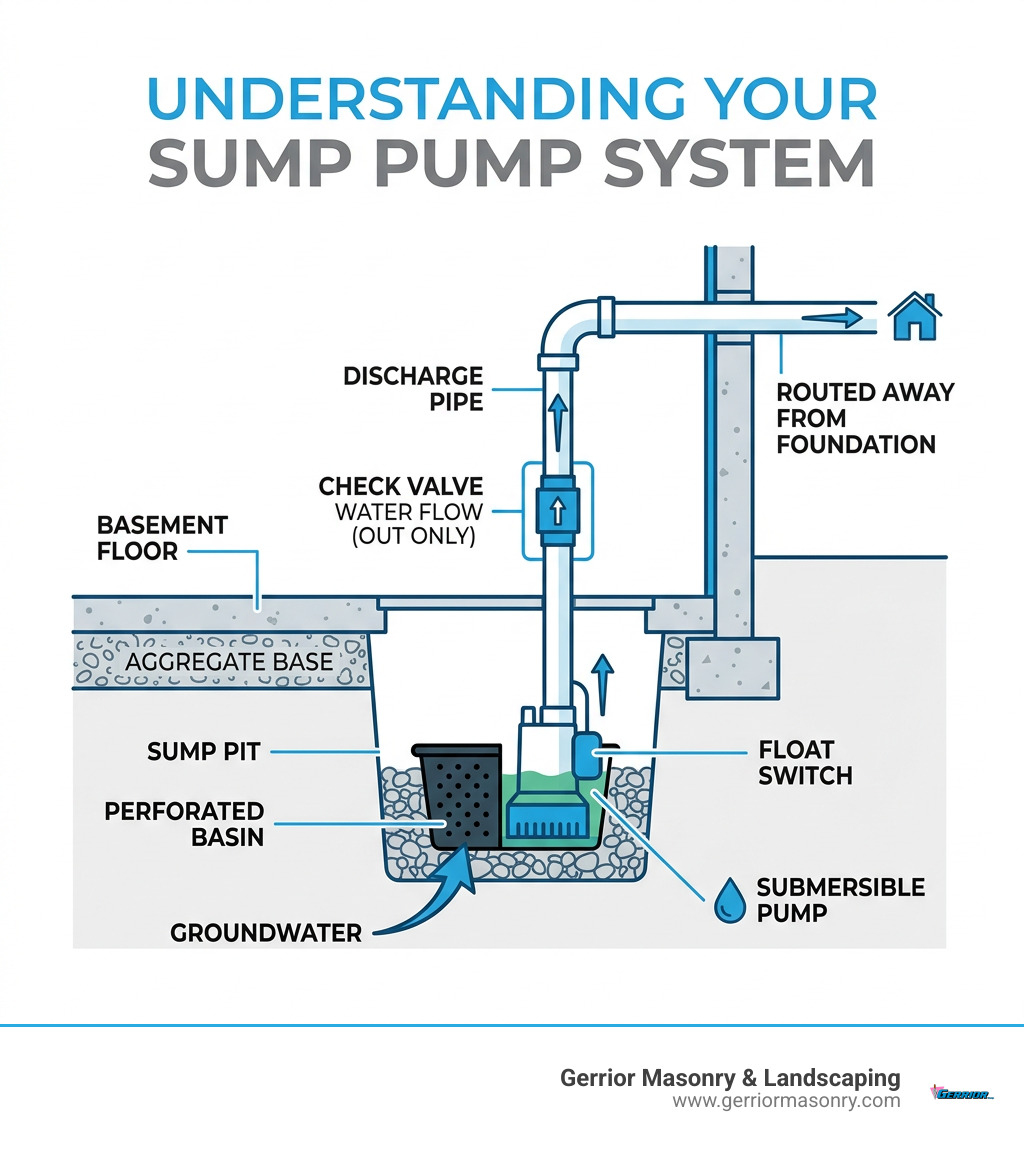
Sump Pump Basin: A heavy-duty perforated basin (usually 30 to 36 inches deep) that houses the pump.
Submersible Sump Pump: The heart of the system. We highly recommend submersible pumps with vertical float switches over pedestal pumps because they are quieter, run cooler, and are far more reliable.
Check Valve: A one-way valve installed on the discharge pipe that prevents pumped water from running back into the basin when the pump cycles off.
Discharge Pipe: High-quality Schedule 10 or 40 PVC pipe that routes the water up, out, and far away from the foundation.
Washed Filter Stone: Clean, 3/4-inch washed river gravel packed around the drainage channel. This acts as a natural filtration barrier, preventing fine soil particles from entering the channel while maximizing water flow rate.
Addressing Monolithic Foundations and Special Floor Types
A monolithic foundation is a structural design where the concrete floor slab and the foundation footing are poured as a single, continuous piece of concrete. This creates extremely thick concrete edges along the perimeter of the basement.
For standard drainage systems, monolithic slabs present a major challenge because trenching through this thick concrete is incredibly difficult, loud, and structurally risky.
Fortunately, we have specialized solutions. An above-floor baseboard channel system (such as DryTrak) can be permanently sealed to the top of the slab using a high-strength epoxy adhesive. This system collects water weeping from the walls and directs it to the sump pump without requiring any jackhammering of the floor. If you are dealing with leaks in a monolithic foundation, a targeted Foundation Leak Repair plan is essential.
Installing a Basement Gutter Drainage System: Why DIY is Risky
While some home improvement guides present interior drainage installation as a straightforward weekend project, the reality is highly demanding and physically punishing.
The process requires:
Using an electric jackhammer to break up a 6-to-12-inch trench of concrete along your entire basement perimeter.
Hauling hundreds of pounds of heavy concrete debris up stairs and out of basement windows.
Digging a deep trench and grading it precisely (at least 1/4 inch of fall per 10 feet) to ensure water flows properly to the sump basin.
Backfilling the trench with clean, washed stone, laying the pipe, and pouring new, smooth concrete to match your existing floor.
A single mistake in the slope of your pipe can cause standing water, sediment buildup, and system failure. Furthermore, improper jackhammering can crack your footing or damage the structural integrity of your foundation walls. In historical areas like Lexington and Arlington, where foundations require delicate care, DIY is simply not worth the risk. We strongly advise hiring professionals to handle your Basement Waterproofing to guarantee a clean, dust-controlled, and structurally sound installation.
Mitigating Common System Issues: Clogs, Freezing, and Radon
A poorly designed or cheap drainage system can fall victim to several common issues:
Silt and Sediment Clogging: Traditional perforated pipes placed deep in the dirt can easily clog with mud over time. Our advanced systems sit safely on top of the footing, completely out of the “mud zone,” and are surrounded by washed river stone to keep the channel clean.
Frozen Discharge Lines: During harsh Massachusetts winters, discharge lines can freeze, causing water to back up and flood your basement. We install specialized grated exterior outlets (like IceGuard) that allow water to escape automatically even if the main pipe is blocked by ice.
Radon Gas: Because an interior drain opens up a pathway around your foundation, it can allow radon gas to enter. We mitigate this by using airtight sump pump basin lids and specialized drainage channels that feature built-in air locks. This ensures that your indoor air quality remains safe and healthy.
Iron Bacteria: In some regional soils, a harmless but slimy orange iron bacteria can build up. We install convenient, accessible inspection ports along the channel, allowing us to easily flush the system with hot water or eco-friendly treatments. If you need to route water to an exterior drainage point, a professional Dry Well Drainage system is an excellent pairing.
Integrating Drainage with Wall Vapor Barriers and Dehumidifiers
For a completely dry, finished basement, a drainage channel should not work alone. We often combine our drainage systems with heavy-duty plastic wall vapor barriers. If water leaks through cracks higher up on your foundation walls, the vapor barrier catches it and directs it behind the wall directly into the drainage flange, keeping your finished studs and drywall completely dry.
Additionally, we can route your basement dehumidifier’s condensate drain line directly into one of the system’s dedicated access ports. This comprehensive approach keeps your relative humidity low (ideally below 50%), prevents musty odors, and stops mold growth in its tracks, ensuring complete compliance with Domestic Drainage Systems best practices.
Professional Installation, Costs, and Next Steps in Massachusetts
When you are ready to invest in protecting your home, understanding the financial scope is key. Based on publicly available online data, the average cost for a professional interior basement drainage system in the Massachusetts area typically ranges from $13,000 to $35,000 depending on the linear footage, foundation type, and sump pump configuration.
Please note: These figures are average industry estimates compiled from public sources and do not represent the actual pricing or guaranteed rates of Gerrior Masonry & Landscaping.
At Gerrior Masonry & Landscaping, we provide tailored, high-quality drainage and masonry solutions designed specifically for the unique architectural and soil conditions of Winchester, Woburn, Burlington, Lexington, and Arlington. With over three decades of experience, our skilled team offers close owner oversight on every single project to ensure your home is protected for the long haul.
Investing in a professional basement gutter drainage system not only protects your home’s foundation but also increases your property’s overall market value. A dry, certified basement is a major selling point for future buyers in the competitive Massachusetts real estate market. By choosing a local, experienced contractor, you ensure that the work complies with all local building codes and environmental regulations, giving you peace of mind for decades to come.
Beyond basement waterproofing, we specialize in a wide range of residential and commercial services to improve and protect your property, including:
Don’t let a wet basement threaten your home’s structural integrity or your family’s health. Request an Estimate Online to take the first step toward a permanently dry, healthy home. Let us help you protect your investment with our premier Basement Waterproofing solutions!
Your Basement Has a Crack — Here’s What That Actually Means
Basement cracks repair is one of the most common — and most misunderstood — home maintenance challenges Massachusetts homeowners face. Before diving deep, here’s a quick snapshot of what you need to know:
Quick Reference: Basement Crack Types and What to Do
Crack Type
Likely Cause
Action Needed
Hairline vertical
Concrete shrinkage during curing
Monitor; DIY kit may suffice
Wider vertical (>1/4 inch)
Settlement or backfill pressure
Professional assessment
Diagonal
Differential settlement
Professional assessment
Horizontal
Lateral soil or hydrostatic pressure
Call a pro immediately
Stair-step (block walls)
Settlement or soil pressure
Professional assessment
Most basement cracks start small. A hairline crack from normal concrete shrinkage seems harmless. But left alone, that same crack becomes a doorway for water, mold, radon gas, and — in serious cases — structural failure.
Think of it like a slow leak in a car tire. You can ignore it for a while. But eventually, you’re stranded.
The tricky part? Not all cracks are equal. A hairline shrinkage crack and a horizontal bowing crack need completely different solutions. Using the wrong fix — or doing nothing at all — can turn a $300 repair into an $11,000 nightmare.
Cracks wider than 3/8 inch, or cracks with uneven ridges on either side, are signs something more serious is going on beneath the surface.
I’m Joe Gerrior, owner of Gerrior Masonry & Landscape Construction Corp., and over 34 years of foundation and masonry work in Massachusetts has given me a front-row seat to what happens when basement cracks repair gets delayed or done wrong. In this guide, I’ll walk you through the best products and methods available so you can make a smart, informed decision for your home.
Choosing the Right Method for basement cracks repair
When we walk into a basement in Lexington or Bedford, the first thing we do is play detective. We aren’t just looking at the crack; we’re looking at what the crack is telling us. In basement cracks repair, there is a massive distinction between non-structural (cosmetic) cracks and structural cracks.
Non-Structural Cracks These are usually the result of the natural curing process. As concrete dries, it loses moisture and shrinks. This creates hairline vertical cracks. While they don’t threaten the stability of your home, they are prime candidates for water intrusion. In the freeze-thaw cycles we experience here in Middlesex County, a tiny crack can quickly expand as water enters, freezes, and pushes the concrete apart. Over several seasons, this cycle of expansion and contraction can turn a minor cosmetic issue into a significant leak point.
Structural Cracks These are the “red flag” cracks. They are caused by external forces like foundation settlement, expansive soils, or hydrostatic pressure (water in the soil pushing against your walls).
Horizontal Cracks: These are the most dangerous. They indicate that the soil outside is pushing the wall inward. This often leads to “bowing.”
Stair-Step Cracks: Common in cinder block foundations, these follow the mortar joints and usually signal that one corner of your foundation is sinking faster than the rest.
Diagonal Cracks: These often indicate differential settlement, where the middle of the house is moving at a different rate than the ends.
In the Middlesex and Essex County areas, we often deal with heavy clay soils that retain significant amounts of water. This water creates hydrostatic pressure, which is essentially the weight of the water pushing against your foundation walls. When the pressure becomes too great, the concrete eventually gives way. Identifying these correctly is the difference between a simple seal and a major stabilization project. If you are dealing with more than just a hairline fracture, you can find more info about foundation repair services on our dedicated service page.
Injection Solutions for basement cracks repair
For poured concrete walls, injection is the gold standard for basement cracks repair. However, there is a common misconception that all injections are the same. In reality, we use two very different materials: polyurethane and epoxy.
Polyurethane Foam Injection (The 90-95% Solution) According to industry statistics, 90 to 95% of crack repairs are completed using polyurethane. Why? Because polyurethane is flexible. It’s a hydrophobic material that reacts with moisture and expands up to 20 times its volume. This allows it to fill the entire depth of the crack — all 8 inches of the foundation wall — and even expand into the soil behind it. Because it remains flexible, it can handle the minor, natural movements of a home without cracking. It is the perfect choice for stopping water leaks.
Epoxy Injection (The 5-10% Solution) Epoxy is used when we need to restore structural strength. Once cured, epoxy is actually stronger than the concrete itself, often reaching a compressive strength of 12,000 PSI. We use this for dry, dormant cracks that aren’t actively leaking. The downside? Epoxy is rigid. If your foundation continues to move or settle, the concrete will likely crack again right next to the epoxy plug.
High-Pressure vs. Low-Pressure Injection
Low-Pressure Injection: This is what we typically recommend for residential concrete foundations. It’s less intrusive, uses simpler equipment, and ensures the resin flows slowly enough to fill every void without blowing out the surface seal.
High-Pressure Injection: Usually reserved for massive commercial structures or very thick walls where gravity and low pressure won’t suffice to move the material through the crack.
Structural Reinforcement and basement cracks repair
Sometimes, filling the crack isn’t enough. If the wall is bowing or the cracks are widening, we need to bring in the heavy hitters.
Carbon Fiber Reinforcement Carbon fiber is a modern marvel in basement cracks repair. It is 10 times stronger than steel but only as thick as a dime. We apply carbon fiber straps perpendicular to the crack to keep it from ever opening back up. We also use carbon fiber staples (grid stitches) to “bridge” cracks and distribute the load. This method is highly preferred because it is non-invasive and can be easily painted over, making it nearly invisible in a finished basement. Note: Carbon fiber is typically not useful on a wall bow that is more than two inches. If the movement is more severe, we move to mechanical solutions.
Steel Beams and Wall Anchors For walls that have bowed significantly, we install heavy-duty steel I-beams or wall anchors. Wall anchors involve an anchor plate buried in the yard and a plate inside the basement, connected by a steel rod. By tightening the rod over time, we can actually pull a bowing wall back toward its original position.
Foundation Piers and Jacking If your house is sinking (settlement), we use push piers or helical piers. These are driven deep into the earth until they hit load-bearing soil or bedrock. We then use hydraulic jacks to lift the structure, which often closes those nasty settlement cracks instantly.
Evaluating DIY Repair Kits vs. Professional Intervention
We know it’s tempting to head to the hardware store in Woburn or Danvers and grab a quick-fix kit. Products like RadonSeal or DRICORE offer DIY injection kits that have decent ratings (RadonSeal, for example, maintains a 4.5-star rating from over 1,000 reviews).
The Pros of DIY Kits:
Cost: They are significantly cheaper upfront than hiring a crew.
Accessibility: You can get started the same day you notice the leak.
Radon Protection: Good kits can effectively seal out radon gas and moisture if applied perfectly.
The Cons and Limitations:
Preparation Errors: 90% of DIY failures happen because the crack wasn’t cleaned properly. Dust and debris prevent the epoxy or urethane from bonding.
Surface Patching: Many homeowners just smear hydraulic cement or caulk over the top. This is a temporary “band-aid.” It traps water inside the wall, where it can corrode rebar and cause the concrete to deteriorate faster.
Misdiagnosis: A DIYer might seal a horizontal crack that is actually a sign of a collapsing wall. You’ve stopped the water, but the wall is still moving.
Pressure Issues: Without professional-grade injection ports and pumps, it’s hard to ensure the material reached the full 8-inch depth of the wall.
DIY vs. Professional Comparison
Feature
DIY Kit
Professional Repair
Material Quality
Consumer-grade
Commercial-grade resins
Depth of Seal
Often surface-only
Full wall thickness (8″)
Equipment
Hand-squeeze tubes
Low-pressure injection pumps
Warranty
None (Product only)
Transferable service warranties
Structural Fix
No
Yes (Piers, anchors, beams)
Professional Costs and Long-Term Prevention
One of the most frequent questions we get is, “How much is this going to cost me?”
Average costs for basement cracks repair, based on internet data, can vary widely, typically ranging from $500 to $15,000. Please keep in mind that these are not actual costs for Gerrior Masonry services, as every foundation in Massachusetts presents unique challenges based on soil type and age.
Beyond the immediate structural concerns, there is the financial aspect of home ownership. In competitive real estate markets like Newton, Winchester, or Lexington, a wet basement or a visible foundation crack can decrease a home’s value by 10% to 20%. Prospective buyers are often scared off by the word “foundation,” even if the issue is minor. By investing in professional basement cracks repair now, you aren’t just fixing a wall; you are protecting your largest financial asset. A certified repair with a transferable warranty provides peace of mind to future buyers, often paying for itself during the home inspection phase of a sale.
Factors Influencing the Price:
Crack Size and Type: A single hairline crack is a minor expense. A 10-foot horizontal bowing crack requiring carbon fiber or steel beams is a major project.
Material Used: Polyurethane is generally more affordable than high-strength structural epoxy and carbon fiber systems.
Accessibility: If we have to move utilities, furnaces, or finished walls to reach the crack, the labor costs will rise.
Structural Needs: If the house requires piers to stop it from sinking, the cost moves into the higher five-figure range.
Long-Term Prevention Repairing the crack is only half the battle. If you don’t address why the crack happened, it will return. Massachusetts weather is notoriously hard on masonry, with heavy snowmelt in the spring and torrential rains in the autumn.
Drainage Systems: Most basement cracks are caused by water pressure. Ensuring your gutters are clean and your downspouts discharge at least 10 feet away from the house is the best thing you can do. We often install dry wells or French drains to manage this. More info about drainage systems can help you understand how to keep water away from your foundation.
Grading: The ground should slope away from your foundation at a rate of at least 1/4 inch per foot. If the soil has settled near the house, it creates a “bowl” that collects water.
Humidity Control: High humidity can accelerate mold growth in existing cracks. Using a high-capacity dehumidifier keeps the environment stable and prevents the deterioration of surrounding materials.
When to Call a Foundation Specialist
Not every crack requires a full team of masons, but there are specific “must-call” scenarios. If you see any of the following, put down the DIY kit and call a professional:
Cracks wider than 3/8 inch: This usually indicates significant movement.
Uneven ridges: If one side of the crack is sticking out further than the other, the wall is shifting.
Bowing walls: If the wall looks curved or tilted, it is a structural emergency.
Active water gushing: DIY kits rarely work on cracks with high-pressure active leaks.
Multiple cracks in one area: This suggests a localized foundation failure.
At Gerrior Masonry & Landscaping, we take pride in our 30+ years of experience. We don’t just “plug” cracks; we provide engineered solutions that protect your home’s value. Unlike DIY fixes, professional repairs often come with transferable warranties, which is a huge selling point if you ever decide to sell your home in towns like Winchester or Newton.
When Water Wins: Why Putting a Sump Pump in Your Basement Matters
Putting a sump pump in basement spaces is one of the most effective ways to protect your home from water damage, mold, and costly foundation repairs.
Here’s a quick overview of how it works:
Locate the lowest point in your basement floor
Dig a sump pit (typically 10-12 inches below floor level)
Install a perforated basin and submersible pump
Connect a PVC discharge pipe routed away from your foundation
Test by pouring water into the pit and confirming the float activates
Maintain by testing every 2-3 months and cleaning annually
A wet basement isn’t just an inconvenience. It’s a warning sign. Water seeping through your floor or walls creates the perfect environment for mold, structural damage, and ruined belongings. Whether you’re dealing with a high water table, heavy New England rainfall, or clay-heavy soil that holds moisture like a sponge, a properly installed sump pump system gives that water somewhere to go before it becomes your problem.
The good news: this is a project that experienced DIYers can tackle. But it involves breaking concrete, digging, electrical work, and proper drainage planning — so it pays to understand every step before you start.
I’m Joe Gerrior, owner of Gerrior Masonry & Landscape Construction Corp., with over 34 years of experience helping Massachusetts homeowners solve drainage and foundation problems — including putting a sump pump in basement settings across Middlesex and Essex County. In the sections below, I’ll walk you through everything you need to know to do this right.
The Essential Guide to Putting a Sump Pump in Basement
When we talk about putting a sump pump in basement floors, we are essentially building a defense system against hydrostatic pressure. This is the pressure exerted by fluid (groundwater) due to the force of gravity. In areas like Lexington or Winchester, where the water table can be high, that pressure pushes water through tiny cracks in your foundation or even up through the floor slab itself. This pressure is relentless; it doesn’t just cause leaks, it can actually compromise the structural integrity of your concrete over time.
A sump pump acts as a relief valve. It collects the water in a pit (the “sump”) and pumps it out before the water level reaches your floor. According to Scientific research on groundwater pumping stations, selecting the correct pump based on “performance curves”—which measure how much water a pump can move relative to the height it has to lift it—is critical for long-term success. If you choose a pump that isn’t rated for the “head height” (the vertical distance the water must travel), the motor will burn out prematurely.
Signs You Need a Sump Pump and Choosing the Right Type
How do you know if you’re a candidate for putting a sump pump in basement areas? Look for these red flags:
Standing Water: If you see puddles after a Nor’easter, your basement is already losing the battle. Even small amounts of standing water can lead to thousands of dollars in damage.
Musty Odors: That “basement smell” is usually mold or mildew thriving on hidden moisture behind walls or under floorboards.
Efflorescence: A white, powdery substance on concrete walls indicates water is evaporating and leaving minerals behind. It’s a clear sign of moisture migration.
Wall Cracks: Hydrostatic pressure can bow walls and cause visible cracking. For more serious structural issues, check out our guide on foundation leak repair.
Once you’ve decided to install one, you need to choose the right pump. There are two primary residential styles:
Submersible Pumps: These are designed to be fully underwater inside the pit. They are quieter, more powerful, and safer if you have children or pets, as the pit is sealed with a lid. They also tend to last longer because the water surrounding the motor helps keep it cool during heavy use.
Pedestal Pumps: The motor sits on a column above the pit. While they are easier to service and generally cheaper, they are louder and more prone to being bumped or damaged. They are often used in very narrow pits where a submersible might not fit.
For most Massachusetts homes, we recommend a high-quality submersible pump with a cast iron core for better heat dissipation.
Tools and Materials for Putting a Sump Pump in Basement
Before you start swinging a hammer, you’ll need to gather your supplies. Putting a sump pump in basement concrete requires heavy-duty tools and a bit of physical stamina.
check valve: Crucial! It prevents water in the pipe from falling back into the pit when the pump stops.
breaker hammer: To get through that thick concrete slab.
gravel: To line the bottom and sides of the pit for better filtration.
landscape fabric: To wrap the basin and prevent silt from clogging the pump.
Step-by-Step Guide to Putting a Sump Pump in Basement
If you’re ready to get your hands dirty, follow this process. If this looks like more than you want to handle on a Saturday, our basement waterproofing company services are always here to help.
1. Find the Low Spot
Water follows gravity. Use a laser level or simply observe where water pools after a storm. Ensure the spot is at least 10 inches away from the foundation walls to avoid damaging the footings or the structural integrity of the wall base.
2. Break the Concrete
Mark the outline of your basin on the floor, adding about 6 inches of diameter for gravel backfill. Use a breaker hammer to chip away the concrete. We recommend hanging plastic sheeting from the ceiling to contain the massive amount of dust this creates, and always wear a respirator.
3. Pit Excavation
Dig the hole about 6 inches wider and 12 inches deeper than the basin itself. This extra space allows for a base of gravel which helps the water flow into the pit more efficiently while filtering out large debris.
4. Prepare the Liner
If your sump basin isn’t already perforated, drill 1/2-inch “weep holes” in the sides every 4 inches. Wrap the exterior in landscape fabric to keep fine silt and sand out of the pump’s intake.
5. Sump Pump Liner Placement
Place the basin in the hole. Ensure it is level and flush with the basement floor. You can see a visual of this step here: sump pump liner placement. Fill the space around the liner with gravel up to about 6 inches from the top.
6. Install the Pump and Plumbing
Set the pump inside the basin, ensuring the float arm can move freely. Connect your 1 ½” PVC pipe to the pump’s outlet. Install the check valve on the vertical section of the pipe, making sure the arrow points in the direction of the water flow.
7. Final Seal
Fill the remaining gap around the top of the basin with concrete. Smooth it over so it’s flush with the rest of the floor. Use sealing foam or caulk where the discharge pipe exits the foundation wall to keep pests, radon gas, and moisture out.
Professional Installation vs. DIY: Final Steps and Maintenance
Deciding between a DIY approach and hiring a pro often comes down to your comfort level with structural work. Putting a sump pump in basement floors isn’t just about the pump; it’s about the integrity of the slab and ensuring the discharge route is effective.
Feature
DIY Installation
Professional Installation
Estimated Cost
$300 – $800
$1,500 – $10,000+
Time Investment
2 – 3 Days
6 – 8 Hours
Tools Needed
Rental (Jackhammer, etc.)
Included
Risk Factor
High (Foundation/Plumbing)
Low (Warranty/Experience)
Permits
Homeowner responsibility
Handled by contractor
Note: All service prices listed are average costs based on internet data and do not represent actual quotes for Gerrior Masonry services.
When considering the soil around your home, checking UCONN’s Soil Survey can provide insights into how much water your ground typically retains. Clay-heavy soils in parts of Massachusetts retain water longer, which might influence whether you need a single or dual pump system to handle the volume.
Discharge Pipes and Proper Drainage Solutions
The most common mistake we see is people putting a sump pump in basement pits but then failing to move the water far enough away. If you pump water just two feet outside your wall, it’s going to soak right back down into the pit. It’s a literal “hamster wheel” for your electricity bill and puts unnecessary strain on the pump motor.
The 10-Foot Rule: Your discharge line should extend at least 10 feet from the house, preferably sloping downward toward a natural drainage area or the street.
Splash Blocks: Use a downspout extension and a splash block to prevent soil erosion where the water exits. This prevents the water from digging a hole in your lawn.
Dry Wells: In flat yards or areas with poor drainage, we often recommend a dry well. This is an underground structure that disposes of unwanted water by dissipating it into the ground. Learn more about backyard drainage solutions dry-well.
Anti-Freeze Devices: In cold climates like Medford or Andover, discharge lines can freeze solid. Devices like “IceGuard” allow water to escape through slotted openings if the main pipe is blocked by ice, preventing a basement flood during a winter thaw.
If the power goes out during a thunderstorm (and in Massachusetts, it usually does), your primary sump pump is just a very expensive paperweight. This is why we strongly advocate for a battery backup or a dual pump system. A backup system provides peace of mind when you aren’t home to monitor the basement.
Battery Backup: These systems can provide up to 24 hours of operation without mains power. Modern versions even include Wi-Fi alerts to notify your phone if the pump activates.
Dual Pump Systems: This setup includes two pumps in one basin. If the first pump fails or is overwhelmed by a massive influx of water, the second one kicks in automatically.
Common Mistake – Tied Discharge Lines: Never tie two discharge lines together inside the house. If one pump is running, it could force water back down the other pipe into the pit. Always run them separately to the exterior.
Common Mistake – Float Obstruction: Ensure the pump is positioned so the float (the ball that tells the pump when to turn on) doesn’t get stuck against the side of the basin. A stuck float is the #1 cause of pump failure.
Long-Term Maintenance Checklist
Putting a sump pump in basement floors is not a “set it and forget it” project. To ensure it works when you need it most, follow this schedule:
Every 3 Months: Pour a bucket of water into the pit to ensure the pump activates and the water disappears quickly.
Annually: Remove the pump and clean the intake screen. Debris and silt can build up and reduce efficiency.
Check the Discharge: Ensure the exit point is clear of leaves, mulch, or ice.
Listen: If the pump makes a grinding noise, the impeller may be damaged or obstructed.
If your basement entry is also a source of leaks, you might want to look into bulkhead-replacement to ensure your entire basement envelope is sealed.
Costs and When to Call a Professional
How much does putting a sump pump in basement floors actually cost? Based on internet average data, you can expect a wide range depending on the complexity:
Basic DIY Replacement: $150 – $500 (if the pit and pipes already exist).
New DIY Installation: $300 – $1,200 (including tool rentals).
Professional Retro-fit: $2,500 – $5,500.
Full Waterproofing System: $6,000 – $15,000+ (includes interior French drains and high-end dual pumps).
Note: All service prices listed are average costs based on internet data and do not represent actual quotes for Gerrior Masonry services.
When should you call us?
Finished Basements: If you have a finished space, you don’t want to mess up the flooring or risk a flood due to a DIY error.
Structural Concerns: If you see significant cracks, you need a pro to evaluate if you need foundation repair in addition to a pump.
Electrical Safety: Sump pumps require a dedicated GFCI outlet. If you aren’t comfortable wiring a new circuit, call an expert.
The “Back-Breaker” Factor: Digging through Massachusetts hardpan and breaking concrete is exhausting work. We have the equipment to do it in a fraction of the time.
Gerrior Masonry & Landscape Construction is based in Woburn, MA, and services Middlesex and Essex County, Massachusetts. For professional assistance with your home’s water management, visit our basement sump pump service page.
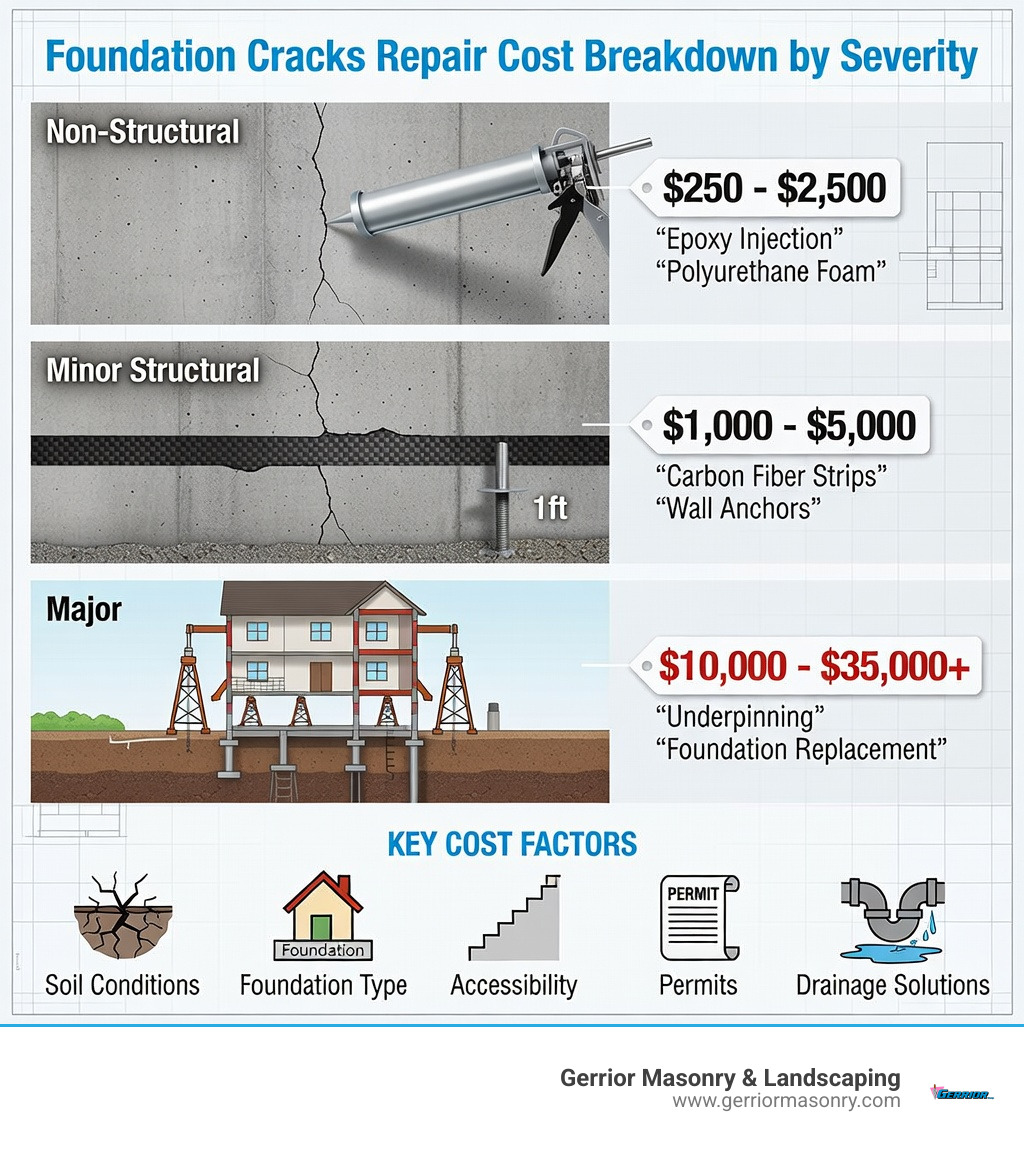
Foundation cracks repair cost typically ranges from $250 to $800 per crack for non-structural issues, while structural repairs can run anywhere from $1,000 to $35,000+ depending on severity and method. Here’s what you need to budget for:
That small crack in your basement wall might seem harmless now, but it’s often a warning sign of bigger problems developing beneath the surface. Foundation damage doesn’t just threaten your home’s structural integrity—it can dramatically reduce property value, create safety hazards, and lead to costly water intrusion if left unaddressed.
The good news? Early intervention saves money. A $500 crack repair today can prevent a $15,000 structural disaster down the road. The challenge for Massachusetts homeowners is understanding which cracks are cosmetic and which signal serious foundation movement—especially in our region where freeze-thaw cycles, expansive soils, and hydrostatic pressure create unique challenges.
Massachusetts winters are particularly harsh on foundations. When water seeps into small cracks and freezes, it expands, widening those openings and accelerating deterioration. Combined with the clay-heavy soils common throughout Middlesex and Essex Counties, even minor settlement issues can quickly escalate into major structural concerns requiring wall stabilization, underpinning, or comprehensive waterproofing.
I’m Joe Gerrior, owner of Gerrior Masonry & Landscape Construction Corp., and over the past 34 years I’ve helped hundreds of Massachusetts homeowners navigate foundation cracks repair cost decisions, from simple epoxy injections to complete foundation stabilization projects. Understanding the true scope and pricing of these repairs—and knowing when to act—is essential to protecting your largest investment.
Understanding Foundation Cracks Repair Cost by Severity and Method
When we talk about the cost to fix a foundation, we aren’t just looking at one flat fee. The price is a puzzle made of several pieces: the width of the crack, the direction it runs, and whether it’s actually threatening to drop your kitchen into the basement. According to the American Concrete Institute, the type of crack you are dealing with reveals the underlying issue, and classifying it correctly is the first step in estimating your expenses.
In the industry, we generally divide cracks into two categories: non-structural and structural. Non-structural cracks are usually the result of the concrete “curing” or shrinking as it dries, or minor settling that happens in almost every home in towns like Billerica or Reading. Structural cracks, however, mean the house is moving in ways it shouldn’t. In Massachusetts, the soil often contains a high concentration of clay, which is notorious for its ‘shrink-swell’ capacity. During wet springs, the clay absorbs water and expands, exerting massive hydrostatic pressure against your foundation, while summer heat causes it to shrink away, leaving the structure unsupported.
Note: All service prices listed in this guide are average costs based on general internet data and do not represent actual costs for Gerrior Masonry services. To get a precise quote, we recommend a professional on-site evaluation.
Most homeowners encounter “hairline” cracks at some point. These are typically less than 1/8-inch wide and are often vertical or diagonal. While they might look scary when you’re doing laundry, they usually aren’t an immediate threat to your home’s safety. However, they are a major threat to your dry socks. In Massachusetts, even a tiny crack can become a highway for groundwater during a heavy spring thaw.
For these issues, we look at basement foundation repair methods that focus on sealing and water mitigation.
Epoxy Injection: This is the “gold standard” for cracks that aren’t moving. Epoxy is incredibly strong—often stronger than the concrete itself. It bonds the crack shut and restores the wall’s integrity. Internet data suggests this costs between $300 and $800 per crack, though extensive networks of cracks could push a project toward $2,500 or more.
Polyurethane Foam: If the crack is still “active” (meaning it might expand or contract with the seasons), polyurethane is better because it remains flexible. It’s also great for stopping active leaks because it expands to fill every nook and cranny. Costs are similar to epoxy, typically $400 to $900 per injection.
These are primarily cosmetic and preventative fixes. They stop the water, but they don’t fix a house that is sinking into the dirt. If you’re just looking to spruce up the basement before selling a home in Winchester or Woburn, these are your go-to options.
Structural Foundation Cracks Repair Cost and Methods
Now, let’s talk about the “red flags.” If you see horizontal cracks, stair-step cracks in your masonry, or walls that look like they are “bowing” inward, you are looking at structural damage. This is where the foundation cracks repair cost starts to climb because we aren’t just filling holes; we are fighting gravity and soil pressure.
Carbon Fiber Strips: These are high-tech, incredibly thin straps that are glued to the wall. They have ten times the tensile strength of steel. If your wall is bowing slightly, these can stop it in its tracks. Based on internet pricing, expect to pay $700 to $1,500 per strip, with a total project cost often reaching $5,000 to $15,000.
Wall Anchors: If the bowing is more severe, we have to go outside. We bury an “anchor” in your yard and connect it to a plate on the inside of your wall with a steel rod. By tightening the bolt, we can actually pull the wall back toward its original position. These typically cost $600 to $1,200 per anchor.
Underpinning (Piering): This is for the big jobs—when your house is literally sinking. We drive steel piers deep into the earth until they hit stable soil or bedrock. Then, we use hydraulic jacks to lift the house. This is the most expensive repair. Internet averages place this at $1,000 to $3,000 per pier. A typical home might need 8 to 15 piers, leading to costs between $10,000 and $45,000+.
For those with older homes, you might want to check out more info about cinder block foundation repair, as these foundations often require unique stabilization techniques like “stair-step” mortar repair combined with reinforcement.
Factors Influencing Total Repair Expenses
Why does one neighbor in Andover pay $2,000 while another in Lexington pays $20,000? It’s rarely just about the crack itself. According to 2025 pricing data from Angi, several variables can swing the bill:
Soil Composition: Massachusetts is famous for its “glacial till” and heavy clay. Clay expands when wet and shrinks when dry, putting immense “hydrostatic pressure” on your walls. If your soil is particularly problematic, we may need more intensive (and expensive) solutions.
Accessibility: Can we get our equipment to the crack? If we have to move your prize-winning rose bushes, a deck, or a bulkhead, the labor costs will rise.
Permit Fees: Most structural work in Middlesex County requires a building permit. These can range from $75 to $500 depending on the town and the value of the work.
Engineering Inspections: If the damage is significant, we often recommend a structural engineer. They provide an unbiased report on what is actually happening. This usually costs $500 to $1,500, but it’s the best way to ensure you aren’t paying for repairs you don’t need.
Drainage Systems: Often, the crack is just a symptom. The “disease” is poor drainage. We might need to install French drains or dry wells to keep the water away from the house permanently. You can find more info about drainage systems and dry wells here.
Protecting Your Investment: Professional Solutions and Prevention
It is tempting to head to the local hardware store in Woburn, grab a $50 DIY crack-fill kit, and call it a day. We get it—saving money feels great! However, DIY foundation repair is a bit like putting a band-aid on a broken leg. It might look better for a week, but the underlying bone still isn’t set. The biggest risk with DIY is that you might hide a structural problem until it becomes a structural catastrophe. Professional masons have the specialized equipment and, more importantly, the “trained eye” to see if that crack is caused by a simple settling or a dangerous shift in the earth. Plus, most professional repairs come with long-term warranties that can be transferred to the next owner, which is a huge selling point if you ever decide to move.
We’ve been in the masonry business for over 30 years, and if there is one thing we’ve learned, it’s that no two foundations are the same. When you hire a specialist, you aren’t just paying for a bag of concrete; you are paying for experience. For instance, if you’re looking for foundation repair in Andover, MA, you need someone who understands the local water table and how our specific soil types react to the heavy snowfalls we get.
You should call us if:
The crack is wider than 1/8 of an inch (roughly the thickness of two pennies).
The crack is horizontal (this is almost always a sign of wall failure).
You see “stair-step” cracks in your brick or cinder block walls.
Doors and windows are starting to stick, or floors feel like they are sloping.
You have active water pouring into your basement during rainstorms.
At Gerrior, we pride ourselves on owner oversight. I personally ensure that our team follows strict safety protocols and uses the highest quality materials. We don’t just “patch” things; we aim for long-term stability.
Maintenance and Prevention Strategies
The best way to lower your foundation cracks repair cost is to make sure you never have to pay it in the first place! Prevention is significantly cheaper than a hydraulic pier. Furthermore, the financial implications of ignoring these repairs extend to your home’s resale value. In the Massachusetts real estate market, foundation integrity is a top priority for home inspectors. A documented, professional repair not only provides peace of mind for the current homeowner but also serves as a vital asset during the closing process, often preventing the steep price reductions that occur when ‘unfixed’ issues are discovered during a buyer’s inspection.
Gutter Maintenance: This is the #1 cause of foundation issues. If your gutters are clogged, water pools right next to your foundation. This softens the soil and increases pressure on the walls. Clean them twice a year!
Soil Grading: Your yard should slope away from your house. If it slopes toward the house, you’re essentially living in a moat. Aim for a drop of at least 6 inches over the first 10 feet.
Foundation Repointing: For older stone or brick foundations, the mortar eventually crumbles. Foundation repointing replaces that old mortar and keeps the structure strong.
Vegetation Management: Keep large trees at least 10-15 feet away. Roots can suck all the moisture out of the soil, causing the foundation to settle unevenly.
Crawl Space Care: If you have a crawl space, ensure it is dry and well-ventilated. Moisture here can rot wooden supports and lead to foundation shifts. Check out more info about crawl space foundation repair for preventative tips.
Conclusion and Next Steps
Dealing with foundation issues can feel overwhelming, but you don’t have to face it alone. Whether you’re dealing with a tiny hairline crack in Lynnfield or a bowing wall in Lexington, taking action now is the smartest financial move you can make. At Gerrior Masonry & Landscaping, we bring over 30 years of experience to every job. Based near Woburn, we are your local experts in everything from complex structural stabilization to the maintenance and care of your masonry features. We understand the unique challenges of Massachusetts architecture and climate, and we provide the owner-led oversight that ensures your home stays safe and valuable for decades to come.
Ready to get a handle on your foundation? Don’t wait for the next big rainstorm to find out how deep that crack really goes.
Note: All service prices listed in this guide are average costs based on general internet data and do not represent actual costs for Gerrior Masonry services. Gerrior Masonry & Landscape Construction is based in Woburn, MA, and services Middlesex and Essex County, Massachusetts.
Why Water Management is Critical for Commercial Properties
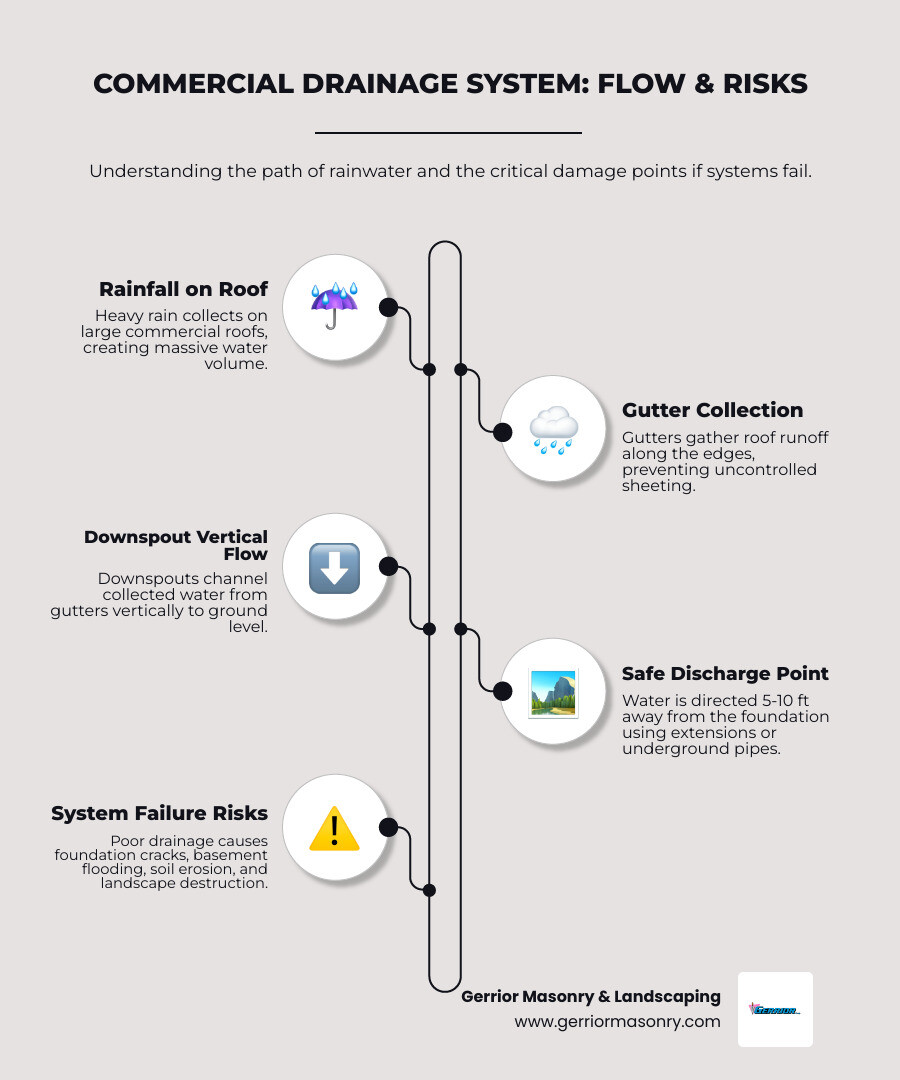
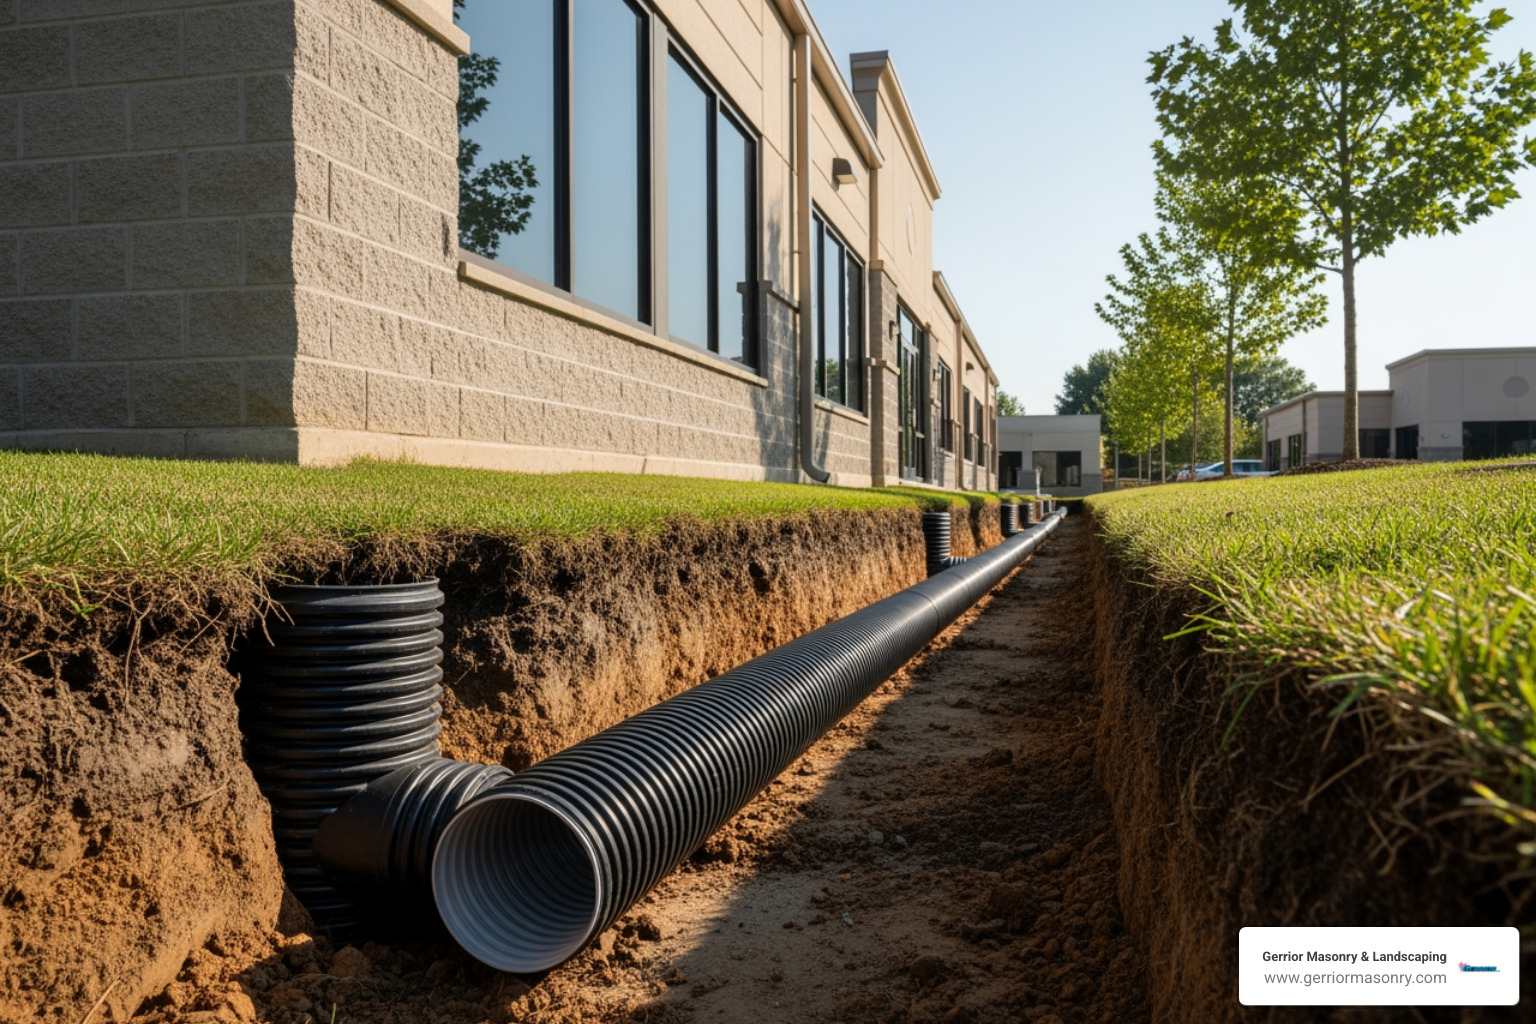
Downspout drainage systems are essential for commercial properties, channeling rainwater from the roof safely away from the building’s foundation. A complete system includes gutters, downspouts, extensions, and a safe discharge point. Without proper management, the thousands of gallons of runoff from a single storm can cause catastrophic damage.
When water pools near a building, it saturates the soil, exerting immense pressure on the foundation. This leads to cracks, basement flooding, mold growth, and compromised structural integrity. In Massachusetts, where expansive soils are common, this pressure can cause walls to crack and structures to shift. Beyond structural issues, poor drainage erodes landscaping and creates safety hazards like standing water or ice, leading to costly repairs and potential liability.
A professional drainage system prevents these issues by using properly sized components, ensuring correct slope for water flow, and directing water to a safe discharge location at least 5-10 feet from the foundation. This protects your investment, prevents business disruptions, and maintains a safe property.
I’m Joe Gerrior, owner of Gerrior Masonry & Landscape Construction Corp. With over 34 years of experience, we’ve protected countless Massachusetts properties with expertly designed downspout drainage systems. This guide will help you understand your options for safeguarding your commercial building.
Choosing the Right Downspout Drainage Systems for Your Building
Selecting the right downspout drainage systems is critical for protecting your commercial property’s structure and value. This involves choosing the right materials, deciding between above-ground and underground solutions, and ensuring the system is properly designed for your building’s specific needs.
Common Materials and Above-Ground Solutions
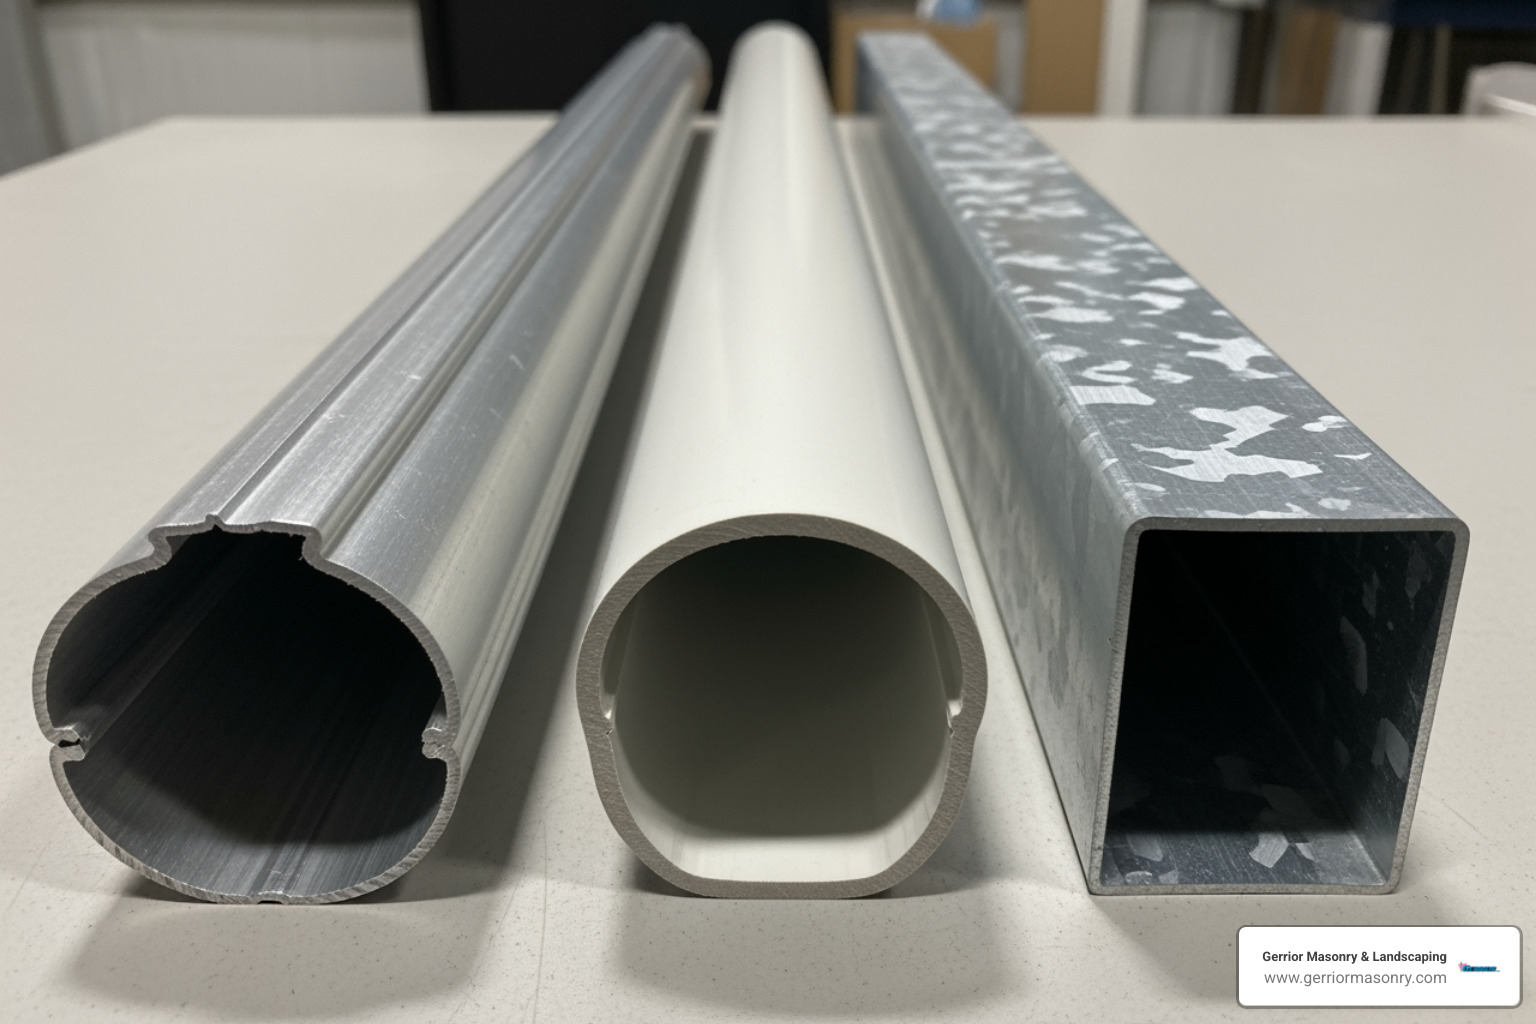
The visible parts of your drainage system must be durable and effective. Here are common material choices:
Aluminum: Lightweight, rust-resistant, and affordable, making it a popular, cost-effective choice.
Vinyl: Completely rust-proof and available in many colors to match your building’s exterior.
Steel (Galvanized): Offers superior strength and impact resistance, ideal for high-traffic areas or harsh weather.
Copper: Provides exceptional longevity and a distinguished look. It’s highly corrosion-resistant and develops a classic patina over time.
Simple, above-ground extensions are often used to carry water away from the foundation:
Downspout Extensions: Basic attachments that direct water further from the building.
Splash Blocks: Concrete or plastic blocks placed under the downspout to disperse water and prevent erosion.
These solutions help meet the crucial “discharge distance rule”—ensuring water is released at least 5 feet from the foundation to prevent soil saturation and water damage. For more complex projects, we offer a range of masonry services.
Underground Downspout Drainage Systems: Types and Benefits
For a more robust and aesthetically pleasing solution, underground downspout drainage systems are ideal for commercial properties. They offer superior protection by moving large volumes of water far from the building.
Key benefits include protecting the foundation from water damage, preventing soil erosion, and eliminating waterlogged landscaping. Common underground options include:
French Drains: A perforated pipe in a gravel-filled trench that collects and redirects groundwater away from problem areas. Learn more here: Dry Well vs French Drain.
Dry Wells: An underground chamber filled with gravel that collects runoff and allows it to slowly seep into the soil. This is a great option when a storm drain connection isn’t possible. See how they can help your property: Dry Well for Lawn Drainage.
Catch Basins: Grated inlets that collect surface water and debris from large areas like parking lots, channeling clean water into underground pipes.
Pop-Up Emitters: Discreet discharge points that pop up under water pressure to release water safely onto a landscaped area, then retract when dry.
Sizing and Design Principles for Effective Drainage
Proper design is crucial for an effective drainage system. We base our designs on proven engineering principles to ensure your property is protected.
Rainfall and Roof Area: We calculate the total water volume your system must handle by analyzing local rainfall intensity data for Middlesex and Essex County and measuring your roof’s total surface area and pitch.
Gutter and Downspout Sizing: Gutters must be sized and sloped (min. 1/16 inch per foot) to handle the calculated water flow. Downspouts are spaced no more than 50 feet apart and should have a cross-sectional area of at least 7 square inches to prevent bottlenecks.
Proper Slope for Pipes: All underground piping requires a minimum slope of 1/4 inch per foot to ensure positive drainage and prevent standing water, which can lead to clogs or freezing. We use resources like the Gutter and Downspout Design Guide to ensure every detail is correct.
A well-designed system is the first step in comprehensive water management. For solutions custom to your property, learn about our work with Drainage Around House Foundation.
Installation, Maintenance, and Advanced Solutions
A well-designed downspout drainage system is only as good as its installation and maintenance. Following best practices is key to ensuring long-term performance and protecting your commercial property.
Installation Best Practices and Common Mistakes
Proper installation prevents future failures. Our team focuses on key details to avoid common, costly errors.
Installation Best Practices:
Proper Slope: We ensure all underground pipes have a minimum slope of 1/4 inch per foot to guarantee positive water flow and prevent blockages.
Secure Connections: All joints are securely fastened, with upper sections fitting inside lower ones to prevent leaks.
Safe Discharge: Water must be discharged at least 5 feet from the foundation, or 10 feet for underground systems, to prevent water from returning to the structure.
Common Mistakes to Avoid:
Incorrect Slope: The most common error, leading to standing water, clogs, and pipe damage from freezing.
Discharging Too Close to the Foundation: This defeats the purpose of the system and causes the very water damage it’s meant to prevent.
Using the Wrong Materials: Choosing cheaper, less durable pipes like corrugated plastic over stronger PVC can lead to premature failure, especially in commercial settings.
Avoiding these mistakes is crucial for a reliable system. If you’re already facing issues, we can help with Fixing Pooling Water in Yard.
Year-Round Maintenance and Climate Considerations
Regular maintenance is essential, especially with Massachusetts’ four-season climate. A simple routine can prevent major problems.
Maintenance Checklist:
Clean Gutters Twice a Year: Clear leaves and debris in late spring and late fall to prevent clogs.
Inspect the System: Regularly check for leaks, loose connections, or signs of damage, especially after storms or winter freeze-thaw cycles.
Flush the Pipes: Use a hose to flush the downspouts and underground pipes to ensure water flows freely.
Winter Challenges in Massachusetts:
Freezing temperatures pose a significant threat to downspout drainage systems.
Prevent Freezing: Disconnect underground extensions during winter to prevent water from freezing, expanding, and cracking the pipes. Reconnect them in the spring.
Ensure Proper Slope: A continuous slope is vital to drain water completely before it can freeze.
Keep Discharge Points Clear: Ensure pop-up emitters and other outlets are free of snow and ice so water can escape.
Modern drainage can be both effective and environmentally friendly, adding value and sustainability to your commercial property.
Rainwater Harvesting: Collect and store roof runoff in large cisterns for non-potable uses like landscape irrigation, reducing municipal water consumption.
Rain Gardens (Bioretention Areas): Landscaped depressions that use soil and plants to filter pollutants from stormwater while adding aesthetic appeal. They are an EPA-recommended Best Management Practice (BMP).
Permeable Pavers: An alternative to traditional pavement for walkways and patios that allows rainwater to soak into the ground, reducing runoff. We can integrate these into your Patio Design & Installation.
Here’s a quick comparison of two popular eco-friendly options:
– Requires more space and specific soil
– Needs occasional plant maintenance
– No pollutant removal
– Can clog over time
– Limited capacity
Best Use Case
– Managing runoff from large surfaces like parking lots where aesthetics are a priority.
– Managing downspout runoff in areas with limited space or where a hidden solution is preferred.
These advanced solutions offer a sustainable approach to protecting your commercial building and the surrounding environment.
Secure Your Investment with Professional Drainage Solutions
A properly designed and installed downspout drainage system is not an expense but a crucial investment in protecting your commercial building’s structural integrity and value. From selecting the right materials and underground options to ensuring correct sizing and year-round maintenance, a professional approach is key to preventing costly water damage. For expert assessment and installation of comprehensive drainage solutions, trust the experienced team at Gerrior Masonry & Landscaping. With over 30 years of experience, we ensure high-quality results for every project. Gerrior Masonry & Landscape Construction is based in Woburn, MA, and proudly services Middlesex and Essex County, Massachusetts. Contact us today to learn more about our dry well drainage services.